How to beat Moongrum Carian Knight in Elden Ring – Guide 

Facing difficulties on how to beat Moongrum Carian Knight in Elden Ring? Do not worry, we have a guide to help you win this battle.

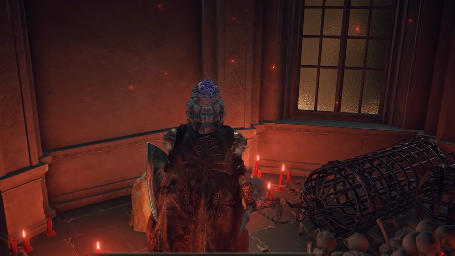
In Elden Ring, Moongrum Carian Knight is a humanoid enemy. In addition to wielding melee weapons, Moongrum is able to use sorcery. He wears the armor of a Carian Knight. Raya Lucaria Academy’s Grand Library is guarded by Moongrum the Carian Knight, who is the last line of defense against intruders seeking to destroy the institute’s head sorcerer. 

As players enter the Grand Library and face Rennala, they must face an NPC guardian: Moongrum, Carian Knight. Moongrum is also capable of using two weapons, a shield, sorcery, and a flask to heal his health just like you. You can truly call him Raya Lucaria’s true warrior. Here is our guide that will teach you how to beat Moongrum Carian Knight in Elden Ring.

combat with Moongrum Carian Knight
Combat gameplay (YouTube)
Read How to beat Malekith The Black Blade in Elden Ring – Guide 

Watch out for these moves

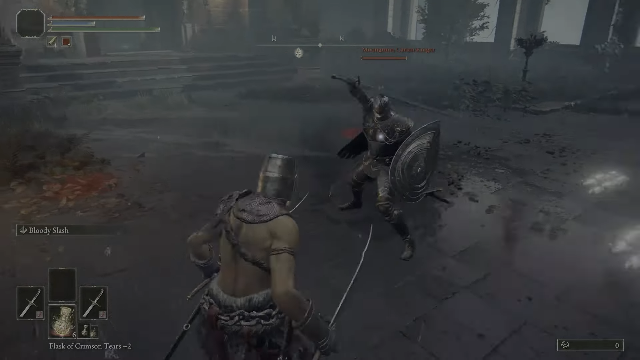
  • Sword Stab: Moongrum is armed with two types of weaponry. One is a sword and shield, and the other is a staff. While he normally attacks with the sword, he can punish you for taking too long to heal with a dashing pierce attack. He deals medium damage but is difficult to avoid.
  • Carian Piercer: A gigantic greatsword called the Carian Piercer is summoned by Moongrum, which thrusts forward, breaking through a wall. The sword is hard to block but can deal high damage.
  • Glintblade Phalanx: The player will sometimes be struck by three Glintblade Phalanxes that travel towards them after a short time. Although low damage, if Moongrum hits you he will surely rush in to take advantage of your stunning state.
  • Parry/Riposte: Moongrum is capable of parrying almost any attack made against him and following that up with a critical strike that will almost certainly cause death without high Vigor. Unless you use moves that cannot be parried, such as Colossal Weapon, Flails, Jumping Attacks, and Ranged, there is no way to avoid this.
  • Jumping Attack: In some instances, Moongrum will leap upward and use Jumping Attacks against you. Easily dodged, but has the potential to be punished if an attack is landed before he lands.
Read All Boss Fights in Elden Ring – Ranked

How to beat Moongrum Carian Knight 

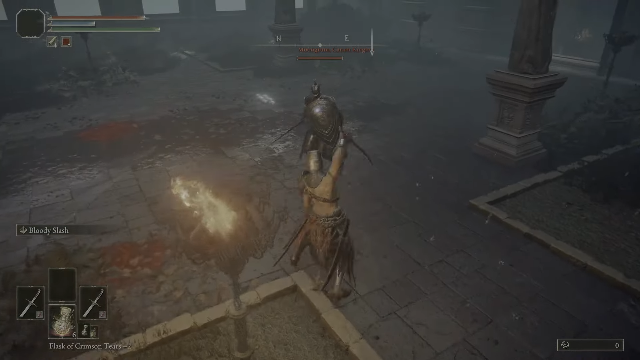
As long as he gets the status affliction early on, Mohngrum is vulnerable to Poison and Scarlet Rot damage. By dealing with both poison and scarlet rot damage to his HP, you can see it decrease rapidly. Even though he can be stunned, it is hard to hit him reliably, since he can parry so well.

Being a Sorcerer himself, Moongrum is a little resistant to Magic damage, but he has no other notable resistances and the damage reduction isn’t that great. This fight is easy for sorcerers who stay at a range and cast spells repeatedly, even if they deal far less damage than other NPCs.

There’s a massive ramp right outside the entrance to Moongrum’s combat arena that a boulder slides down at regular intervals. Moongrum can be lured out here so that the boulder falls on him. This doesn’t cause much damage, but it’s a dependable approach to gradually deplete his HP without having to come too near.

Boulder coming down
Boulder coming down (YouTube)

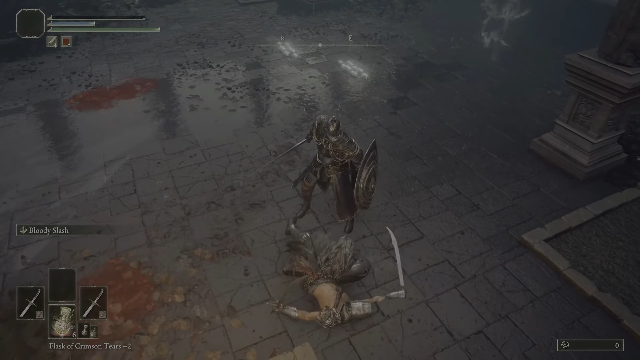
Players have also figured out that Jumping Attacks cannot be parried, so if you play Melee, use a Talisman like the Claw and take down your opponents. The lift that leads to Rennala is behind Moongrum; if you raise the lift and lure Moongrum into the room, there is a great chance that he will drop into the pit by accident. You will have to get past Moongrum to make this move, but it’s arguably the easiest way to take out the Carian Knight.

Read Best Weapons in Elden Ring – Weapons You Should Be Using

Some extra tips to beat Moongrum Carian Knight

Combat with Moongrum Carian Knight
Combat gameplay (YouTube)

The boulder will come down and if you stay just in front of it, you’ll be able to get a decent amount of ranged hits in. From his left, you can cast spells and cast arrows or go down a short flight of stairs. He has trouble getting up these stairs when aggroed because a wall appears to block his path. If you want to avoid getting hit by his gap-closing abilities, you should be careful not to run into Carian Piercer.

Moongrum is so adept at parrying attacks that it’s virtually guaranteed that he’ll use it a few times in a fight. Using Jumping Attacks and weapons that aren’t parried, such as the Flail, will help you avoid this. He can also be parried, but he gets up quickly after taking a Critical Hit, so you’re likely to be parried immediately.

Read Best Armor in Elden Ring – Ranked

Rewards

Rewards after you beat beat Moongrum Carian Knight
Rewards (YouTube)

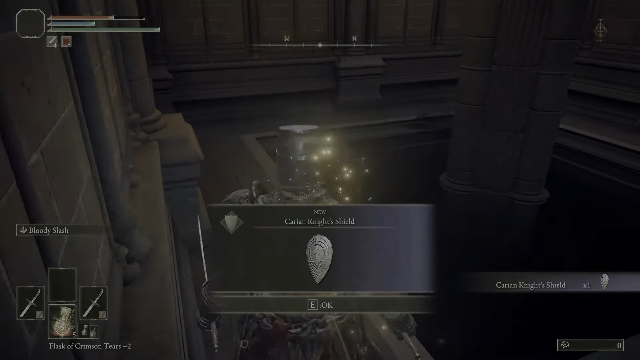
When you defeat Moongrum, Carian Knight, you have access to several items in addition to the Grand Library elevator. The elevator has no time limit, however, it is easier to complete the voyage if Moongrum is removed beforehand. You also obtain the Carian Knight’s Shield in addition to 3000 Runes and the Rennala fight.

This shield scales with Str and Int, making it one of the few shields capable of reducing physical damage by 100%. There are various ways to alter the No Skill Ash of War. A shield of this weight is well suited for sorcerers with low Equip Load. However, several other Elden Ring shields with similar stats weigh as little as 3.5, which excel in this area.

For more Guides, Tips, and Tricks

You can also check out our dedicated Video Games Guides section.

Demon’s Tilt Guide – 10 Things You Should Know

Love Pinball games? Demon’s Tilt is just for you. To have a good start in the game, read our Demon’s Tilt guide, which will help you learn a lot of things.

This game takes place mainly on a pinball board with three sections, each with its own screen: Lilith, Zodiac, and Hermit. A multiplier score is based on the players’ achievement of specific objectives or items. Four pairs of flippers allow the player to move the ball around the board with three balls per game. 

The Nudge feature in the game helps the player control the ball by adjusting the trajectory of the ball by shaking the table. Throughout the board, there will be enemies, obstacles, and boss characters that can cause the player to lose a ball. To know everything, read our Demon’s Tilt guide.

Read Tunic Beginner’s Guide – 10 Tips and Tricks

Demon’s Tilt Guide: Scoring Events

Any event that increases your score is a scoring event. From hitting a kicker to winning a jackpot, every interaction with a table feature counts as a scoring event. The score is represented by little numbers that float up from the position of the ball whenever a goal is made.

Listed here in ascending order according to amount are the four tiers of scoring events: Normal, Jackpot, Super Jackpot, Ultra Jackpot. Since multiplier plays a role in determining all scores, high scoring events with a high multiplier will show exponential returns. For more information on how to trigger jackpot scoring events, please consult the guide properly.

Demon’s Tilt Guide: Base Multiplier

Multipliers are acquired from multiple sources and appear as floating green coins on the table. The most common way players get multipliers is to forge at the anvil (1 multiplier per charge), to defeat bosses (variable), or complete rituals (3 multipliers per ritual letter, retained through ball loss). The maximum multiplier is 99x. 

Read Rainbow Six Siege Azami Guide – Tips and Tricks

Demon’s Tilt Guide: Global Multiplier

Demon's Tilt gameplay
Gameplay (FLARB LLC)

Global multipliers are applied after regular multipliers, and they are the second tier of multipliers. In other words, the quickest way to gain huge scores is to increase your GX. GX can only be gained through Wizard Mode.

Take advantage of Combos

Combos reward players who play aggressively. A combo meter is incremented whenever a scoring event is triggered. Combinations can only be used to the fullest extent if you play confidently and aggressively. Whenever you hit a bullet, the combo will be incremented and the timer reset, but your ball may also be knocked off course. 

You will almost certainly lose a combo if you take your time to line up a shot. The place and method in which you hit your ball must be known before it reaches the flipper.

Read Cities Skylines Guide – 10 Tips and Tricks Everyone Should Know

Bullet Conversion is Crucial

There are sometimes gold, polyhedral bullets used when enemies shoot regular bullets – fancier bullets, like pentagrams or stars, don’t do this. Once collected, these bullets turn every other bullet on the board into a gold coin, which can be collected by the claw on Tier 1. Chimera Ultra Jackpot’s base value is increased by every coin you collect. Following the claim of the Chimera Ultra Jackpot, the bank will be returned to its original value of 100k.

You can put a lot of points on the board by converting bullets, especially when the multiplier is high. You get a significant boost to your combo, and those annoying, momentum-killing bullets are removed from the board. Furthermore, you are also given a higher chance of winning the easiest Ultra Jackpot.

Hermit Ritual

Demon's Tilt gameplay
Gameplay (FLARB LLC)

Hermit Ritual activation takes place when the mini-ramp is hit directly above the right flipper, then it feeds through to the top flipper. Each ritual has its own set of objectives you must meet in order to complete. After you complete all rituals once, the order is randomly generated. You need to complete the below objectives.

  • Kill 10 gore demons
  • Kill 5 blood bats
  • Hit 5 tiles
  • Kill 5 Mastroshka
  • Spin slots
  • Flip 4 cards

Your ball will bounce away from some enemies

The ‘enemies’ and objects in the game will fire projectiles at you after you have hit them. These pink projectiles are worth some points whenever you hit them. Whenever you hit them, please take care, as they are solid, so your balls will bounce off of them, unlike some of the smaller enemies. A gold projectile or multiple gold projectiles are almost always found in pink explosions. For each pink projectile you hit, you will receive score bonuses!

Read Triangle Strategy Guide – 10 Things to Remember

Demon’s Tilt Guide: The Anvil

In Demon’s Tilt, you gain a multiplier by using anvils. Anvils charge when the Priestess casts magic. A charge is applied to each casting. The Priestess can be identified by green flame rings ascending into the sky, or the phrase “pachi reward” in the bottom left. Her casting starts when you enter her cup while on a green magic charge.

As a ball is being forged, these charges are converted to multipliers. Thus, returning to the anvil periodically to raise your multiplier is much more efficient than completing rituals. With effective use of the anvil, you can get twice as many multipliers!

The Green Magic Meter

Demon's Tilt gameplay
Gameplay (FLARB LLC)

Tier 2 grants you a green magic meter when you kill enemies and interact with the board. The meter is visible at the bottom left of Tier 2. As soon as you have green magic, you will see green flames traveling to the meter. In the absence of recent purchases or expenditures, green magic will start to decay.

The Priestess will begin casting portals around the board when you enter the cup, which will consume all green magic and add to the Anvil’s charge. It will increase the Priestess’ casting frequency if you kill soul demons during casting to add to the meter. She will cease casting once the meter is empty. Hit the Priestess a lot, as this will spawn some soul demons, and you can use green magic for funding. You get lots of green magic from killing soul demons with your ball.

Read Risk of Rain 2 Guide – 10 Things You Should Know

How to unlock the Scorpio Multiball

Blue flames will be scattered throughout Tier 3 as you play. After collecting all the seance bonuses, the Outer Loop ramp will display a bonus. The Scorpio multiball is unlocked by claiming this seance bonus. By hitting the relic below the Priestess, you can release the multiball once you’ve locked three balls. With retractable spikes, the multiball is released and the Tier 3 drain blocked.

gameplay
Gameplay (FLARB LLC)

For more Guides, Tips, and Tricks

You can also check out our dedicated Video Games Guides section.

How to Beat Galadons Golem Gauntlet in Clash of Clans

Have difficulty in Clash of Clans’ newest battle? Do not worry, we have a guide that will tell you how to beat Galadons Golem Gauntlet.

The game “Clash of Clans” was created by Supercell. Make your own army and guide your clan to victory! From rage-filled Barbarians with extravagant mustaches to pyromaniac Wizards, there’s something for everyone! Battle against millions of other players from all around the world, form a powerful clan to crush your opponents and protect your village against raids. 

The newest battle is here, and if you are facing difficulties in how to beat Galadons Golem Gauntlet, then do not worry. Read our guide carefully and put those three stars in your pocket.

Galadons Golem Gauntlet gameplay
Gameplay (YouTube)
Read Top 5 attack strategies in Clash of Clans 2022

How to Beat Galadons Golem Gauntlet: Team

You can have a different type of army with you as this battle is not so very hard as it seems. You can go with three super wizards, three golems, five bowlers, four super bowlers, five headhunters. Furthermore, you can also have a stone slammer, bowlers, a couple of spells like rages, freezes, poison, and skeleton spells. 

How to Beat Galadons Golem Gauntlet: Part one

To avoid confusion, we have broken this combat into two sections. Begin at the base of the three eagle artilleries by picking a super wizard and placing it on the lowest rock of the eagle tillers. Then you’ll choose your headhunters. You’re going to send three headhunters to retrieve all of the tornado traps and teslas. Now you’ll simply let the super wizard work for a few seconds; it’ll take a little while, but that’s alright.

starting the battle from one side
Start from this corner (YouTube)

You must be patient and allow them to do their job. They’ll be able to get all three eagles out and deal some damage to the Teslas. Now, if Super Wizard gets through that second eagle, he’ll be knocked down, but we want him to get this all down before we launch the remaining of our invasion, which will move rapidly, so try to keep up.

Triangle strategy

triangle shape strategy
Drop your troops from these three sides in a triangle shape (YouTube)

So, while he’s working, you can go ahead and choose a golem since he’ll be your next unit down and he’ll get through straight away. This attack should be in the shape of a triangle. So make a golem with two bowlers on one side. 

Go with a golem and two bowlers on the other, then two super wizards from the top with one head hunter and the last golem. On one side, you can utilize a bowler and four super bowlers, as well as the king, queen, and warden. You are making your way around the corners in this manner. 

Read Castle Clash Tier List – Best Heroes for Guild War, Arena, and more

How to Beat Galadons Golem Gauntlet: Part two

It’s time for some spells. Go ahead and dump in your first rage spell in the center of the stage, and then simply start freezing. After that, poison the clan castle troops as they emerge, then use rage again. Use freeze once more to ensure that everything works properly.

Now is the moment to use our king’s ability as you work towards the town hall, and again, just keep everything frozen and heading towards the town hall, and after that town hall is destroyed, activate your warden’s ability. Hit the right with your stone slammer.

Read Ubisoft’s latest mobile game, Clash of Beasts: Tower Defense

Add the last Freeze

use spells in Galadons Golem Gauntlet
Use spells (YouTube)

Let’s go ahead and add the last freeze. To assist out a bit, poison the kings. Go in with your royal champion from where you began your initial attack, and then cast a skeleton spell straight through there. The champion will be accompanied by the last headhunter to assist with this. Work your way all the way to the end of the base. 

You’ve got your queen, warden, and royal champion all set up and ready to start. Get through the last few defenses, do some damage to the scattershot, and then use the last viz to take out the scattershot, and you’ll have defeated Galadon’s Golem Gauntlet.

For more Guides, Tips, and Tricks

You can also check out our dedicated Video Games Guides section.

Genshin Impact Gorou Guide – 10 Tips and Tricks

We have brought you the Genshin Impact Gorou guide with some of the best tips and tricks. From our guide, you’ll learn everything about Gorou. 

In Inazuma, Gorou led the fight against the vision decree. Gorou is the General of the Watatsumi Army. Both he and Kokomi led the army to victory in seemingly impossible circumstances. Gorou, like the rest of the island’s population, is a staunch supporter of Sangonomiya Kokomi. Kokomi believes in him as the major commander of the Watatsumi Army because he is bold, truthful, and dedicated.

The soldier under his direction has a great feeling of camaraderie and gets along well with all of his subordinates, who also consult with him if any problems emerge, even new recruits. Kazuha describes Gorou as someone who expresses what he thinks without regard for the sentiments of others.

Genshin Impact Gorou
Gorou (YouTube)

Young Gorou has fair skin and light orange-brown hair with teal blue eyes. Like Diona, he belongs to a race of humans with animal-like physical characteristics. White highlights are visible on the front of his hair, ears, and tail. He has erect pointy ears and a bushy tail of the same color. Gourou was born on 18 May and his estimated age is around 18-22. Gourou’s height is around 5’3″. In our Genshin Impact Gorou guide, we have covered everything that you need to know about Gorou.

Read Genshin Impact Signora Guide – Best characters, rewards, and more

Genshin Impact Gorou Guide: Favonius Warbow

The strength of Gorou lies in his Elemental skills. Therefore, unless you’re in the privileged position of having a spare Elegy for the End, it is not recommended to equip him with a 5* weapon. Favonius Warbow gives Gorou greater effects than the rarer weapons anyway, so it’s actually better than any other weapon. This bow’s crits are more likely to generate elemental orbs that restore Gorou’s energy faster and enable him to recharge his superior Elemental Burst with faster speed.

Genshin Impact Gorou Guide: Sacrificial Bow

A sturdy Sacrificial Bow has a small chance of ending the cooldown of Gorou’s Elemental Skill when he damages an enemy with it. However, it cannot occur more than once every 30 seconds and isn’t as likely as triggering the elemental effect of the Favonius Warbow. As a result, this weapon should only be chosen if you don’t have a Warbow to give to Gorou or if you are extremely fond of his abilities.

Read Genshin Impact Xinyan Guide – 10 Tips and Tricks

Gorou’s All-Round Defense is the best

Gorou's all-round defense
Gorou’s all-round defense (YouTube)

It is extremely advised to disregard Gorou’s relatively weak Bow strikes in order to leverage his elemental abilities. If the squad is mostly composed of other Geo characters, putting him in a role as a supporting character should be a priority.

Due to his General’s War Banner effect, he obtains significantly increased DEF when he is in a group with at least two other Geo users. For Gorou, only one General’s War Banner can be deployed at a time. After a party member departs the field, the active bonus will stay for 2 seconds.

Genshin Impact Gorou Guide: Forward Unto Victory

In a show of his bravery, Gorou deals with DMG Aoe Geo and turns the General’s Glory field into a battlefield to embolden his men. The General’s Glory field provides buffs to active characters within the skill’s AoE according to the number of Geo characters in your party, much like the General’s War Banner created by Inazuka All-Round Defense. Your active character also moves with it. 

Each 1.5s, the skill generates 1 Crystal Collapse that deals Geo DMG to 1 opponent within its area of effect. Your active character’s position receives 1 elemental shard every 1.5s in the skill’s AoE.

Read Genshin Impact Qiqi Guide – Tips and Tricks You Should Know

Genshin Impact Gorou Guide: Best Constellations

Gorou's Constellations
Gorou’s Constellations (YouTube)

Rushing Hound: Swift as the Wind – As long as characters in the Area of Effect of Gorou’s General’s War Banner or General’s Glory deal Geo DMG to opponents, Gorou’s Inuzaka All-Round Defense CD is decreased by 2 seconds. Once every 10 seconds, this effect occurs.

Valiant Hound: Mountainous Fealty – C6 is the most important constellation for Gorou to increase the damage potential of the entire team. Having the constellation unlocks higher damage numbers, but it is not necessary for him to be top-tier support. In C4, Gorou is able to heal and with shields in Geo, even a little healing ability means players don’t need to have a healer on their team and can concentrate on supporting or damaging characters.

Gorou’s special dish

The dish Victorious Legend is Gorou’s specialty. To form a vague moving image of Gorou’s own motivations, the side dishes have been piled high. Your stomach is full of satisfaction and you look up to see Gorou smiling radiantly as his tail wags from side to side as you finish eating the noodles and soup.

Read Genshin Impact Tatara Tales Quest Guide – Complete Walkthrough

Use Gorou with Geo

The main focus of Gorou’s kit revolves around off-field abilities, making him a Support. In addition to passively supporting other geo characters, Gorou is a good partner. The low attack scaling of his normal attacks makes him extremely difficult to use as the primary DPS. As a power bank for the main DPS character and sub-DPS characters, he is a great pick for Geo teams.

Materials required for a talent upgrade

  • 38x Philosophies of Light
  • 31x Spectral Nucleus
  • 22x Spectral Heart
  • 21x Guide to Light
  • 6x Spectral Husk
  • 6x Molten Moment
  • 3x Teachings of Light
  • 1x Crown of Insight
  • 1,652,500x Mora

Best team for Gorou

Selecting a team for Gorou in Genshin Impact
Selecting a team for Gorou (YouTube)

The off-field support Gorou, whose buffs increase both DEF and Geo Damage, is best utilized by Geo teams. Geo resonance is also granted by having two or more Geo characters, which increases shield strength, decreases enemies’ Geo resistance, and increases damage. Noelle, Itto, and Albedo work exceptionally well together. 

Although they have the main character Geo as a better choice, he can be paired with Zhongli and Ningguang. In addition, it is possible to create teams consisting of Gorou by combining geo characters with characters that are able to do reactions and those that have off-field support abilities.

Read How to beat the Golden Wolflord in Genshin Impact – Guide

Elegy for the End is the best weapon

The character Gorou is very energy-hungry since his burst consumes 80 energy. Furthermore, Gorou is unable to generate more than 2 energy orbs, resulting in his energy woes being amplified. This makes equipping a weapon with an energy recharge secondary stat extremely important. Five-star game Elegy for the End is the best choice for recharging your energy and mastering the elements.

For more Guides, Tips, and Tricks

You can also check out our dedicated Video Games Guides section.

How to beat Darkeater Midir in Dark Souls 3 – Guide

This fight is one of the most difficult fights in Dark Souls 3. To know how to beat Darkeater Midir, read our complete guide.

Midir, a descendent of Archdragons, is a mighty four-winged dragon that serves as one of the Ringed City’s fierce defenders. Midir, who was raised by the Gods, was entrusted with fighting the dark for all eternity. Even when the Gods were destroyed, this obligation was never broken. As he fought the evil, he began to pour Abyss magic straight into his lethal fire breath.

Because the corruption spread so swiftly, the Church’s Spears are scared of what may happen if Midir were ever totally consumed by darkness. Shira, Knight of Filianore, gave the Ashen One the order to kill Midir before the Abyss consumed him. Even though it is optional, players must beat Midir in order to join the Spears of the Church. Here is our guide that will teach you how to beat Darkeater Midir in Dark Souls 3.

Fight with darkeater midir
Gameplay (YouTube)
Read Dark Souls 3 – A guide for this nightmarish hellscape

Location of Darkeater Midir

When you enter the Ringed City for the first time, you are greeted by Darkeater Midir while the First Flame has not yet faded. When you cross the bridge over the abyssal swamp, he will ignore you. Atop a cliff, he awaits your approach, then flies down in a frenzy and breathes fire down onto the bridge and nearby paths.

How to beat Darkeater Midir: Part one

When you approach the bridge, you will have your first encounter. Taking note of Midir’s long landing time, you can land directly underneath him. Midir can use his claws to swipe at you, which is less dangerous than his fire breath. You can use the large rock just before the bridge as cover, to heal, or to adjust your gear.

The danger that Midir poses is real, as he is a dangerous foe. Midir actively responds to a player’s tactics unlike many other bosses in the game. When you camp beneath Midir for too long, he’ll fire dark energy across the entire bridge, causing you to either die or fall into the abyss. When you camp behind a rock to avoid Midir’s breath, Midir will adjust the trajectory of his flame in order to hit you from above, which will force you to move or die. Over time, Midir will sustain enough damage to fall into the chasm beneath the bridge if you balance your attacks. It doesn’t end here, though. 

Read Best Weapons in Elden Ring – Weapons You Should Be Using

How to beat Darkeater Midir: Part two

Fight with darkeater midir
Gameplay (YouTube)

Midir’s health and defense are both strong. If you hit him in the head, your damage will be doubled by two. Because the battle against him will be protracted, you should concentrate all of your efforts here. If you try to strike him somewhere else, you’ll require twice as many blows to knock him out, and you’ll almost always be killed by one of his devastating attacks.

In addition to firebreathing, bites, and even a laser beam, Mirdir’s head is used for a variety of other attacks, as well. Even at its lowest point while Midir stands, it rests just above the player’s head, meaning that many weapons will have difficulty hitting this weak point easily. Axes, hammers, and great weapons are able to swing overhead (with the strong attack), allowing them to clip the vicious violet dragon’s head.

In this strategy, players commonly use lighter and faster axes or hammers to hit the boss twice or three times per opening. However, a greataxe or greathammer can deal nearly the same damage with a single strike. Havel the Rock’s Dragon Tooth and the Dragonslayer Greataxe would both be excellent choices for such a heavy-handed approach.

Read All Boss Fights in Elden Ring – Ranked

The Dragon Tooth

The Dragon Tooth is an unequaled physical devastation weapon. With this weapon, one gains a 12.5% reduction to magic and fire damage, which will come in handy when fighting Midir’s flaming breath. With its Perseverance weapon skill, one can also increase their poise for improved survivability while also making them more resistant to damage.

The Dragonslayer Greataxe

As well as possessing an innate lightning attack, Midir’s greatest weakness, the Dragonslayer Greataxe is a better choice. However, its weapon skill will be greatly useful here as well; it can be used to deal huge damage to the boss with strong attacks on Midir’s head. Players who use the Falling Bolt ability will unleash a severe strike of lightning in an explosive explosion that will surround them. Performing this on Midir’s head will result in colossal damage to the dragon.

Read Best Armor in Elden Ring – Ranked

Stay at the center with Midir

Fight with darkeater midir
Gameplay (YouTube)

Even though Midir’s enormous size is intimidating, its ability to change camera angles can complicate the fight. When the camera flips, make sure that you are centered with Midir so that you are able to see his incoming attacks and move in the right direction.

Even though Midir uses claws and the tail to attack, these are less deadly. However, you should beware of his flaming attacks, lunging bites, and dark beams. Midir begins channeling the Abyss once he loses half his health to summon large humanity orbs that follow you. He currently has a deadly attack in the form of a dark energy beam that covers almost the entire arena and can cause a series of explosions.

Read How to Beat Iudex Gundyr in Dark Souls 3 – Guide

When he rushes at you to bite, roll back to avoid the attack. When he employs a flurry of lunges, you should narrow the space between you a couple of times. You just have a few seconds to assault his head while it’s exposed. 

The closer you get to Midir, the less likely it is that he will be able to unleash his beam strikes, which are quite hazardous in the second portion of the fight. Furthermore, if Midir captures you in his mouth, he may virtually toss you across the entire arena. This roar should be avoided since it is always preceded by a loud, continuous roar.

Rewards

Rewards from darkeater midir
Rewards (YouTube)

After Darkeater Midir is destroyed, there will be some rewards for your efforts. Midir will do so first by dropping the Soul of Darkeater Midir and the Spears of the Church. The souls dropped by Midir are also the most of any of the bosses, totaling 1,115,370 when all soul-boosting equipment is used.

Upon transposing Ludleth of Courland’s soul with Darkeater Midir’s soul for 5,000 souls, you may obtain one of the game’s most powerful yet delicate weapons, the Frayed Blade. The Soul of Darkeater Midir can also be transposed with the Soul of Ludleth of Courland for 15,000 souls to obtain Old Moonlight, a powerful greatsword. Make your choice wisely, however, since only one of them can be purchased for the price of Midir’s soul.

The Titanite Slab, a component needed for upgrading weapons to their maximum level, can be obtained from Shira. As a final option, the Spears of the Church item can be equipped to join the covenant.

For more Guides, Tips, and Tricks

You can also check out our dedicated Video Games Guides section.

How to beat Malekith The Black Blade in Elden Ring – Guide 

Are you having difficulty with how to beat Malekith The Black Blade in Elden Ring? Do not worry as we have a guide to help you.

Elden Ring contains fewer compulsory bosses than previous Soulsborne games. After you light the kiln in the Forge of the Giants, the adventure will lead you to Crumbling Farum Azula. If you are unable to fight the area’s final boss, Malekith, the Black Blade, you will be unable to proceed in the tale.

Maliketh, the Black Blade, is Elden Ring’s one of the toughest boss fights, a fast and agile warrior who attempts to overwhelm you with a barrage of rapid attacks. There are two phases to the boss fight, and each is challenging in its own way, making it challenging to get through. Here is our guide that will teach you how to beat Malekith The Black Blade.

Combat gameplay
Combat gameplay (YouTube)
Read All Boss Fights in Elden Ring – Ranked

How to beat Malekith The Black Blade: Phase one

Phase 1 of Maliketh has Maliketh in the form of a Beast Clergyman, similar to the Gurranq NPC from Dragonbarrow that you give Deathroot to. In this phase, Maliweth mainly attacks with rapid slashes and thrusts from his dagger, so you shouldn’t be greedy. Most of the time, you will have no more than a couple of seconds before he attacks again.

You can expect Maliketh to hurl rocks at you or create magical claws that tear through the ground toward you from a distance. Dodging is a must. Your guard will be instantly breached if you try blocking these ranged attacks.

Keep an eye out for Maliketh’s dagger attack. He drags it through the ground before using it to uppercut you. The move does high damage, so it should be avoided at all costs. Maliketh launches several boulders into the air whenever he digs his claws into the ground. Observe the boulders’ landing spot and take care to avoid them, if necessary.

Read Best Weapons in Elden Ring – Weapons You Should Be Using

Maliketh will throw a volley of sharp stones at you shortly after dragging his claw through the ground and moving away from you. The best way to dodge Maliketh’s stones is to run towards him when he throws them so you can get in melee range again.

If you need to heal or are having difficulty avoiding Maliketh’s projectiles, you can find a temporary cover under the large pillars in the arena. The cover gives you just enough time to heal if you need it before Maliketh gets to you. A cutscene will play once Maliketh reaches 50% health, and he will use the power of Death Rune, which initiates the second phase.

How to beat Malekith The Black Blade: Phase two

Malekith The Black Blade in Phase two
Maliketh going in phase two (YouTube)

He becomes more agile and uses a huge greatsword in his second phase. Maliketh’s attacks are slow in this phase, but they also do more damage over time, and they also have additional damage over time effect. Dodging them is imperative since they can be extremely punishing. Shield blocking is not recommended during this phase.

You will be blasted with energy projectiles by Maliketh when he jumps into the air. Avoid these projectiles as much as possible. In addition to hitting hard, they spread Maliketh’s damage over time, so you must avoid them at all costs. Roll away from Maliketh if he stabs his sword into the ground.

Read Best Armor in Elden Ring – Ranked

Keep your distance from Maliketh if he starts roaring. Maliketh’s roar will knock you down and leave you immobile for a few seconds, leaving you vulnerable to his follow-up attacks. If you hit Maliketh enough times, you can stagger him in this phase. If you are successful in landing a critical strike against him, you will deal massive damage. Using the arena’s pillars as a temporary cover is similar to what you could do in Phase 1. In this phase, Malytheth gets around them more quickly, so heal up quickly.

Things to keep in mind

Fight scene with Malekith The Black Blade
Combat gameplay (YouTube)

Avoid falling into the shallow chasms by taking extra care at the arena’s entrance. It’s very advised that you dash into the room a good amount before engaging Maliketh.

Read Elden Ring – Which Keepsake Should You Pick

It is advantageous to have access to an improved medium or great shield during Phase 1. You may also make use of the Mimic Tear Spirit Ash Summon.

Wear the thickest armor you can, but avoid carrying a heavy load.

You can also call the assistance of other players. It will heal Maliketh, but skilled players will most likely be able to avoid it more effectively than if a Mimic Tear was summoned. Sorcerers admire anybody who can withstand long durations in melee combat while absorbing the boss’ rage.

For more Guides, Tips, and Tricks

You can also check out our dedicated Video Games Guides section.

Genshin Impact Venti Guide – 10 Tips and Tricks

We have brought you the Genshin Impact Venti guide with some of the best tips and tricks. From our guide, you’ll learn everything about Venti.

Even after the release of many different banners, Venti remains one of the most popular designs in Genshin Impact. The Spiral Abyss has been a piece of cake for him, as he has an amazing talent for crowd control. He is a five-star user of anemo bows and the archon of Mondstadt.

For interaction with the people of his region, he takes the form of a young bard in-game. However, despite his carefree nature, he can also quickly stomp out enemies on the battlefield for those who have chosen the right build. Here is the Genshin Impact Venti guide with all the best tips and tricks.

Venti's bow
Venti using his bow (YouTube)
Read Genshin Impact Signora Guide – Best characters, rewards, and more

Genshin Impact Venti Guide: Elegy For The End

A 15% bonus to anemo damage will be applied to Venti, and he’ll do 60% more swirl damage, along with a 40% drop in enemy resistance against swirl for ten seconds. Venti’s anemo damage becomes even more powerful when combined with this bow and Viridescent Venerer.

Genshin Impact Venti Guide: Windblume Ode 

During the Windblume festival, the Windblume Ode is distributed free of charge. Its base attack is 44, and Venti has an additional 36 points of elemental mastery in its secondary stat. For the next six seconds, he will get a 16% boost to his attack when he uses his elemental skill.

Genshin Impact Venti Guide: Skyward Harp

Venti's gameplay
Gameplay (YouTube)

As a bonus, Skyward Harp offers a 4.8% boost to crit rate along with its 48 base attack. Using this skill increases critical damage by 20% and inflicts 125% damage every four seconds in an AoE attack.

Read Genshin Impact Xinyan Guide – 10 Tips and Tricks

Genshin Impact Venti Guide: The Stringless

Besides its base attack stat of 42, the Stringless also provides 36 points in elemental mastery as a secondary stat. During Venti’s skill and burst, both of Venti’s elemental damage will increase by 24%.

Best Artifact for Venti

Venti’s burst damage and skill damage are both enhanced by two pieces of Viridescent Venerer. For ten seconds, the four pieces increase Swirl reaction damage by 60% and reduce elemental resistance to the infused element by 40%. 

The stats you should prioritize for artifacts are elemental mastery, energy recharge, and attack. Due to Swirl’s ability to not crit and its damage based on elemental mastery, crit rate and crit damage are less important.

Read Genshin Impact Qiqi Guide – Tips and Tricks You Should Know

Venti’s Constellations

Genshin Impact venti's constellation
Venti’s constellations (YouTube)
  • Splitting Gale: Per aimed shot, two additional arrows are fired, each dealing 33% of the original damage. In close range, both arrows may strike the same target. There is a critical rate for each arrow.
  • Breeze of Reminiscence: Anemo Resistance is decreased by 12% for 10 seconds with Skyward Sonnet. Anemo and Physical Resistance debuffs are increased by 12% for enemies in the air.
  • Ode to Thousand Winds: Wind’s Grand Ode is raised by three levels, up to a maximum of 15.
  • Hurricane of Freedom: Anemo damage bonus of 25% is applied for 10 seconds when Venti picks an Elemental Orb or Particle.
  • Concerto dal Cielo: Skyward Sonnet levels up by three, up to a maximum of 15.
  • Storm of Defiance: Wind’s Grand Ode decreases an enemy’s Anemo Resistance by 20% when they take damage from it. If an element is absorbed, their resistance toward that element is also reduced by 20%.

You can level up Venti easily

Due to his reliance on slime drops and cecilia plants, which are found throughout Starsnatch Cliff, Venti is likely to level faster than other characters. Anemo Hypostasis in Mondstadt can provide him with Hurricane Seed, which is his elemental item.

Read How to beat the Golden Wolflord in Genshin Impact – Guide

Items needed to level up the talents

  • 114 Philosophies of Ballad
  • 93 Slime Concentrate
  • 66 Slime Secretions
  • 63 Guide to Ballad
  • 18 Tail of Boreas
  • 18 Slime Condensate
  • 9 Teachings of Ballad

Best Party for Venti

Genshin Imapct Venti squad
Selecting team for Venti (YouTube)
  • Sub-DPS – Venti
  • Main DPS – Ganyu
  • Sub-DPS – Mona
  • Support – Diona
  • Venti’s Burst will be used only in this team competition. The Ganyu and Mona combo can be set up whenever it is available
  • The main damage-dealer on the team will be Ganyu. You will mostly be relying on her charged attacks since this is not an Elemental Reaction team, so plan your build accordingly
  • Hydro damage is a great way to freeze up enemies and keep them under control with Mona’s constant damage. The Burst ability further increases the damage Mona deals.
  • When Diona and Ganyu interact, their Elemental Resonance will increase their damage. Her multiple purposes include healing and shielding.
Read Genshin Impact Tatara Tales Quest Guide – Complete Walkthrough

The tap skill is very effective

Tap skills are mostly used to deal damage to enemies and gather items from them. This skill is spammable, has a shorter cooldown, and is great for producing energy.

For more Guides, Tips, and Tricks

You can also check out our dedicated Video Games Guides section.

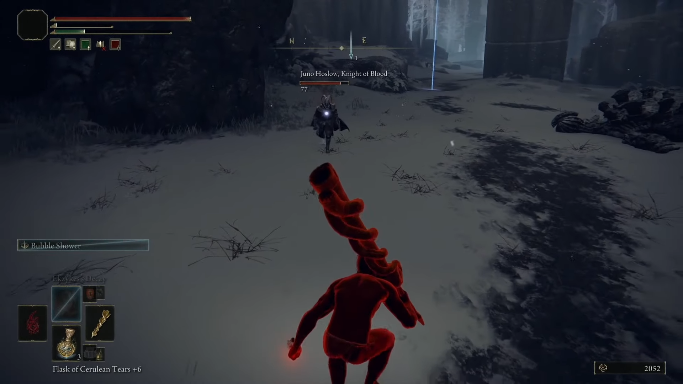
How to get Juno Hoslow in Elden Ring – Guide 

Are you confused about how to get Juno Hoslow in Elden Ring? Do not worry, as we have a guide that will solve this problem for you.

As a humanoid enemy, Juno Hoslow, Knight of Blood, appears in Elden Ring. As part of the Volcano Manor questline, you can invade Juno Hoslow, a hostile NPC. The knight is equipped with a whip and wears black and silver armor. You can become a bounty hunter in the Elden Ring Hoslow Quest if you kill Juno Hoslow and join the Volcano Manor’s group. Read our complete guide below that will teach you how to get Juno Hoslow in Elden Ring.

Fight with Juno Hoslow
Fight with Juno Hoslow (YouiTube)
Read How to beat the Elden Beast in Elden Ring – Weakness, Strategy, and more

Hoslow Quest 

The Petal Whip and the armor set from Hoslow’s set of equipment make this an excellent voyage to start out on. It also helps you to acquire a bit more skill to help you overcome some of the tougher fights ahead. 

Several steps need to be completed before this battle can be won, so when you’re done with the final steps, make sure you return to the Volcano Manor and complete another mission. In addition to killing Old Knight Istvan, you might also have to kill Rileigh the Idle and then you can go for Juno Hoslow. 

As the name implies, Hoslow’s Set is a set of silver armor with crimson accents. The armor has been a family heirloom for generations. The Volcano Manor invited Juno Hoslow, but he politely declined. In an Elden Ring set of armor, there are four armor pieces: helms, chest armor, gauntlets, and leg armor.

Read All Boss Fights in Elden Ring – Ranked

During the Volcano Manor Questline’s last contract, Juno Hoslow dropped it together with his Petal Whip. As soon as you complete the questline, Juno Hoslow will appear as a hostile NPC. A rune bearing his invasion message can be found in the northern Mountaintops of the Giants, east of the Shack of the Lofty.

How to get Juno Hoslow: Things to do first

You can say that the Volcano Manor’s final quest is Juno Hoslow. Obtaining all of his weapons and gear is only possible by joining Volcano Manor’s resistance organization. The first thing you need to do is locate Volcano Manor, which is in the northwest corner of the Altus Plateau. 

To get to the castle door, it would be best if you used ladders to climb to the top of the mountain and ignored a wormlike boss at the top. From there, you could jump to the other side of the mountain and then follow the path to Volcano Manor.

Tanith, a female NPC who will welcome you to join Volcano Manor, will be waiting for you inside. If you accept, you will be handed a key that will open almost all of the manor’s chambers. A letter can be found in one of the rooms. After you’ve opened your map, take the letter from it. Limgrave should now have a new red sign. You’ll start your bounty search there.

Talking with the NPC for Juno Hoslow quest
Talking with the NPC (YouTube)

To enter the bounty’s domain, touch the red symbol on the ground at the red point on the map. If you return to Tanith after killing him, you can collect your prize.

Read Best Weapons in Elden Ring – Weapons You Should Be Using

How to get Juno Hoslow

Return to the same room to select a new letter. The Altus Plateau is still on the lookout for bounty hunters. Red Letter, your final mission at Volcano Manor, will require you to murder the bounty. To accomplish this mission, you must kill Juno Hoslow, who may be found in the Giants’ Mountaintops.

Beginning of the Juno Hoslow quest
Beginning of quest (YouTube)

There is a red marker on your map indicating where Hoslow can be found at Shack of the Lofty. To obtain Juno Hoslow’s armor and weapons, you must attack his realm and kill him when you’ve located him. For the questline to be completed, you need to speak with Tanith at Volcano Manor.

Read Best Armor in Elden Ring – Ranked

Rewards

  • Hoslow’s Petal Whip
  • Hoslow’s Helm
  • Hoslow’s Armor
  • Hoslow’s Gauntlets
  • Hoswlow’s Greaves

For more Guides, Tips, and Tricks

You can also check out our dedicated Video Games Guides section.

Tunic Beginner’s Guide – 10 Tips and Tricks

Want some adventure game with lots of action? Then this game is for you. Read our Tunic beginner’s guide to start your game with a bang.

Andrew Shouldice developed the action-adventure game Tunic (originally called Secret Legend). Played from an isometric perspective, Tunic allows players to control their anthropomorphic fox character around a virtual world. There are also combat situations and objects to interact with. Players can switch to top-down views in combat if necessary. Like The Legend of Zelda, the player can only progress through certain parts of the game world until they have collected a new weapon or ability for the fox to use.

The game’s objective and technique of play are oblique; communication with selected characters is frequently in an undecipherable language. Some of the materials the player will uncover are pages from the game’s handbook, and some phrases in the player’s language will appear that hint at puzzle solutions. If you want some tips and tricks about this game, we have the Tunic beginner’s guide.

Read Cities Skylines Guide – 10 Tips and Tricks Everyone Should Know

Tunic Beginner’s Guide: Explore

Secret passages and hidden places abound in the game Tunic. Finding hidden chests behind waterfalls (classic but effective), behind pillars, along paths hidden by the camera, and other places you cross is routinely possible if you carefully search the places you cross. Tunic offers a wide variety of ways to explore the world, and sometimes you will find shortcuts to reach theoretically unreachable places by taking shortcuts. 

Be sure to use the aim key from time to time to change the camera angle to facilitate exploration. Embark on a perilous journey with your hero by taking him behind the scenes and having him run against walls to find secret hiding spots.

Tunic Beginner’s Guide: Shield

Tunic beginner's gameplay
Cutscene (Finji)

While it is crucial to dodge around in order to avoid trouble, doing so will quickly drain your stamina meter, especially if you are facing more aggressive bosses. Meanwhile, blocking a blow with your shield and then moving out of the way of a follow-up blow will barely cost you stamina, keeping you protected and ready to strike back. Figure out which attacks you can dodge and which attacks you can block, and use them both together since they are most effective when used simultaneously.

Tunic Beginner’s Guide: Stamina

It is always possible to run by holding A, and it does not use stamina. If your stamina is low, you will suffer more damage, so it is wise not to take damage in these moments. Runaway instead, heals if necessary, and plan accordingly for your next move. Block, dodge, and move until you have a comprehensive plan in place.

Read How to beat Grave Warden Duelist – Elden Ring

Keep reading the manual

Tunic manual guide
Gameplay (Finji)

It is likely that you will encounter Manual Pages frequently during your adventure. These first ones may appear to be just a short tutorial for Tunic. However, it’s really a comprehensive guide full of information and clues to help you learn everything about the game. 

As the manual is written in an incomprehensible language with some exceptions, it presents a challenge to find all the pages. Therefore, the information that is available to you will often be incomplete. Keeping your eyes open, collecting as many documents as you can, and reviewing them carefully is key.

Target your enemies

When moving towards an enemy or performing a dodge roll, make sure you target them. By pressing the corresponding buttons, you’ll always attack and dodge, but where you choose to do that is up to you. As enemies often change positions and present different challenges, this is particularly important when faced with multiple enemies.

Read Assassin’s Creed Valhalla: Dawn of Ragnarok – Things You Should Know

Level up when needed

If you want to power up in Tunic, you will have to find hidden items that can boost your stats. In order to increase your damage, defense, health, magic, stamina, or even the potency of your potions, you will need to spend a fair amount of gold.

There are many respawn points scattered throughout the world where you can do all of this. You can find your inventory by opening your inventory and navigating to the bottom right corner of your screen. Your stat-boosting items will be waiting for you there, and once you sacrifice them with some gold, your attribute will be permanently increased.

It is important to parry your shield

Tunic combat guide
Gameplay (Finji)

You can raise the shield by pressing and holding the key associated with it after picking it up. By exchanging a part of your green stamina bar for attacks and projectiles, it will be very convenient. In order to make certain fights easier, one mechanic must be mastered: the shield parade. Simply press the key briefly rather than hold it down. This will show the hero parrying with the shield. 

This technique can make your enemy more vulnerable for a short while if you use it at the right time! At this time, you are more likely to cause greater damage. The same applies if you manage to parry the first enemy and someone hits you behind you at the same time. This effect will be triggered automatically if you manage to parry the first enemy. 

Read Animal Crossing New Horizons – A Complete Fishing Guide

Tunic Beginner’s Guide: Accessibility 

When it comes to combat, the game can be a bit of a challenge. Fortunately, there is a setting called “Accessibility” that allows you to make the game easier. Enabling Safe Mode is the first option. Consequently, you will no longer lose any life points, allowing you to play without fear of losing your life. 

Another option is to play without stamina limits. In this case, you will not have to consume stamina while rolling or defending yourself against a shield attack. In case the game becomes too much for you, you shouldn’t hesitate to use it. Some people think that using easy difficulty will be a bad thing, as people will make fun of you. You are playing for yourself, for your fun. So just enjoy your game in every way.

Take advantage of the explosives

Tunic cutscene
Cutscene (Finji)

Tunic’s gameplay is designed in a way that rewards players who use their explosive items more with free explosives. This is because of using them more often. Fortunately, these items can be very helpful in Tunic, since enemies usually come in packs. When the situation gets tense, you can swing dynamite if you attract several people! A +x appears above your object.

Read Hitman Sniper: The Shadows Beginner’s Guide – Tips and Tricks

Learn about the enemies

Acutely aware of the cute little fox, enemies often telegraph their attack patterns, especially when the gap between them is reduced. When they first begin to attack, be prepared to dodge or block. Knowing their attack pattern will help you engage at the right moment and save your health and stamina.

For more Guides, Tips, and Tricks

You can also check out our dedicated Video Games Guides section.

Raid Shadow Legends Yannica Guide – Best PvP and PvE Build

We have brought you the Raid Shadow Legends Yannica guide. You can also find the best build for PvP and PvE. 

The best champions in your squad can make all the difference when you are facing monsters and bosses. There are a number of champions in Raid Shadow Legends, as you are probably aware. Affinity, role, rarity, and faction can all be used to categorize them.

High Elves legendary champion Yannica is of Spirit affinity. Yannica belongs to a long line of strong epic and legendary champions from the High Elves. In the Arena, Yannica is most effective in teams with an offensive strategy, especially when facing teams with known shield buffs like a Krisk team. 

If built correctly, she will remove those buffs and be very damaging to the enemy team. She can be exceptionally powerful in boss fights in Faction Wars due to Yannica’s strong aoe and leech abilities. The legendary has the ability to play comfortably across a wide range of game areas. Here is our Raid Shadow Legends Yannica guide with some of the best PvP and PvE build.

Read Raid Shadow Legends Champion Tier List – March 2022

What are High Elves

Aravia is home to the High Elves, who have built a magnificent, shimmering city. The physical, intellectual, and spiritual advancement of this society has been facilitated by living in these lands of plenty. Their high ideals encourage exiles to move further east.

Yannica’s story

Yannica, a mage of great innate power and talent, may very well be the personification of a number of expectations young races hold regarding their people – both good and bad. The woman is incredibly intelligent and has mastered many arcane arts without a doubt. Her advice is always considered and carefully considered. 

The arrogance and self-righteousness she demonstrates are grating. Yannica’s condescending smirk has been many an ally’s bane since it finds its way to her noble features so often. AYannica was fascinated by spells that did not fit into the usual arsenal of wizards when she was a young apprentice.

While escorting an old magister on an expedition to collect Artifacts far north of the Aravian city, Yannica and her comrades were plagued and almost overpowered by zombies. After she tossed a half-tested spell, her theatrical mist explosion forced the adversary to lose sight of her. Even the dimwit ghouls were perplexed by the show. 

Yannica dashed into a vantage point before they, or her own party, could intervene. Her friends finished off the undead that had been weakened by her spell, culminating in the deaths of many undead. Many academics and guards were spared from imminent death as a result of this.

Read Raid Shadow Legends Skullcrusher Guide – Best Build For PvP and PvE

Raid Shadow Legends Yannica Guide: Skills

Raid Shadow Legends Yannica gameplay
Gameplay (YouTube)

Even the Odds 

One enemy will be attacked twice, and each attack will have a 50% chance of placing a leech, so in an ally attack team and in a counter-attacking team, this will land a lot and stay up a lot. At levels two and three, the damage is increased by 5%. On the other hand, the damage is increased by 10% on level four.

Buffing Speed

This skill attacks only one enemy. It places a perfect veil buff on her for three turns if this attack is critical. This skill also grants an extra turn. On levels two and level three, the damage will be increased by 5 %. On the other hand, on level four, the cooldown will be less by one.

Elves Judgment

This skill allows you to strike all enemies while ignoring shield bonuses. If this champion is under a veil or perfect veil buff, it also removes shield buffs from targets. Following that, it delivers additional damage equal to 15% of the value of the removed shield buffs. The damage will be raised by 10% at levels two, three, and four. On the other side, the cooldown will be reduced by one on level five.

Read Raid Shadow Legends Theresc Guide – 10 Things you should know

What Artifacts should you choose?

Raid Shadow Legends Yannica artifacts
Artifacts (Plarium)
  • Set: Offense, Weapon Attack 
  • Set: Offense, Helmet HP 
  • Set: Offense, Shield Defense 
  • Set: Offense, Gauntlets Defense %
  • Set: Critical Rate, Chestplate Attack %
  • Set: Critical Rate, Boots Speed

Raid Shadow Legends Yannica Guide: Best PvP Build

  • Deadly Precision
  • Keen Strike
  • Heart of Glory
  • Whirlwind of Death
  • Single Out
  • Cycle of Violence
  • Bring it Down
Read Raid Shadow Legends Ninja Guide – Best Tips and Tricks

Raid Shadow Legends Yannica Guide: Best PvE Build

  • Pinpoint Accuracy
  • Charged Focus
  • Arcane Celerity
  • Evil Eye
  • Master Hexer
Yannica Arena gameplay
Arena Gameplay (YouTube)

For more Guides, Tips, and Tricks

You can also check our dedicated Video Games Guides section.