Genshin Impact Inazuma Reputation Rewards – How to Unlock, Hidden Quests

We have brought you the Genshin Impact Inazuma Reputation Rewards guide that will help you to learn everything about it.

The Reputation system is there in Genshin Impact from before. This feature has lots of rewards and quests. Rewards will give you interesting recipes and even gadgets. Therefore, you would really not want to miss this. If you don’t know much about it, then do not worry, Our guide will tell you everything about the Genshin Impact Inazuma Reputation Rewards.

Inazuma Reputation Rewards
Inazuma Reputation Rewards (YouTube)
Related How to Beat the Electro Hypostasis in Genshin Impact – Attack Patterns, Strategy, Rewards, and more

How to unlock

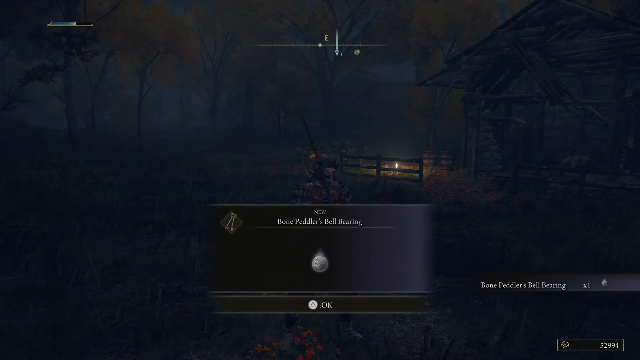
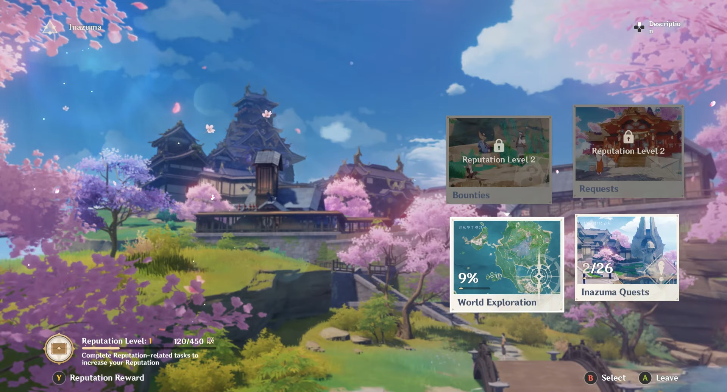
The Reputation system always requires you to talk to an NPC in order to unlock it. The process to unlock it is not very difficult. After you complete a few quest chains in Inazuma Archon Quest, “The Immovable God and the Eternal Euthymia”, you will unlock the Inazuma Reputation system. After this, you will need to interact with Madarame Hyakubei in order to learn more about this system. You will find Madarame in Kamisato Estate.

Talk to the NPC
Talk to the NPC (YouTube)

Level Up Reputation

  • By completing the weekly bounties and requests, you can get the Reputation Exp. You can complete three bounties and three requests every week, so try not to miss any.
  • You will get 40 Reputation and 20,000 Mora by completing a single Request.
  • On the other hand, the Reputation Exp from bounties depends on the bounty level that you have selected.
  • If you want more Reputation Exp, then you have to explore Inazuma, complete World Quests, and Archon Quests.
Genshin Impact Inazuma Story quests
Story quests (YouTube)
Related Genshin Impact Aloy Guide – 10 Tips and Tricks

Genshin Impact Inazuma Reputation Rewards

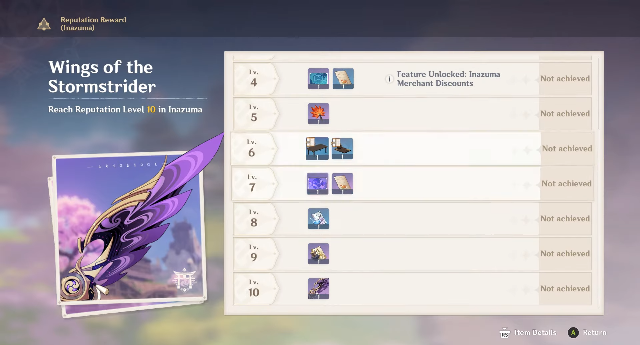
  • Konda Cuisine Recipe (Level 1)
  • “Pines Awaiting the Twilight” and “Stone Lantern: Fudoumyou’s Light” blueprints (Level 2)
  • Naku Weed Seeds (Level 3)
  • Inazuma “Kamisato Crest” name card and Rice Cake Soup Recipe (Level 4)
  • Red Feather Fan (Level 5)
  • “Long Yumemiru Table” and “Tea Wisp-Clouded White Couch” blueprints (Level 6)
  • Inazuma “Raiden Emblem” name card and Butter Crab Recipe (Level 7) 
  • Electroculus Resonance Stone blueprint (Level 8)
  • Electro Treasure Compass Diagram (Level 9)
  • “Wings of the Stormstrider” wind glider and “The Illustrious” (Level 10)
Related Genshin Impact Thoma Guide – 10 Tips and Tricks

Use of Inazuma Reputation Rewards and Gadgets

There are some Genshin Impact Inazuma Reputation Rewards and gadgets that are very helpful and great to have. 

  • If you want to locate the precious Electroculi in Inazuma, the Electroculus Resonance Stone gadget will help you.
  • Konda cuisine: It is one of the best rewards. You can revive a character by restoring 1200 HP.
  • Rice Cake Soup: Defense will be increased for all party members by 200 for 300 seconds.
  • A world Quest, The Art of Horticulture will unlock at Reputation level 3. It will enable the gardening system in the Teapot Realm.
  • If you want to track the treasure chests in Inazuma, the Electro Treasure Compass will help you.
  • You will get a 30% boost in gliding speed for three seconds with the help of a gadget called The Red Feather Fan.

For more Guides, Tips, and Tricks

Check out our Video Games Guide Section for more dedicated guides.

How to beat Bell Bearing Hunters in Elden Ring

We have brought you the guide that will tell you how to beat Bell Bearing Hunters in Elden Ring. You will find this boss in various locations.

Bell Bearing Hunters are bosses in Elden Ring who show up at different locations in the game. They appear only at night. This means that if you go to their location during the day, you won’t find them. Also, they appear when there is no NPC present in that area. So keep all these things when you are finding the Bell Bearing Hunters.

Despite their slow pace, the Bell Bearing Hunters can deal very high damage. So you should not take these boss fights lightly. But how to beat Bell Bearing Hunters? Well, the answer is in our guide below.

Bell Bearing Hunter fight gameplay
Bell Bearing Hunter fight gameplay (YouTube)
Related How to Beat Godrick, the Grafted in Elden Ring

Location of Bell Bearing Hunters 

  • Hermit Merchant’s Shack, Leyndell, Royal Capital
  • Warmaster’s Shack, Limgrave
  • Church of Vows, Liurnia
  • Dragonbarrow, Caelid

How to beat Bell Bearing Hunters

In order to beat this boss, you will need to learn his attack patterns. If you are a melee user, it is recommended to go with a two-handed weapon so that you can deal some extra damage. In this fight, you do not have to be greedy. If you go for extra attacks, you might get a hit from the boss

A spellcaster or a pack of wolves can observe you if you are out west or east, and trees could get in your way. So, be careful with the surroundings. It is best to learn his attack patterns. Once you learn how to roll through his attacks, you can get a strike on him. The best time is during the Three-hit Combo. Furthermore, you can roll in at the last moment to land next to him and leave him wide open when he does his Shield Rush once you learn the timing.

When he’s winding up his Corkscrew, you should always keep a safe distance from him. If you think you’re too close to him, you should always roll to avoid the incoming blast whenever you see him charging it. You should also be on the lookout for him to lunge forward and grab you when he walks toward you with his hand glowing. If you are caught by this move, he will do huge damage to you because it cannot be blocked.

Bell Bearing Hunter fight gameplay
Bell Bearing Hunter fight gameplay (YouTube)
Related How to Beat Rennala, Queen of Full Moon in Elden Ring

Range Attack strategy

This is the best and the easiest way to deal with the Bell Bearing Hunters in Elden Ring. You will not have to worry much about the melee attack patterns of the boss, as it will be easy for you to block and dodge the attacks. However, he will use long-range attacks too, so you just have to take care of those. You will even have a greater chance of attacking in this strategy.

You’ll have an easier time managing the Bell Bearing Hunter if you play as a magic user. While riding on horseback, you can avoid attack combinations such as Sword Throw Combo or Corkscrew, and use magic against him. A rapid cast of Swift Glintstone Shard or Rock Sling is the best way to rack up serious damage. The best way to avoid the boss’s attacks is to use Swift Glintstone Shard while riding Torrent.

Related All Boss Fights in Elden Ring – Ranked

Rewards

The Bell Bearings you get for defeating each boss can be given to the Twin Maiden Husks at Roundtable Hold. Additionally, you can purchase items from them in the shop if you do this. The Twin Maiden Husks will accept any kind of Bell Bearing.

Rewards after defeating Bell Bearing Hunter
Rewards (YouTube)

Below are the rewards you will get in different locations.

Warmaster’s Shack, Limgrave:

  • 2,700 Runes
  • Bone Peddler’s Bell Bearing

Church of Vows, Liurnia:

  • 6,000 Runes
  • Meat Peddler’s Bell Bearing

Hermit Merchant’s Shack, Leyndell, Royal Capital:

  • 20,000 Runes
  • Medicine Peddler’s Bell Bearing

Dragonbarrow, Caelid:

  • 50,000 Runes
  • Gravity Stone Peddler’s Bell Bearing

For more Guides, Tips, and Tricks

You can also check our dedicated Video Games Guides section.

Shindo Life Raion Azure – Everything You Need to Know

Want to know everything about Shindo Life Raion Azure? Our guide will give you all the details that you need to know.

Raion Azure is an Eye Bloodline in Shindo Life. Players who owned the Bloodline Bag game pass can purchase this Bloodline for 799 Robux. Raion-Azure’s moveset revolves around pulling, location switching, and illusion casting. All this makes it a great choice for team battles. In this guide, we will tell you everything that you need to know about Shindo Life Raion Azure.

Raion Azure gameplay
Gameplay (YouTube)
Related Shindo Life Element Tier List

Shindo Life Raion Azure Mode

Activating Raion-Azure’s mode begins at Stage 1 by holding Z (on PC). As long as they meet the bloodline’s level requirements, they can toggle between stages by holding Z and pressing the stage’s corresponding number. The user of Raion-Azure’s mode, in addition to speed boosts and passive teleportation, will also experience significant performance boosts. The mode requires 40 MD per second to operate.

This mode’s second stage allows the user to either fly while holding down the spacebar or descends while holding X, which drains approximately 1800 stamina per second. This is quite much, so use it carefully. 

Rengoku Style: Inferno Engage

This move takes a 22-second cooldown. Users hold out their hands and pull nearby enemies close to them, causing their enemies to impale themselves on spikes. These spikes have white flames around them and deal burning damage.

Read Best Planets in No Man’s Sky

Rengoku Style: Vanishing Replacement

This move takes an 18-second cooldown. When the user presses the relevant button, their right eye is covered, while their left eye emits blue light, and they emit a white aura. Clicking on an enemy will then swap them with the user while shooting white flames and lightning in their original position inflicting damage on the swapped enemy. While using this technique, the user is immune to any damage.

Raion Azure gameplay
Gameplay (YouTube)

Rengoku Style: Eternal Death

This move takes 22 seconds cooldown. In the end, the user casts an illusion on nearby enemies by glowing blue and emitting a white aura from their left eye. While the enemy is seeing themselves being impaled by the user with a Copy Style: Lightning Blaze, they take damage. A person affected by the illusion is still able to use their abilities.

Read Smite Yu Huang Guide – 5 Things You Should Know

Shindo Life Raion Azure Mode: Stage 2  

While Pressing “Z”

This move takes a 25-second cooldown. In this mode, when the user presses Z, before going toward the cursor, he will gather a ball of lightning in the right hand. When you will strike with this attack, a giant lightning explosion will take place.  

While Pressing “Q”

This move takes a 30-second cooldown. When the user presses Q, it is similar to the first stage’s Z attack, but this time it shoots three arrows.

Raion Azure gameplay
Gameplay (YouTube)
Read Cookie Run Kingdom – A Complete Class Guide

While Pressing “E”

This move also takes a 30-second cooldown. In this mode, when the user presses E, a lightning arrow shoots into the sky, creating a lightning ball that then shoots down a barrage of lightning arrows that create lightning explosions. Moving the cursor to the desired location allows the user to determine where the arrows will land.

For more Guides, Tips, and Tricks

Check out our Video Games Guide Section for more dedicated guides.

Clash Royale Ramp Up Challenge – Best Cards and Decks

We have brought you the best cards and decks guide that will help you to win the Clash Royale Ramp Up Challenge.

The Clash Royale Ramp Up challenge is not as easy as it looks. You will face many defeats if you do not have the right deck for the battle. Taking the right deck with you will help you to win this challenge easily. However, it totally depends on what and how you use it. You can even practice by exploring different decks and taking them against friendly challenges. This will help you to know which is the best deck for your style.

The challenge will reward you with some of the best rewards. So, you definitely want to win here. The nice part about this challenge is that the elixir charges up speedily after some time. So don’t be bothered about the elixir. Our guide to the best cards and decks will help you to win the Clash Royale Ramp Up challenge. Read below to know the best decks.

Related How to Beat Galadons Golem Gauntlet in Clash of Clans

Clash Royale Ramp Up Challenge: Deck 1

  • Battle Healer
  • Electro Dragon
  • Elixir Golem
  • Fireball
  • Inferno Dragon
  • Night Witch
  • Rage
  • Tornado

This deck will help you if you want to just charge up and finish the battle by focusing more on the attack. This rage deck will help you to give all that charge power to attack the opponent. You can attack directly and if you feel you are losing some of your armies, the Battle Healer can assist you in staying on the battlefield.

Clash Royale Ramp Up Challenge: Deck 2

  • P.E.K.K.A
  • Princess
  • Inferno Dragon
  • Mega Minion
  • Zap
  • Tornado
  • Wizard
  • Balloon

Who does not like PEKKA? Your main focus will be on him, as you will place him near the king’s tower. P.E.K.K.A will be doing its job, and you will need to focus on charging up the elixir. Once it is charged, use the wizard and tornado. This deck costs you a bit more elixir, but it will be fine as this challenge will charge up the elixir quickly after a certain time.

PEKKA card (Clash Royale Wiki)
Related Top 5 attack strategies in Clash of Clans 2022

Clash Royale Ramp Up Challenge: Deck 3

  • Valkyrie
  • Bomber
  • Wall Breakers 
  • Fireball 
  • Fire Spirit 
  • Goblin Drill 
  • Tesla 
  • Skeletons 

This deck will not cost you that much elixir. You can deploy from this deck quickly, and it will be more beneficial when the elixir starts to charge up quickly. Try not to lose your Valkyrie early in the battle. 

Clash Royale Ramp Up Challenge: Deck 4

  • Royal Hogs
  • Royal Recruits
  • Barbarian Barrel
  • Electro Spirit
  • Fireball
  • Flying Machine
  • Goblin Cage
  • Zappies

This royal deck will surely help you with the victory. The goblins will do their job by distracting the giants. This will clear the path for the Royal Hogs so that they can charge and attack directly. You can replace the fireball, but it is recommended to use it as it will help you in the last moments of the battle.  

Clash Royale Ramp Up Challenge gameplay
Gameplay (YouTube)
Related Ubisoft’s latest mobile game, Clash of Beasts: Tower Defense

Clash Royale Ramp Up Challenge: Deck 5

  • Spear Goblins
  • Goblin Barrel
  • Skeleton Army 
  • Bomber 
  • Arrows
  • Valkyrie
  • Musketeer
  • Barbarian Barrel

Again, a low-cost elixir deck that will help you in the battle. There are many goblins and other small cards that have been used in this deck. Do not think that you don’t have some heavy attackers. The goblins, bomber, and skeleton army will help you deal with some of the damage and distract the enemy attackers too. This will clear the path for your Valkyrie, and Musketeer. Keeping them safe till the end will surely give you the victory.

valkyrie card
Valkyrie card (Clash Royale Wiki)

For more Guides, Tips, and Tricks

You can also check our dedicated Video Games Guides section.

Oda Boss Fight in Cyberpunk 2077 – Tips and Tricks

Don’t know how to beat Oda in Cyberpunk 2077? We have brought you the guide for Cyberpunk 2077 Oda boss fight. Follow the steps carefully and win this fight in no time.

Sandayu Oda is a boss that you will face in Cyberpunk 2077. This boss uses Mantis Blades as his primary weapon to fast attack. During the “Play It Safe” mission, you will face Oda whom you must defeat. But how will you beat Oda? In this guide, we will tell you everything about the Cyberpunk 2077 Oda boss fight. Learn all the strategies, tips, and tricks for this boss fight from our guide. So, without wasting any time, read below.

Oda boss fight gameplay
Oda boss fight gameplay (YouTube)
Read God of War PC Guide – Tips and Tricks for Your Journey

Tips for Cyberpunk 2077 Oda Boss Fight

Fight from a long distance

It is recommended to fight with Oda from a long distance. Oda is very quick and is great in melee attacks. The Manits Blades is what you have to look for. Taking damage from this weapon is not good. Therefore, it is recommended that you should keep your distance from the boss. 

Try to aim for its head. This is the best way you can deal damage to Oda. For this, it is recommended to use LMGs or any other Assault Rifle that has good range and power. SMGs will not help you as they have a low range and their magazine size will also trouble you.

Use Kerenzikov implant

You can use Kerenzikov implant that will help you to make a slowdown effect so that you can dodge easily. You just need to dodge whenever Oda uses the blades. The boss will take some rest after using the blades. This is your greatest chance to do damage. Rush as hard and attack as much as you can.

Read Assassin’s Creed Valhalla Guide – Best Tips and Tricks

Use snipers too

Use sniper for a headshot
Use sniper (YouTube)

Oda will begin running on the walls after sustaining a significant amount of damage. Here, Oda will be far away from you, and he will also use a gun to attack you. We recommend you take cover and use a sniper rifle to attack him. Aiming at his head will deal good damage, and it will help you to take down this boss.

Stop Oda from regenerating

After dealing some damage, if you stay too far or out of reach of Oda, he will use a camouflage. This is great trouble because Oda will become invincible and he will also start regenerating. If you wait for long and think that it will be best to not fight at this moment, then this is a big mistake. You should quickly turn on the scanner and track his steps and attack him. If you don’t do this, then he will regenerate all his health back again. Then it will be a type of rematch with only his health at full.

So, this was everything you need to know about the Cyberpunk 2077 Oda Boss Fight. Follow these steps, keep dodging, and use the guns to aim his head. You will win this fight easily at one time.

Read How to beat Crazed Tank – Battle Cats Guide

Cyberpunk 2077 Oda Boss Fight: Things to keep in mind

  • Oda has low health and can be stunned when you use frag grenades against it. 
  • EMP grenades will also help you to turn off Oda’s mask for a short time.
  • Cyberware Malfunction will help you to slow down the movements of the boss. 
  • The Oni mask will be destroyed instantly when you perform a surprise attack and hit the head.
  • If you stay too close when Oda uses a camouflage, you will be knocked out by an explosion upon the activation of the camouflage. If this happens, you will lose control of the character for a while.
Cyberpunk 2077 Oda boss fight
Oda (YouTube)

For more Guides, Tips, and Tricks

You can also check our dedicated Video Games Guides section.

Coin Master Daily Free Spins – April 2022

We have brought you the Coin Master daily free spins. Check all the links and grab those free spins so that you can have nonstop fun.

The goal of Coin Master is to acquire coins in order to enhance commodities and settlements. Coin Master is classified as an “Adventure Game” on the app stores, despite the fact that it has gambling elements. Users must spin to acquire money in order to create their own game towns or assault the villages of other players. 

The number of attempts every hour is limited to seven, but spins may be used to purchase further attempts and other products. Free spins may also be obtained by following Coin Master on social media and subscribing to their email newsletter. Many websites and third-party programs collect these links in order to assist gamers in obtaining all of the free gift incentives.

Read Coin Master Free Spins, Tips, and Tricks 2022

A fortune can be obtained via spinning the wheel and winning, invading another player’s town, or looting another player’s wealth. To protect communities, a maximum of five shields and the pet Rhino can be utilized. When a player’s town is attacked, the game provides “revenge,” which allows the player to launch a counterattack. When a player’s town is completed, he or she moves on to the next village. As the player continues, the stages become increasingly difficult. Below are some Coin Master Daily Free Spins.

Coin Master Daily Free Spins

April 25

April 24

April 23

April 22

April 21

April 20

April 19

April 18

April 17

April 16

April 15

Coin Master (YouTube)
Other game codes:
Anime Training Simulator Codes for Free Yen and how to redeem them
Fishing Clash Gift Codes
Roblox Demonfall Codes

How to get more Coin Master Daily Free Spins

When you invite a friend to play Coin Master on Facebook, you may get 40 free spins. Your friend must accept the invitation, download the game, open it, and connect their Facebook account to the game in order to gain credit. If you have a large group of pals, this might rapidly mount up.

Once you’ve recruited all of your friends and they’ve joined, you and your friends may gift each other Coin Master free spins and coins every day! This procedure does not result in any personal Spins being lost. A total of 100 Spins can be given and received.

You also have the option of waiting! You will receive five Coin Master free spins for every hour you wait, up to a total of 50 Coin Master free spins. If you want to maximize your Spins, you should wait no more than 10 hours.

Attack friends in coin master to get daily free spins
Attack your friends! (YouTube)

For more Guides, Tips, and Tricks

Check out our Video Games Guide Section for more dedicated guides.

How to complete Prowler Quests in Fortnite

Want Prowler in Fortnite. Our guide will tell you how to complete Prowler quests so that you can get all the rewards.

We all know that Fortnite introduces many Marvel characters, anime characters, and several other famous characters. Fans always have fun playing with these characters as it is something new for them. Playing a battle royale with one of the best characters is another feeling. Similarly, Prowler, a new marvel character has come to the game, and you can unlock its skin easily. 

In the Quests menu, you’ll see the new Prowler Quests. Nine quests can be found in total, and most are fairly self-explanatory. Three of the nine challenges must be completed to unlock the Prowler skin. There are also some emotes, sprays, banners, and more players can earn from these quests. To know how to complete Prowler quests, read our guide below.

Prowler
Prowler (YouTube)
Related Best Guns in Fortnite Ranked

How to complete Prowler Quests

Below are the quests and rewards you will get after completing them.

  • Complete 3 Prowler Quests – Prowler Outfit
  • Collect 3 Different Weapon Types of Epic Rarity or Higher in a Single Match – Prowler Banner
  • Complete 7 Prowler Quests – Slash and Smash Emote
  • Mod a Vehicle, Then Drive it 500 Meters In a Single Match – Prowler’s Grasp Emoticon
  • Search 7 Chests Before Taking Damage in a Match – Sky Prowler Glider
  • Do 500 Damage to Opponents While Crouched or Sliding – Energy Claw Pickaxe
  • Get 3 Headshots on Opponents With a Thermal Weapon – Mark of the Prowler Wrap
  • Use a Spray at the Daily Bugle – Prowler Tag Spray
  • Collect 300 Bars – On the Prowl Loading Screen

It’s easy to see that each Prowler quest revolves around its abilities. Since Prowler is known to be a thief, the majority of his quests revolve around acquiring Bars, opening chests secretly, and so on. It shouldn’t be difficult for you to complete all the challenges and earn all the rewards.

Get the Prowler Outfit

You will be able to wear the Prowler outfit in the game after you have completed three out of those quests. The Slash and Smash Emote will also be yours if you complete all seven challenges.

Thermal Weapon Quest

kill with thermal weapon
Using a thermal weapon (YouTube)

The only option in the thermal weapon quest is the Thermal Scoped Assault Rifle. If players seek out and defeat Huntmaster Saber, the thermal rifle will drop. However, it can also be obtained by searching chests and can appear as floor loot. 

Related Fortnite Close Encounters Mode Guide – How to access it, Quests, and more

Mod a Vehicle Quest

Search garages and find some off-road tires. This will help you to mod your vehicle. When you will throw the tires on the car, it will be counted as modded. Yes, it is that simple.

Collect 300 Bars Quest

In order to complete this quest, all you have to do is use the Bounty Boards that are spread over the map. There is also the option of defeating a boss named Gunnar in Command Cavern to collect more. Once he drops the keycard, a room containing safes and gold bars can be unlocked.

We have explained the necessary quests. The other remaining quests have nothing complicated. It defines exactly what is needed to be done. Therefore, complete the quest and enjoy lots of rewards.

collect gold bars to complete Prowler quest
Collecting bars (Youtube)

For more Guides, Tips, and Tricks

You can also check our dedicated Video Games Guides section.

Fire Emblem Three Houses Guide – Tips and Tricks

We have brought you the Fire Emblem Three Houses guide with some of the best tips and tricks that will help you in your gameplay.

Fire Emblem Three Houses can be confusing because of their complex tactical battles, extensive class system, and specific features. If you don’t know what you’re doing, you and your students could be at a great disadvantage. In order to have a good gaming experience in this RPG game, you must be aware of its multiple parts. Below we have the Fire Emblem Three Houses Guide with some tips and tricks that could give you an edge in the game.

Fire Emblem Three Houses Guide: Recruit

Following your selection of a house, you will be assigned to a group of students. You’ll be able to recruit students from other houses eventually. To recruit someone, you must first speak with them and do a basic skill check. They will decide to join if your bond and skills are strong enough. It’s best to recruit all of your favorite characters as soon as possible because you never know where they’ll wind up later in the game.

Fire Emblem Three Houses Guide: Lost Items

You must return the items that have been lost. It will tell you who they belong to in a brief explanation. Returning a lost item to a student or professor increases your relationship with that individual. They’ll be more motivated if they’re in your class.  

If you are retrieving a lost item for someone who is currently at full motivation, you should wait until their motivation begins to drop. You can then go back and return it to again increase their motivation. The location where someone was last seen a month ago is frequently where lost items show up. If you’re still unsure, look into who could have been in the area.

Officer's academy

Fire Emblem Three Houses Guide: Terrain

The fire emblem can be greatly influenced by the terrain. Standing near the fire will naturally harm characters over time, and sand makes moving some units very hard. There are, however, ways to make the terrain work in your favor. Some classes, such as the bishop, are fire-resistant, and mounted units can temporarily dismount to enhance Traverse sand.

Share meals with your students

Sharing a meal with your students will result in a great benefit for you. This is an excellent way to develop your bond with them, increase their motivation, and improve your professor’s level. So, whenever you get a chance, share meals with your students.

Support Levels and Conversations

Support levels and conversations function the same way they did before. As you fight and bond with your students, you’ll unlock conversations that rank up support levels. You will learn more about your students and gain a stat benefit if two or more students are close to each other on the battlefield. 

Fire Emblem Three Houses gameplay

Renown points

Completing quests allows you to get a lot of renown points. These renowned points can be utilized by talking to the priest and praying to four statues in the cathedral. It’s a simple process. Each statue has a bow, sword, lance, and axe. This will help you earn skill bonuses as well as other stat boosts. 

Manage abilities before battle

Remember to manage your unit’s abilities before the battle. As a character advances through the skill levels, they have access to abilities that relate to what they’ve learned. When using an axe, for example, you’ll have better stats, and when using magic, you’ll have better avoidance. The abilities must be manually equipped, therefore make sure you have abilities that match the unit’s current class and loadout before starting the battle.

Repair Weapons

You’ll eventually find a blacksmith in the marketplace. You can upgrade and repair your weapons here. It’s important to remember that repairing weapons costs gold and smithing stones. It will be good if you don’t repair every weapon because it takes up a lot of gold resources. However, there are some weapons that are worth repairing later on. You can also turn rusty weapons found on the battlefield into useful resources by forging them.

Use ZR

Using ZR to see the range of your enemies is arguably one of the most crucial battle tips. Purple outlines appear around tiles when you press the ZR. If one of your units is inside one of those purple tiles, the enemy is within range. If there are Pegasus units on the battlefield, you can keep this on for the duration of the battle as it will be beneficial for you.

For more Guides, Tips, and Tricks

You can also check our dedicated Video Games Guides section.

Just Die Already Guide – 10 Things You Should Know

We have brought you the Just Die Already guide that will tell you 10 things that you should know. Follow the guide to have smooth gameplay.

Want to play as an old man? Just Die Already is a survival game in which everyone is old and has been kicked out of their retirement home. The game has all old characters who do not have any children. You have no pensions and no one is there to look out for you. 

Therefore, it is you only who will have to take care of yourself and survive in the game where everyone wants you to Just Die Already. But how will you survive? To help you, we have the Just Die Already guide with some tips that you should know. 

Read God of War PC Guide – Tips and Tricks for Your Journey

Just Die Already Guide: Bucket List

The bucket list has the list of all the objectives in the game. You will unlock more objectives when you complete the current ones. By doing this, you will get items such as wearables, tools, guns, JDA tickets, and much more. To access the bucket list, all you need to do is press B (in PC).

Just Die Already Guide: JDA Tickets

If you want to make some purchases from the blue vending machine, you will need the JDA tickets. The machine sells items such as weapons, tools, and more. You will also get clothing that will help you speed, fly, and other abilities. In addition to all these, you will get items like musical instruments which will be unlocked upon the progression of the game. Keep in mind that there is only one blue vending machine on the map.

Read Assassin’s Creed Valhalla Guide – Best Tips and Tricks

Other vending machines

There are two more vending machines in the game. One is Red and the other is yellow. The Red vending machine is for guns, bombs, rockets, and other weapons. The Yellow Vending Machine is for clothing, wearable, apparel, and other usable items such as rocket packs. You can find these across the entire game’s area.

Gameplay (Curve Games)

Just Die Already Guide: Bird Wing

One of the game’s most mysterious flying items is the bird wing. It’s a one-handed gadget that can also be used with other items, such as a butt propeller. You can find it opposite the main entrance of the Zen garden. Explore the area until you find the bird wing.

Sacrifice body parts

There are some places in the game that will ask you to sacrifice some of your body parts in order to proceed further. It will show an X sign and some body parts will be marked in red. This indicates you’ll have to give up those parts of your body. Now, many people get confused. For example, if the sign is shown for the parts below the knees, you just have to sacrifice those parts of your body and not the whole legs.

Read How to beat Crazed Tank – Battle Cats Guide

Unlock gun stores

You can unlock the gun stores in the game. At the City Center Docks follow the cables and go from the locked doors then fly with the butt propeller to the metallic grid ledge. You will find the eclectic boxes. Open the electric box and you will get what you were looking for.

Gameplay (Curve Games)

What are the Golden Keys?

The golden keys are used to open the locked chests and the golden gates. If you see a wooden chest that has a golden lock on it, you will need the golden key to open it. There is no specific golden key for each chest or gate. Any key can work anywhere. However, the problem is that you cannot use the key again once you used it. The key will vanish when you use it on a chest or a gate.

Read Crazed Cat, Pikotaro, and more – How to Beat the Hardest Enemies In Battle Cats

Co-op is very beneficial

There are many benefits if you play any objective with another player. Playing solo will be more challenging, and sometimes it will feel impossible to complete some objectives. For example, when you sacrifice your limbs for an objective and you will further require it, then you will feel helpless. On the other hand, having a partner with you will be very beneficial.

Play with other friends (Curve Games)

A Real Trapper challenge

For this challenge, you will need a golden key to unlock the door. There will be seven bear traps in the store which you will have to step on. It will clamp onto your body once you step on them. After these seven, you will find the remaining three in Zen Garden’s inner yard. 

Body Dunker challenge

This challenge will be very easy if you play with another player. Playing solo will cause you a lot of time and brainstorming. Therefore, it is recommended to play co-op. The easiest and quickest technique is to have a friend cut you into a stump and then fly you into the hoop & dump you down in there.

For more Guides, Tips, and Tricks

You can also check our dedicated Video Games Guides section.

Lost Ark Express Mission – A Complete Guide

Want some big prizes in Lost Ark. The Lost Ark Express Mission event will give you all of it. Read our complete guide to know everything.

In addition to store updates, South Vern Continent, and a new class, Lost Ark has an Express mission event for the players. If you want lots of silver, honing materials, engravings, and lots of items, then you will have to complete the Express Mission event.

The event has already started and players are playing it. However, you do not have to worry as the event will be available till 30th June. In this Lost Ark Express Mission guide, we will tell you everything that you need to know.

Related How to Unlock the Unicorn Mount in Lost Ark

What is Lost Ark Express Mission

In the Lost Ark Express Mission event, players can complete Express Missions with any character they like. Keep in mind that the character you choose must have a combat level of at least 5 and an item level of 1000. The character you pick will be given Level 302 gear to help it complete express and bonus missions for progression rewards and honing. 

If you don’t have a level 50 character yet, you can quickly level them up with the help of Vern Pass or Knowledge transfers. The Vern Pass, on the other hand, is a more efficient option.

North Vern and Rohendel are Tier 1 continents, and Yorn and Feiton are Tier 2 continents. These are the places where you can find the Express Missions. Completing these missions will reward you with various items that will help you advance, such as honing materials, important potions, engravings, silver, and many other useful items. 

You will also receive a huge bonus reward chest if you complete all the missions. This will be beneficial to boost your progression even further. You can view your levels and missions, along with the rewards, by accessing the Express Mission event menu.

Related Lost Ark Drumbeat Island Guide – Everything you should know

More about the Lost Ark Express Mission

Fieton Powerpass in lost ark
Feiton Powerpass (YouTube)

The Express Mission event is the ideal opportunity for you to catch up with the other players if you are behind. Players can use the rewards to level up the Lost Ark characters if they have already reached Tier 3. 

You can complete the main story quest “Will” while you progress through the event to get Feiton Powerpass that will give you level 960 gear. This will work similarly to the Vern Power passes. However, it will end with the event on 30th June. To get the Feiton Powerpass immediately, the required story quest should be completed already. 

For more Guides, Tips, and Tricks

You can also check our dedicated Video Games Guides section.