Best Signature Moves and How to Perform them – WWE 2K22

For all the WWE fans, we have listed the WWE 2K22 best signature moves and also how to perform the signature moves in the game.

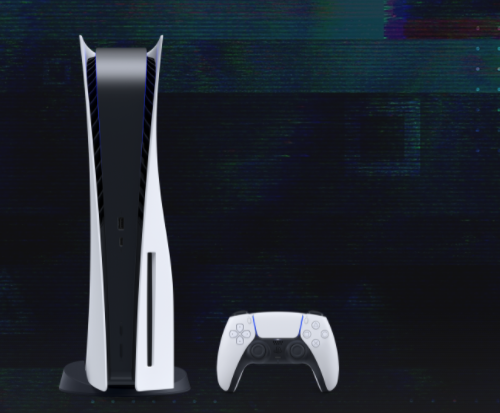
Visual Concepts and 2K Sports have just released WWE 2K22, a new professional wrestling video game. In total, it is the twenty-second installment of the video game series based on WWE. It is the ninth title in the WWE 2K series. The game will be available for Microsoft Windows, Xbox One, Xbox Series X/S, PlayStation 4, and PlayStation 5 on March 11, 2022.

The MyCareer mode in WWE 2K will be renamed “MyRISE” and will have different storylines for male and female superstars. Players may establish alliances, make enemies, and branch into subplots based on their decisions using manufactured superstars. The 2K Showcase will return, with Rey Mysterio as the cover hero, allowing gamers to relive the highlights of his WWE career. New features and improvements will be added to the 2K Showcase mode. 

Many characters have a signature move, which is a skill, attack, taunt, evasive move, or spell that they utilize more frequently than any of their others. You will need the signature moves to win the matches. So here are the WWE 2K22 best signature moves guide that will also help you to learn how to perform them.

Read How to beat Kronika in Mortal Kombat 11

WWE 2K22 best Signature moves: Superman Punch

WWE 2K22 Roman reigns signature move
Superman Punch (YouTube)

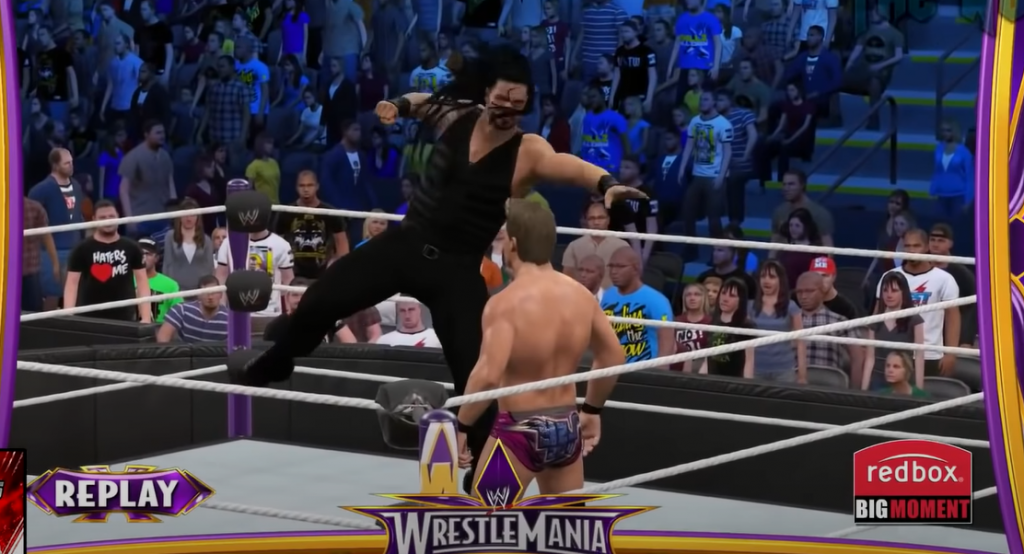
WWE wrestler Roman Reigns, often known as “The Big Dog,” has a signature move called “The Superman Punch.” This technique is performed by Roman Reigns by striking the opponent with his right hand. Roman Reigns goes towards his opponent, leaps into the air, and executes his magnificent Superman Punch while continuously pounding his fist on the mat. It is like a knockout punch to your opponent.

WWE 2K22 best Signature moves: Five Knuckle Shuffle

WWE 2K22 John Cena's signature moves
John Cena’s Five knuckle shuffle (YouTube)

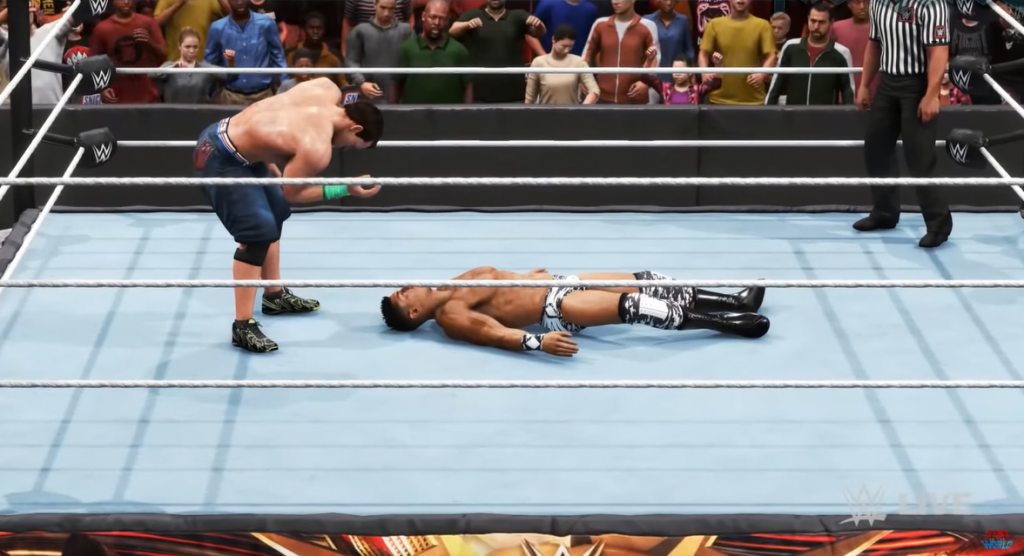
John Cena is one of WWE’s most recognized superstars, and his pro wrestling prowess has won him a lot of respect and popularity throughout the world. With his incredible power and unique maneuvers, John Cena has demonstrated his strength by knocking out some of WWE’s top performers.

Cenation’s leader begins his signature move by lifting his hands and mocking his opponent with his signature “U Can’t See Me” sign, then sprinting towards the ropes and stopping in front of his opponent to smack him in the face. The Five Knuckle Shuffle is a well-known signature move that has taken out a lot of big names.

Read Elden Ring Golden Scarab Guide – How to obtain, uses, and more

WWE 2K22 best Signature moves: Rope Hung DDT

Randy Orton
Randy Orton’s DDT (YouTube)

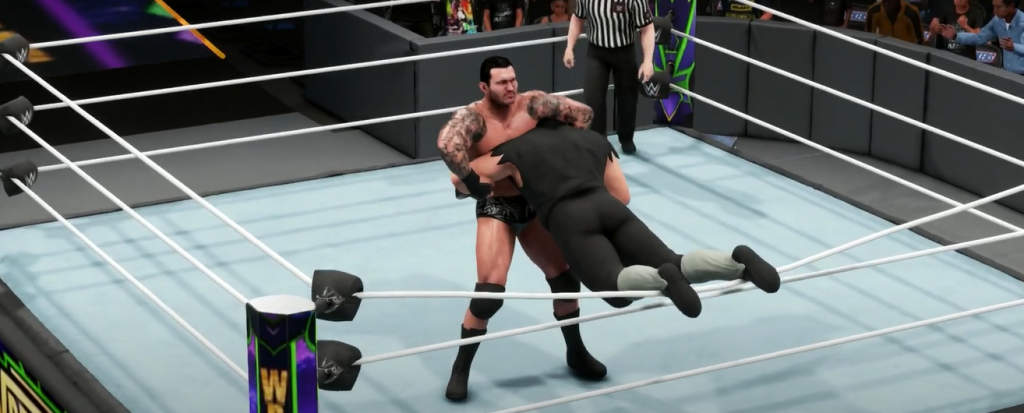
RKO, Randy Orton’s finisher, is one of the most well-known finishes in the WWE. But don’t forget about his signature move. When it comes to wrestling, Randy Orton has a pretty unique collection of moves to knock out his opponents. He hangs his opponent between the ring rope and drops him on the face using the Rope Hung DDT signature move.

It is possible to execute a DDT in a number of different ways in WWE. Randy Orton, however, uses a unique variation of the DDT; he kicks his opponent in the belly, settles him between the ropes, and delivers a brutal DDT.

Read Horizon Forbidden West Guide – 10 Things Everyone Should Know

WWE 2K22 best Signature moves: Buckle Bomb

Seth Rollin's Signature move
Seth Rollin’s Signature move (YouTube)

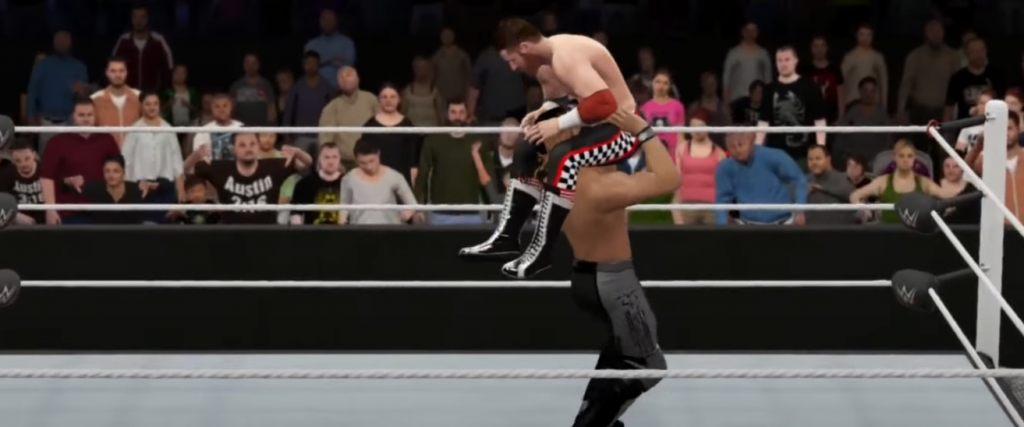
In addition to being one of the most popular wrestlers, Seth Rollins has proven to be the best athlete in the WWE. After performing a buckle bomb, Seth Rollins performs a curb stomp as his finisher. To set up his finisher, Rollins throws his opponent brutally towards the turnbuckle while on his shoulders. 

WWE 2K22 best Signature moves: Splash on the floor

rey mysterio gameplay
Rey mysterio gameplay (YouTube)

WWE 2K22 has Rey Mysterio on its cover for its latest release. Considering this, we might see the 619 star back with its Splash on the floor signature move. After Rey Mysterio has placed his opponent outside of the ring, he runs to the ropes, slides under the third rope, and executes a splash on the opponent. We could see this great signature move of our favorite 619 guy again in WWE 2K22.

Read FIFA 22 Guide – 10 Things you should Know

How to perform signature moves in WWE 2K22

WWE 2K22 signature moves
WWE 2K22 cutscene (YouTube)

In WWE 2K22, signatures are generally done just before hitting a Finisher. The reasoning is twofold: not only does it fill up the Finisher bar on the HUD far faster than regular strikes, slams, and combos, but it also delivers just enough damage to other wrestlers and/or wrestlers to set up the Finisher. To learn how to perform Signature Moves and Finishers, you must first comprehend the Special Meter idea.

The Special Meter is the blue meter just beneath the Health Meter. Once your Special Meter has three full bars, you can execute a Signature or Finisher. The three bars would be used up by the Signature. When you have all three bars on your Special Meter, press R2 on PlayStation or RT on Xbox. You must tap the Light Attack button for Signature while holding that button.

R2/RT + Square/X = Signature Move 

For more Guides, Tips, and Tricks

You can also check our dedicated Video Games Guides section.

Triangle Strategy Guide – 10 Things to Remember

We have brought you the Triangle Strategy guide with 10 things that you should remember while playing the game.

Gameplay is based on turn-based tactics in Triangle Strategy. On a grid-based playing field, players take turns moving their party members across the grid, attacking and defeating computer-controlled opponents. A character can move at a certain distance per turn and attack at a certain range as well as a certain power based on his inherent attributes and alterable attributes, such as the terrain he is positioned on and whether he is wearing armor or weapons.

The game takes place on the mythical continent of Norzelia. Thirty years after the “Saltiron War,” a new struggle erupts between three-continent governments – Glenbrook, Aesfrost, and Hyzante – for salt and iron resources. Serenoa Wolffort, the protagonist, tries to work out his differences with his friend Prince Roland, his fiancée Princess Frederica Aesfrost, and the housesteward, Benedict Wolffort, in the game. The below Triangle Strategy guide will help you to understand more about the game.

Read Risk of Rain 2 Guide – 10 Things You Should Know

Triangle Strategy Guide: Story Scenes

Game flow is directly affected by story scenes between battles. The player is presented with decisions with different values with respect to morality, liberty, and utility. Characters’ support or opposition to a player’s cause and the outcomes of battles and story scenes are affected by the choices they make.

Triangle Strategy Guide: Tactical Points

Tactical Points (TP) is what you utilize to conduct any attacks other than a basic assault in battle. Each unit in your party will begin with one TP, as shown by a yellow diamond, and will gain another TP point every round. Always keep TP in mind and store upon it, so you can unleash deadly techniques when needed. Of course, it’s also crucial not to spend turns attempting to preserve TP.

Triangle Strategy Guide: Panels

Triangle Strategy gameplay
Gameplay (Nintendo)

Blue Panels are within movement range, but not attack range, for the enemy. Purple Panels are inside the opponent’s attack range and movement range. Enemies that can attack the unit are shown by red lines.

Placing your army

Triangle Strategy might not allow you to place your troops anywhere you want before a fight begins, but you are given a limited amount of space to move them. So it’s important to get your troops sorted how you want them, especially on harder difficulties.

Your front-line units should consist of Roland, Seranoa, and Erador as they face off against enemy forces with the support of your mages. Anna and Hughette, your two scouts, should try to flank from a different angle.

The game recommends you what to choose for the fight

Triangle Strategy combat
Gameplay (Nintendo)

When you open your unit roster before combat, you’ll see that the game has highlighted the troops it thinks will be most useful in the next conflict. You are free to disregard this advice, but these suggestions are typically correct, and it is best to follow them until you are certain you understand what you’re doing. 

If you need someone to build ladders in your next battle, the game will make sure to highlight a unit that can do it. So you don’t have to take the long way around a cliff because the game will help you in your battle.

Know Your Units

If you view your party members’ lists at your encampment, you will be able to see detailed summaries on each and every one of them that will tell you everything you need to know. This will show you the weapons you have, the accessories you’re wearing, and what each fighter can do. Your battle success will increase if you familiarize yourself with your party’s strengths and weaknesses.

Read How to unlock all characters in Risk of Rain 2 – Guide

Take advantage of the surroundings

Advantages by the surroundings
High advantage (Nintendo)

Using the high ground to get an edge over your opponents is critical in Triangle Strategy, and assaulting from an elevated position will even offer you an offensive advantage. Put your fighters in positions that lift them above their opponents wherever feasible to offer them an edge. In a close game, this might make the difference between a victory and a defeat.

Upgrade the weapons carefully

Triangle Strategy gameplay
Gameplay (Nintendo)

In Triangle Strategy, weapon upgrades are essential for toughening up your forces, but they’re also incredibly expensive. You’ll need to furnish the blacksmith with the needed resources, such as Stone, Timber, or Fiber, in addition to paying a minimum of 500 coins for each improvement. These materials can be collected through level exploration as well as spoils from fighting. 

However, you’ll very certainly have to buy them from the Encampment merchant as well, especially because the number of necessary resources increases dramatically after your initial improvement. As a result, you’ll want to think about your alternatives before proceeding with an update.

Triangle Strategy Guide: Quietus Skills

When you acquire access to the Sundry Shop in the Encampment early in the game, you’ll obtain Quietus, which are effectively one-use talents that may provide you a considerable edge in battle.

Extra turns, bulk healing, and guaranteed critical strikes on your next turn are among the new Quietus talents available in the Sundry Shop for Kudos. These talents may only be used once every fight, but they’re highly strong, especially as you gain more Quietus points and unlock the ability to utilize multiple skills at once.

Read All Boss Fights in Elden Ring – Ranked

Grid System is a great help

Red grids
Red grids (Nintendo)

The grid on which you combat reveals which places are safe for you to hold, with out-of-reach squares colored blue and purple squares indicating that you are vulnerable to opponent attacks. Furthermore, panning over a grid square will show you how many opponents will be able to attack you if you choose to go there, thanks to helpful red attack lines.

As you aim around at adversaries with magic strikes, grid squares glow red, indicating where your fire, ice, and lightning will land and how much of the battlefield they’ll affect. It’s quite useful!

For more Guides, Tips, and Tricks

You can also check our dedicated Video Games Guides section.

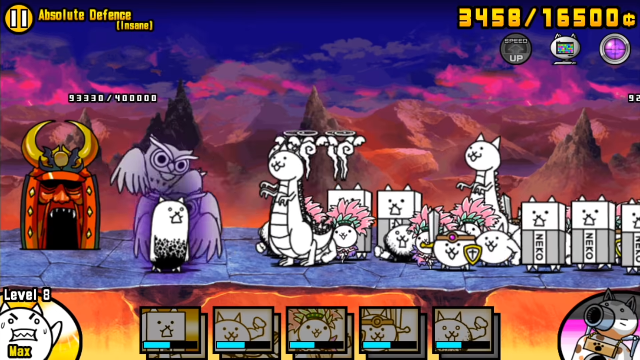
How to beat Crazed Tank – Battle Cats Guide

Have difficulty in defeating Crazed Tank? In our Battle Cats guide, we will tell you how to beat the Crazed Tank.

To most players, it is advised that you bring Rich Cat, Sniper the Cat, and, if required, Cat CPU. The Crazed Tank’s stage is unquestionably one of the most crucial in the game, awarding a superior meatshield unit. A trio of opponents will spawn on a timer and will attack the Crazed Tank first. To battle Crazed Tank in The Battle Cats, you’ll need as much money as possible, so hold off on going to the base until you’ve fought the first set of Owlbrows.

Crazed Tank’s range is not something to be laughed at: you will have to use units that can outrange it. Most likely, you will be using Lizard/Dragon Cat and Bahamut Cat to fight Crazed Tank and Owlbrow, both of whom have a long range. It works better to have Ururun. However, obtaining her may be difficult at this point. 

Crazed Tank fight
Gameplay (YouTube)

Crazed Tank boss also boasts a lot more HP than Crazed Cat itself, so it’s extremely tanky. Sniper the Cat will also help close the distance between you and Crazed Tank with 1 knockback as well. Cat Cannon is also necessary to close the distance between you and Crazed Tank. Below is a guide that will tell you how to beat crazed tank in the game.

What Ubers should you choose?

Read Black Widow: Recharged Guide – 10 Things You Should Know

Through the use of a Sniper the Cat and sufficient protection, Aphrodite, Nobiluga, Kinrangers, Sakura Miku, and other Long Distance Ubers can safely outrange the boss and possibly hit the base behind him. They will certainly ease the process if any of them are available to you.

The first to attack the base will leave Warlock and Pierre (38+) one hit away from destruction. Cheeseing a stage with this strategy makes a huge difference, although landing that final hit will still be difficult.

How to beat Crazed Tank

Crazed Tank fight gameplay
Gameplay (YouTube)

If you use any Cat that has a range of 390 or more, like the Mohawk Cat, Eraser Cat, Crazed Macho Cat, a meatshield, or Dragon Cat, Bahamut Cat, will help you. If not, then the Crazed Tank will kill you easily. Utilize cats that possess Knockback abilities, such as Ururun Wolf. It will also help to have a Long-Distance unit with enough range to snipe the base.

Read Centipede: Recharged Guide – Tips and Tricks

The Cat CPU should be turned off immediately. Gather as much money as possible, summon Bahamut, and strike the enemy base. From that point on, turn on the Cat CPU so that Crazed Tank Cat comes out and the battle is automatically won. Units aiming at long distance will be able to hit the bases behind the enemies they are aiming at, so the battle may already be over before the Crazed Tank is eliminated.

For more Guides, Tips, and Tricks

You can also check our dedicated Video Games Guides section.

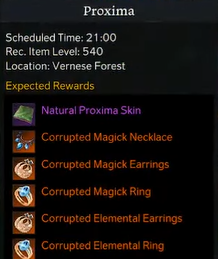
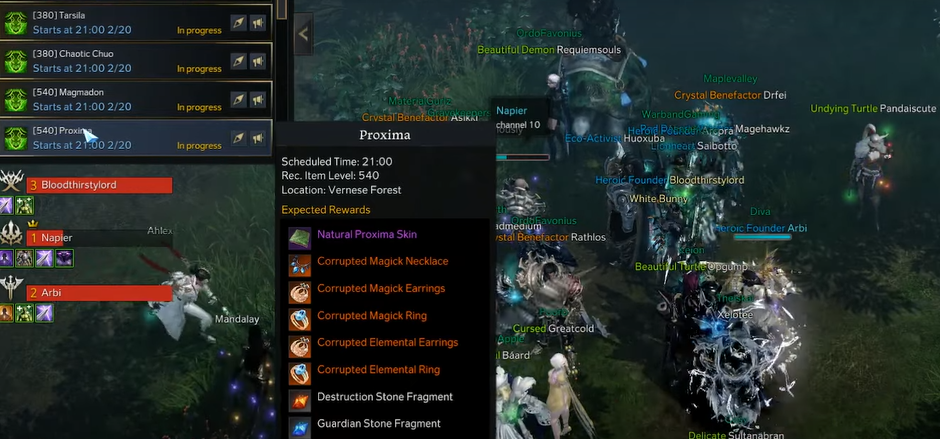
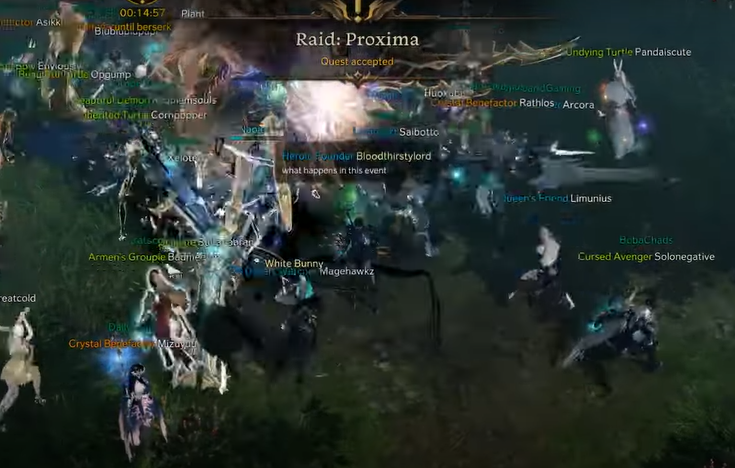
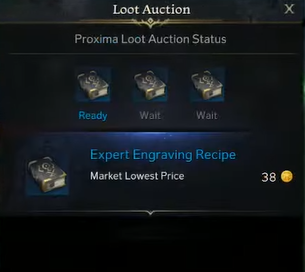
Lost Ark Proxima Guide – Tips and Tricks

Facing difficulties with Lost Ark’s Proxima? Do not worry, we have covered everything in our Lost Ark Proxima Guide.

The world bosses in Lost Ark are massive and can be tackled together by a group of players for huge rewards. However, they require good coordination and teamwork to defeat. Taking on the Lost Ark Proxima boss is no different, and every player will be tested during the battle.

The field boss Proxima is a well-known figure in Lost Ark. Aside from fulfilling the boss section of your Adventurer’s Tome, defeating the boss might also drop a Proxima Course Meal ingredient. Here is our Lost Ark Proxima guide to give you all the information you need.

Lost Ark Proxima quest
Proxima progress and rewards (YouTube)

Lost Ark Proxima Guide: Location

North Vern’s Vernese Forest zone is where you can find Proxima. Getting there is possible by using the Balankar Ranger Headquarters Triport. You can also follow tree trunk pathways. Finding Vernese Forest will probably be difficult.

There are predetermined intervals and dates for each field boss to appear. These boss raids take place every 2-3 days at the same time. There is an alarm schedule for the Proxima field boss.

You will need other players

The concept and mechanics of Proxima are somewhat akin to the Lost Ark Rovlen world boss, as it is also a large flesh-devouring plant. If you hear someone call out when the boss spawns, you should check the area chat since it runs on a timer once defeated. The announcer will usually announce which channel a boss has spawned in. 

That channel can be changed via the drop-down menu in the top right corner. Proxima can only be killed with the help of other players, so if you happen to encounter them on your own, do the same.

Lost Ark Proxima Guide: How to beat Proxima

Proxima gameplay
Proxima quest gameplay (YouTube)

To face the Proxima field boss, you must have the required item level. A minimum item level of 540 is required to participate in the raid. You will not receive rewards if you have not reached the item level yet. Go to the Character Profile page to verify your item level.

Upon reaching the required item level, proceed to Vernese Forest and wait for the boss to appear until the timer has run out. With Proxima’s health point total exceeding 13 million, you want to be sure that other players are nearby to help. Try looking for a crew in the drop-down menu on the top-right corner of the game screen if no one is online.

Each of the phases of Proxima’s life cycle involves the boss covering itself and regenerating health. Proxima will receive a small amount of healing every few seconds while the shield is in place. As a consequence, Proxima will take significantly less damage during this time, so save your hard-hitting spells and attacks for when they’re really needed. As for his fighting style and mechanics, it is fairly similar to those of other field bosses.

Rewards

Rewards from the quest
Loot auction in Proxima quest (YouTube)

When you defeat Proxima for the first time, you’ll earn a first kill reward, which includes three pieces of epic gear and fills in relevant sections of the Adventurer’s Tome. As well as gaining experience, you’ll receive a random assortment of currencies, items, and resources. 

For more Guides, Tips, and Tricks

You can also check our dedicated Video Games Guides section.

Risk of Rain 2 Guide – 10 Things You Should Know

Are you going to start playing Risk of Rain 2? Read our Risk of Rain 2 guide for all the things that you should know about the game.

Risk of Rain 2 follows the same concept as the original game, with players progressing through a number of stages while destroying adversaries. Players must discover a teleporter, which is randomly placed on each level, and activate it; once activated, they must battle their way through an assault of aliens, including monsters, until the teleporter is completely functioning. You gain experience and currency when you kill aliens, and currency can be used as a key to open chests that have random items inside. 

The items provide a variety of benefits to players who carry them, from synergistic effects to the possibility of stacking their benefits if more than one copy of the item is acquired. Aliens increase in strength, difficulty, and number every few minutes, which makes the game more difficult with every successive level played. Below is our Risk of Rain 2 guide with all the things that you should know.

Read What are PS5 Treat Codes and how to get them?

Risk of Rain 2 Guide: Items

White, green, yellow, and red items either enhance your character’s abilities or increase their behavior in some way, such as their speed, life regeneration, etc. Items of the blue color, however, usually cost money. Base damage increases by 100% but maximum health drops by 50%. Some combinations could prove fatal. You can expect chaos from the skies every couple of seconds if you or your teammates have the Glowing Meteorite and Gesture of the Drowned. 

Risk of Rain 2 Guide: Turrets

Combat Gameplay (Gearbox)

In every game, there is a temptation to cash in chests instead of turrets, but turrets can be extremely useful. They come in different types as well; some heal while others shoot at anything they see, and the best part is that they accompany you throughout every level. They can serve as solid support for the group, especially in numbers, whether you’re playing alone or with friends.

Huntress Character

In the hands of a skilled player, Huntress can also be quite mobile, as she specializes in damage. The best thing about her is that she can sprint while attacking, which no other class can do.

While sprinting, your main attack can be launched. If you need to reposition or gain an edge on your enemy, this is invaluable. During Phase Blink, you can even teleport without stopping your sprint to further enhance this playstyle. Keep sprinting with Huntress and you can achieve some nice long runs.

Read How to unlock all characters in Risk of Rain 2 – Guide

Proc coefficient

A percentage of your attacks or skills will activate most items in Risk of Rain 2. The proc coefficient determines whether an attack is in fact equal to another. Proc coefficients are the variables that determine how often an effect will occur for each skill and on-hit item.

Loot and rewards

Boss fight Gameplay (Gearbox)

When you activate the teleporter, you will fight a boss in every level, and once you pick up its loot and defeat the enemies, you will be able to stick around before moving on. This is a great opportunity to use the newly earned money if you did not have time to look for all the chests or if you just want to use it. It is important to keep track of the game’s difficulty, as it will never stop increasing as time goes on. 

Read All Boss Fights in Elden Ring – Ranked

Commando character

In Risk of Rain 2, mobility is essential for every character, but Commando is likely to be the easiest. As a utility character, he is able to stay out of trouble quickly. For evading attacks and navigating the map, he can use the Tactical Dive and Tactical Slide. To avoid projectile attacks, players should use these skills as soon as they see one approaching. 

In order to prevent fall damage while traversing, you can use your utility right before touching the ground. Additionally, your speed will be greatly increased when you use your ability on a sloped surface.

What happens in the metagame?

Gameplay (Gearbox)

In the metagame, by completing certain in-game achievements, players gain access to new characters, items, and game modifiers. The new characters or modifiers (called survivors) are available as soon as they have been unlocked. You may also start seeing them randomly in game once they have been unlocked.

Passive Items

Passive items are displayed in the top bar in-game and provide specific benefits to the player as long as they are in their inventory. If they remove it from their inventory, they will no longer be afflicted by its effects.

Passive items can be found in a wide variety of types, and a player may hold as many passive items as she likes. When a player has multiple copies of a specific item, they stack its effects in an unusual way rather than affecting them individually.

Risk of Rain 2 Guide: 3D Printers

Gameplay (Gearbox)

3D Printers are really something you should start paying attention to when you begin to learn what items are best suited for each character. With these printers, you can always have one specific item displayed on the top. A random item of the same rarity is “recycled” at random from the item you’re carrying. 

When you see an item of a green rarity, it will consume a green item of yours at random, depending on how many items of that category you have. There is no shortage of items in this game, so you should take time to enhance one aspect of your character before moving on to another.

Do not ignore the Scrappers

Now that the full release has been released, there are things called Scrappers. You can select any of your items and scrap them using this interactive. This scrap can then be traded for a 3D Printer later on. You lose the item while you’re waiting, but that gives you the chance to protect the items you want to keep and not lose them to the cruel god of RNG. 

For more Guides, Tips, and Tricks

You can also check our dedicated Video Games Guides section.

How to beat Waterblight Ganon in Zelda: Breath of the Wild

Are there difficulties in defeating Waterblight Ganon? Read our guide on how to beat Waterblight Ganon in Zelda: Breath of the Wild.

This is one of the four Blight Ganons and is a phantom of Calamity Ganon, who controls the Divine Beasts and is responsible for killing Mipha. After attempting to activate the main terminal, he can be found in Divine Beast Vah Ruta, or in Hyrule Castle if Link has not yet liberated Ruta. The weak point of Waterblight Ganon is his eye and horns, just like those of the other Blight Ganons. 

Waterblight Ganon will be knocked to the ground each time Link hits him with an arrow, giving Link the chance to attack while he is stunned. Any attacks Waterblight Ganon attempts will also be canceled when the arrow is shot into his eye. In particular, Ancient Arrows and Shock Arrows will deal heavier damage to Waterblight Ganon. Within Ruta, the Master Sword’s current attack power will increase to 60 if Link has obtained the sword. Read the complete guide on how to beat Waterblight Ganon in Zelda: Breath of the Wild.

Waterblight Ganon Starting scene
Waterblight Ganon emerging (YouTube)
Read How to Beat Master Kohga in Zelda: Breath of the Wild

How to beat Waterblight Ganon: Phase one

You will encounter Waterblight Ganon after activating the main terminal inside of Vah Ruta – in this instance, you will have access to a vast arena to fight him in, so positioning is not a major concern. During the first phase, he makes several attacks.

When Waterblight Ganon is close, he will thrust with his spear. Using a side hop will allow you to dodge this, and perfect timing may reward you with a flurry attack. His spear can sometimes create shockwaves when he thrusts it into the ground when he is close. If he raises his spear with its tip pointing down, you must run away.

FAce off with Waterblight Ganon
Gameplay (YouTube)

He will probably sweep his spear at mid-range, which is indicated by him pulling his spear to his side with his arm out to the side. Performing a backflip will get you a flurry attack, and perfect timing will allow you to avoid this attack. Whenever the beast is thrown at a distance, the spear behaves like a javelin. You can avoid him by running to the side every time. You can stop him from using the move entirely if you stay close.

He will collapse to the ground once you do quite a bit of damage, allowing you to unleash your wrath. Our recommendation is to equip two-handed weapons and charge up a powerful spin attack to do a lot of damage.

Read How to beat Dark Beast Ganon – Zelda: Breath of the Wild

How to beat Waterblight Ganon: Phase two

As soon as you have reduced the Waterblight Ganon’s health to 50%, phase two begins. As the water level rises, Link will only have four platforms to stand on, causing a significant reduction in mobility. In addition, Waterblight Ganon will choose to focus his attacks on ranged weapons. As with Vah Ruta upon entrance, Waterblight Ganon will hurl ice blocks at you in this phase. Using either a well-aimed arrow or a Cyronis rune will break them.

It is challenging to do damage with melee weapons, but not impossible. He is floating near a pillar, at which point you can make use of ranged weapons, such as spears, to damage him. Using weapons while jumping also works, but it’s harder to hit him more than once. 

Waterblight Ganon attacks
Waterblight Ganon attacking with ice box (YouTube)

Waterblight Ganon is best damaged with arrows, particularly if you target his blue eye. You can use your Shock Arrows now if you still have any. Any elemental arrow that you have, including bomb arrows, will also do a decent amount of damage.

When his health is low, he will throw more ice blocks at you, so watch out for that. As the water slows you down, crossing onto different platforms is also a challenge. In order to get across, the best option is to jump and paraglide the short distance, then dash to the next platform.

Read Divine Beast Vah Medoh Guide – Zelda: Breath of the Wild

Waterblight Ganon will eventually switch to those Guardian-style laser beams. When this happens, we recommend avoiding them, but when they are about to strike you, performing a perfect block and parry will send the beam right back at them. 

Rewards

When the war is over, you’ll receive a Heart Container – make sure to collect it before you leave, or it will be lost forever! You will also receive Mipha’s Grace in the cutscene. When charged, this ability will see you automatically resurrected with full health and temporary bonuses. Upon returning to Zora’s domain, the cutscene with the King concludes the quest for Vah Ruta. Chat with him again to learn more about the story, and open the chest you will find on the left for the 22-strength Lightscale Trident. 

For more Guides, Tips, and Tricks

You can also check our dedicated Video Games Guides section.

How to beat Kronika in Mortal Kombat 11

If you are facing difficulties to beat Kronika in Mortal Kombat 11? Our guide will tell you how to beat Kronika.

Kronika is the last boss in Mortal Kombat 11. She is the Time Keeper. The Elder Gods are her two offspring. She is, without a doubt, a dangerous adversary. Her battle is divided into multiple stages, with various characters intervening on her behalf in between. You’ll have to beat her roughly seven times until she dies.

Kronika is extremely tough to combat because of several circumstances at play in her life. She can take a lot of damage and is intrinsically capable of blocking attacks like Liu Kang’s bicycle kicks and deadly punches.

Gameplay (YouTube)
Read How to beat the Golden Wolflord in Genshin Impact – Guide

Kronika’s Abilities

Fight gameplay with Kronika (YouTube)

Kronika’s numerous damaging projectiles make her one of the most dangerous characters. Their long-range makes them very versatile, and they have various effects as well. Using Time Sphere, she can use projectile attacks or beams of energy that reach across the stage. In the event that the Time Sphere’s energy beam pierces your character, several frames will be reversed and damage will be dealt. You may feel like a hostage whenever you’re caught in the Time Sphere’s grasp.

Among Kronika’s other skills is the ability to teleport. This is usually done after every attack she makes. Consequently, you must remain alert and pay attention to where Kornika is located. In addition, use attacks with lower block disadvantages so that Kronika doesn’t have enough time to teleport and attack from behind.

Kronika has a wide array of immunity. Furthermore, she is immune to equipment augments, throws, kombos of juggling, fatal blows, and crushing blows. As a result, showing off with your cool moves won’t get you anywhere.

Read How to Beat the Guardian Ape in Sekiro: Shadows Die Twice

How to beat Kronika

Fight gameplay with Kronika (YouTube)

When Kronika is in the middle of combat, she will be replaced by another character. Despite her having far less health than usual, this essentially improves her overall health and increases your chances of doing something dumb and receiving more damage. She also employs bizarre time-bending moves that are hard to foresee ahead of time. When you’re struck by one of her attacks, you’ll usually find yourself in a protracted Kombo where you’ll take a lot of damage.

To have a chance against Kronika, you must stay on the offense as much as you can. Your powerful special strikes aren’t cost-effective, and if she stops them, you’re in serious trouble. Instead, utilize fast, light Kombos that are easy to recover to keep her shocked and unable to unleash her cheap special attacks. If you can’t successfully execute Kombos, at the very least spam some punches and kicks and do some old-school button pounding. The main goal is to prevent Kronika from attacking and maintain pressure on her.

Don’t attempt to flee or maintain a safe distance. Kronika will track you down and defeat you. You’ll only be able to defeat Kronika if you take the battle to her. You should burn all of your amplified special attacks when the phase turns to her summoning another character. As much as feasible, use Fatal Blow to get them out of the path as quickly as possible.

Block continuously

Continue to use your fists on Kronika when she emerges. Attempt to block as many assaults as you can, despite how difficult it is. If you detect an attack being telegraphed, pause what you’re doing and dodge/block, then return to Kronika’s face and continue. If you follow all these steps correctly, you will surely be able to beat Kronika.

For more Guides, Tips, and Tricks

You can also check our dedicated Video Games Guides section.

All Boss Fights in Elden Ring – Ranked

We have a list of Elden Ring Boss Fights that are the most difficult for you to beat. Read the list and see which boss is the toughest.

Elden Ring provides quite a bit of difficulty in defeating all of its bosses, so that shouldn’t surprise anyone. Anyone who has played past FromSoftware games will recognize it since it frequently requires parrying and dodging in order to score a few decent blows. In addition to your combat skills, you can find various ways to defeat even the most challenging bosses if you are willing to use the various summons and other useful tools available to you.

If you prefer melee combat, however, you’ll find many of the bosses far more difficult than those in other FromSoftware titles. Since Elden Ring has a format that allows players to leave a boss battle anytime they like and returns at a later time, you can come back stronger and take on the boss again. In the below guide, we have ranked all Elden Ring Boss Fights.

Elden Ring Boss Fights

There are lots of bosses in Elden Ring. Elden Ring has a lot of bosses to battle because it’s a Soulsborne game. A minor or major boss may be found in almost every location, bringing the total number of bosses to well beyond 50.

While the majority of bosses are simple, a handful will pose a challenge to users. Because this is an open-world game, FromSoftware made sure that the difficulty is appropriately adjusted so that players don’t have to spend a long time attempting to complete it. Below are some of the most difficult bosses you will face in the game.

Rennala: Queen of the full moon

Rennala Queen of the full moon
Rennala Queen of the full moon (YouTube)

As you may know, Rennala is a boss fight that involves puzzles. During the first phase, the goal is to work out the gimmick and execute it enough times to consistently move on to the second phase, which is where the real fight takes place. That being said, the first phase is so straightforward that you may let your guard down, only to become overwhelmed in the second phase. You shouldn’t do this, and you should spend as few healing items as possible in this phase. This puzzle boss fight makes it difficult to win.

Red Wolf of Radagon

Red Wolf of Radagon In Elden Ring
Red Wolf of Radagon (YouTube)

The Red Wolf of Radagon is a fast-moving enemy with a specific attack technique that Dark Souls players will immediately recognise. The Red Wolf of Radagon is a fast-paced boss encounter that requires players to concentrate and think quickly in order to face this foe. It wields a blazing sword in its jaws and swings it about. This is also one of several creatures that may be encountered multiple times during the game, with each iteration being faster and more agile than the previous.

Read Elden Ring Golden Scarab Guide – How to obtain, uses, and more

Flying Dragon Agheel

Flying Dragon Agheel Elden Ring Boss Fight
Flying Dragon Agheel (YouTube)

While traveling through Elden Ring, players will encounter many dragons including Agheel, the Flying Dragon. A dragon embodies everything we expect from Soulsborne, and Agheel is no exception. From flying through a burnt forest exhaling fire to stomping and tail whipping players, Agheel forces you to charge in and get close. Agheel certainly does not make this easy and is a formidable opponent. 

Cemetery Shade

Elden Ring boss, Cemetery Shade
Elden Ring boss, Cemetery Shade (YouTube)

Cemetery Shade is a gloomy dungeon monster who cuts players with long shadow weapons and travels rapidly. He’s one of the list’s most aggravating employers. This monster has earned a reputation within the community for instantaneously killing players who have been struck too many times due to its bleed stat in its strikes. 

This boss also has multiple skeleton warriors supporting it throughout the entire encounter, which makes it even more annoying as players have to deal with multiple enemies in addition to a boss that deals a lot of damage.   

Read How to get Nokron Elden Ring – Guide

Morgott the Omen King

Morgott the Omen King
Morgott the Omen King (YouTube)

In terms of visual design, Morgott and Margit are very similar, however, Morgott is by far stronger and more aggressive than Margit. Morgott’s quick-paced aggressiveness and long-lasting magical arrows make the boss fight extremely challenging. As one of the most dangerous bosses in the game, Morgott is not something to rush through since most of his attacks are capable of one-shotting players, as well as providing players with a variety of combo attacks that spell doom at every turn. 

Godfrey, First Elden Lord

Godfrey, First Elden Lord
Godfrey, First Elden Lord (YouTube)

The First Elden Lord, Godfrey, is one of the game’s most aggressive bosses. He has a large battleaxe that deals a lot of damage to the player, and his shockwave stomping is not only one of his most frequent attacks. His technique is to combine heavy swings with them, causing the players to have trouble reacting. The second phase of this battle features Godfrey abandoning his weapons, charging directly toward the player, and unleashing a series of combo attacks. 

Read Elden Ring – Which Keepsake Should You Pick

Maliketh, the Black Blade

Maliketh, the Black Blade boss
Maliketh, the Black Blade (YouTube)

The Beast Clergyman boss battle is divided into two segments, Maliketh and the Black Blade, with a considerable difference between them. Maliketh, in addition to launching a range of AOE strikes, glides around the stage in such a way that players will be overwhelmed and wonder how they will be able to get near enough to hit him.

Crucible Knight Ordovis

Crucible Knight Ordovis
Crucible Knight Ordovis (YouTube)

Veteran Soulsborne players will get a glimpse of a particularly iconic Dark Souls duo in a boss encounter with Crucible Knight Ordovis. In the Crucible, Ordovis and his fellow Knights face off in a dual boss encounter with their unique attack patterns. Regardless of the build they utilize, both knights are highly powerful and can cause massive amounts of damage to opponents. For any build, this makes them exceedingly difficult to take down.

Starscourge Radahn

Starscourge Radahn Elden Ring Boss fight
Starscourge Radahn (YouTube)

The strongest demigod in the world is Radahn, the ferocious warrior. Obviously, the boss fight takes place on a huge battlefield. Immediately after the battle starts, players will see Radahn shooting gravity spell-infused arrows from afar.

General Radahn, the Conqueror of the Stars, is the subject of one of the game’s most unusual and ambitious boss fights (also known as Starscourge Radahn). This boss is one-of-a-kind since it is more of a raid than a regular fight. Elden Ring is most likely the first in the series to do anything like this. Users will be able to summon several NPCs for help during combat.

Malenia, Blade of Miquella

Malenia, Blade of Miquella Elden Ring boss fight
Blade of Miquella, Malenia (YouTube)

Malenia, Blade of Miquella, despite not being the largest boss in the game, seems to be among the toughest. Her second phase delivers attacks with a wide range, and her attacks are often faster than her first phase. Besides producing copies of herself, Malenia also releases a huge rot bloom attack, which takes a lot of time to disperse and can kill players very quickly.

For more Guides, Tips, and Tricks

You can also check our dedicated Video Games Guides section.

Hitman Sniper: The Shadows Guide – Things You Should Know

Are you a sniper fan and love to be a hitman? Then this game is for you. Read our Hitman Sniper The Shadows guide to know more.

A wholly original Hitman story sets the scene for Hitman Sniper: The Shadows, an action-based role-playing game. The events surrounding the disappearance of Agent 47 are the focus of Hitman Sniper: The Shadows. A new criminal network threatens global stability in this game, which features a storyline about a group of assassins that call themselves The Shadows.

You must travel around the globe as a member of The Shadow, eliminate targets with stealth and creativity, and compete with other Shadows throughout the world. As an elite agent with the International Contract Agency (ICA), you must additionally build your reputation. The below Hitman Sniper The Shadows guide will help you to learn everything in the game.

Read Brothers A Tale of Two Sons Guide – Best Tips and Tricks

Hitman Sniper The Shadows Guide: Agents

Six sniper assassins are featured in Hitman Sniper: The Shadows, each with their own story, gameplay method, personality, and abilities. With this diversity, players can approach the game and each contract with greater freedom and flexibility. Below is a breakdown of the six agents:

Knight

Agent Knight in Hitman Sniper the shadows
Agent Knight (Square Enix)

You’ll start the game with this agent. Knight, a seasoned survivalist, is both charming and cunning. Posing for a good-looking headshot filled with anti-government propaganda brings her immense joy and pride. Her ability is headshot master, and her weapon is the Sintac Inc. S200. The ability will display an area in your scope where you can headshot anyone within the range with your next shot.

Stone

Agent Stone in Hitman Sniper the shadows
Agent Stone (Square Enix)

Stone has a criminal record and the skillset of a skilled assassin despite being an innocent man. As a means of surviving, he took on a new identity and began to engage in assassinations. His ability is Timed proximity mine. When you use this ability, the next shot will spawn a mine that lures enemies within a wide radius and explodes after a short timer when enemy guards get close enough to trigger it. He uses Precision Global, Mcax as his weapon.

Kolzak

Agent Kolzak in Hitman Sniper the shadows
Agent Kolzak (Square Enix)

Kolzak is a very talented assassin whose skills are constantly developed, in addition to being highly trained. He wants to remain in the background and let his reputation speak for itself. Contagion Round is his talent. When your next shot hits a character, it poisons the body and disposes of it. Anyone who explores the poisoned body will become infected. He employs Marincorp and Parragon SVD.

Espelho

Agent espelho in Hitman Sniper the shadows
Agent Espelho (Square Enix)

Espelho is antithetical to the stereotype of a sniper. However, he is far from innocent. Despite his engaging smile and undying enthusiasm, he is a laser-accurate assassin who routinely makes split-second decisions and rarely misses a shot. His ability is Incendiary Round. The next shot you take will create an incendiary area of effect that will burn and kill anyone caught inside, preventing anyone from walking through it. He uses YHK TIA, NRF-114N.

Soji

Agent Soji in Hitman Sniper the shadows
Agent Soji (Square Enix)

Despite her diminutive size, Soji is a force to be reckoned with, and her dedication is undeniable. As Soji grieves for her brother’s murder, she channels her revenge-fueled rage down the barrel of her rifle. Acid Round is her ability. Anyone who enters the area will be suffocated, killed, and disposed of by your next shot. You will dispose of an enemy directly by shooting them. She uses Raifuru, K65 Tactician.

Kiya

Agent Kiya in Hitman Sniper the shadows
Agent Kiya (Square Enix)

Kiya served with the Anti-Terrorism Squad for over twenty years, and he is the sole survivor of his squad’s massacre. He pushes the limits of every contract he signs, with nothing to lose. His aim is to make each shot count. His ability is lightning round. A subsequent shot has a chance of electrocuting an enemy or chaining it to a nearby enemy. You can electrify an area just by aiming at the ground, which will electrocute all inside the area.

Read Best Guns in Fortnite Ranked – February 2022

Hitman Sniper The Shadows Guide: PvP mode

New PvP mode
PvP mode (Square Enix)

PVP mode has been added to the Hitman Sniper series. In addition to leveling up agents and accepting new contracts, the game contains a PVP-style mode. In this mode, two players compete in high-scoring combat. Another player will be your opponent. In this race against time, targets must be eliminated and optional objectives completed. It shares much of the same model as the campaign, but when you see your opponent’s score at the top, you become more competitive. 

This feature is amazing as it is something new to the series. The rest campaign mode is almost similar to the previous game, so the fans would love to see this new feature that they can explore.

It is a scoring game

Gameplay in Hitman Sniper: The Shadows is focused on scoring. Apart from hitting all your objectives, you want to earn the best possible rewards by getting the highest score possible. You have numerous opportunities to increase your score. If you lure a victim, move him to a fatal location, kill him accidentally, dispose of his body, use your special ability, and kill multiple targets; you will get bonus points. 

Taking note of your agent’s expertise will go a long way to help you earn a big score. Your agent might be great at taking headshots, so every time you hit a target, you’ll earn a lot of money. The same is true for accidental kills, multi-kills, and so forth. 

Read What are PS5 Treat Codes and how to get them?

Hitman Sniper The Shadows guide: New Locations

new locations
New locations in the game (Square Enix)

The game introduces various locations, each with its own unique viewpoints and times of day. Players will have additional options and opportunities to remove targets as a result of this. Each place has its own set of goals and functions as an exploration habitat, a unique storytelling area with its own set of problems.

Be aware of your objectives

Objectives in the game
Objectives (Square Enix)

Consider your objectives and change your tactics accordingly instead of playing the same way on every assignment. As a general rule, you should aim at your target after you’ve taken care of everything else at the end of the mission because the work ends shortly after that person dies. If you take the objectives seriously, you will avoid losing out on important details.

For more Guides, Tips, and Tricks

You can also check our dedicated Video Games Guides section.

What are PS5 Treat Codes and how to get them?

Are you a PlayStation fan? Do you want a PS5 for free? You will need the PS5 treat codes. Read everything about it in our guide.

PS 5 is still a rare sight in retail stores after more than a year of next-gen consoles. The worldwide shortage of components has rendered the latest generation of consoles a rare piece of gaming equipment, requiring most players to purchase a PS5 from scalpers. PlayStation 5 fans still without a PS5 will find a glimmer of hope via an event that Sony launched recently, but it requires more than luck.

Players will be invited to a code hunt in the Treat Codes event, as Sony released 14 codes around the world to enter the contest. Users can enter these codes and have a chance to win a PlayStation 5 directly from Sony with 14 opportunities. However, these codes can be hard to find. Here is everything you need to know about the PS5 treat codes.

How do PS5 treat codes work?

To open the widget, click the “Enter code” button and enter your PlayStation Network ID. The Official Rules contain terms and conditions that must be agreed upon before codes may be entered. You may input a code in the widget using the ‘Enter code’ button. When the code is accurate, the related quest will unlock a question.

If you properly answer the question, you will be eligible to win a PlayStation 5. To confirm that you’ve submitted your submission, you’ll see a crown symbol next to each assignment you’ve completed. Each code you find boosts your chances of winning a PS5, thus the more codes you find, the better your chances. Below are all the treat codes with answers that might be correct.

PS5 Treat Code 1

  • Code: L2, Triangle, R1, Circle, L1, X, left d-pad, right d-pad, R2, Square
  • Question: During December 2021, how many hours of games did players play on their PS4 console globally?
  • Answer: 15000000000

PS5 Treat Code 2

  • Code: L2, R2, Triangle, R1, L1, Circle, left d-pad, X, Square, right d-pad
  • Question: During December 2021, how many times did players log into their PS4 console globally?
  • Answer: 5000000000

PS5 Treat Code 3

  • Code: Triangle, R2, left d-pad, Circle, L2, right d-pad, X, L1, R1, Square
  • Question: During December 2021, how many hours did players play Uncharted 4: A Thief’s End globally? (PS5 and PS4)
  • Answer: 1500000

PS5 Treat Code 4

  • Code: L1, Triangle, L2, right d-pad, R2, Circle, left d-pad, X, Square, R1
  • Question: During December 2021, how many hours did players play “NBA 2K22” globally? (PS5 and PS4)
  • Answer: 10000000

PS5 Treat Code 5

  • Code: Triangle, Circle, L1, right d-pad, X, left d-pad, R1, Square, L2, right d-pad
  • Question: During December 2021, how many hours did players play Horizon Zero Dawn globally? (PS5 and PS4)
  • Answer: 2000000

PS5 Treat Code 6

  • Code: R1, Triangle, R2, L2, Circle, left d-pad, X, L1, right d-pad, Square
  • Question: During December 2021, how many hours of games did players play on their PS5 console globally?
  • Answer: 12000000000

PS5 Treat Code 7

  • Code: Triangle, right d-pad, Circle, L1, X, R2, left d-pad, Square, L2, right d-pad
  • Question: During December 2021, how many hours did players play God of War globally? (PS5 and PS4)
  • Answer: 1800000

PS5 Treat Code 8

  • Code: L2, R2, Triangle, Circle, left d-pad R1, right d-pad, X, Square, L1
  • Question: During December 2021, how many hours did players play Marvel’s Spider-Man globally? (PS5 and PS4)
  • Answer: 2500000

PS5 Treat Code 9

  • Code: Triangle, left d-pad, Circle, L1, L2, X, Square, R2, R1, right d-pad
  • Question: During December 2021, how many hours did players use the “YouTube” app globally? (PS5 and PS4)
  • Answer: 2500000

PS5 Treat Code 10

  • Code: Triangle, R1, <, R2, Circle, >, X, L1, Square, L2
  • Question: During December 2021, how many hours did players play “FIFA 22” globally? (PS5 and PS4)
  • Answer: 14000000

PS5 Treat Code 11

  • Code: >, <, R2, Triangle, Circle, L2, X, Square, >, <
  • Question: During December 2021, how many hours did players play “Gran Turismo Sport” globally? (PS5 and PS4)
  • Answer: 800000

PS5 Treat Code 12

  • Code: L1, Triangle, Circle, >, X, L1, <, Square, >, <
  • Question: During December 2021, how many hours did players play “Ratchet & Clank: Rift Apart” globally? (PS5 and PS4)
  • Answer: 1000000

PS5 Treat Code 13

  • Code: R1, >, Triangle, L1, Circle, X, R2, Square, L2, <
  • Question: During December 2021, how many times did players log into their PS5 console globally?
  • Answer: 2500000000

PS5 Treat Code 14

  • Code: <, L2, Triangle, >, Circle, R2, X, Square, R1, L1
  • Question: During December 2021, how many hours did players use “Spotify” and “Apple Music” apps globally? (PS5 and PS4)
  • Answer: 3000000

Keep in mind

PS5 console
PS5 console (Sony)

Each code you find can only be submitted once. You can therefore enter up to 14 codes if you find them all. For each Participating Group, there are three consoles available to win, resulting in a total of nine consoles available to win for every Participating Group. Among the three Entrants in each Participating Group with the closest correct answer, three will be deemed, Potential Winners.

For more Guides, Tips, and Tricks

You can also check our dedicated Video Games Guides section.