Raid Shadow Legends Skullcrusher Guide – Best Build For PvP and PvE

We have brought you the Raid Shadow Legends Skullcrusher guide. We have also given the best build for PvP and PvE.

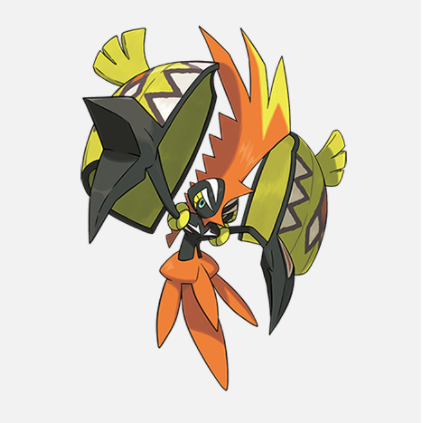
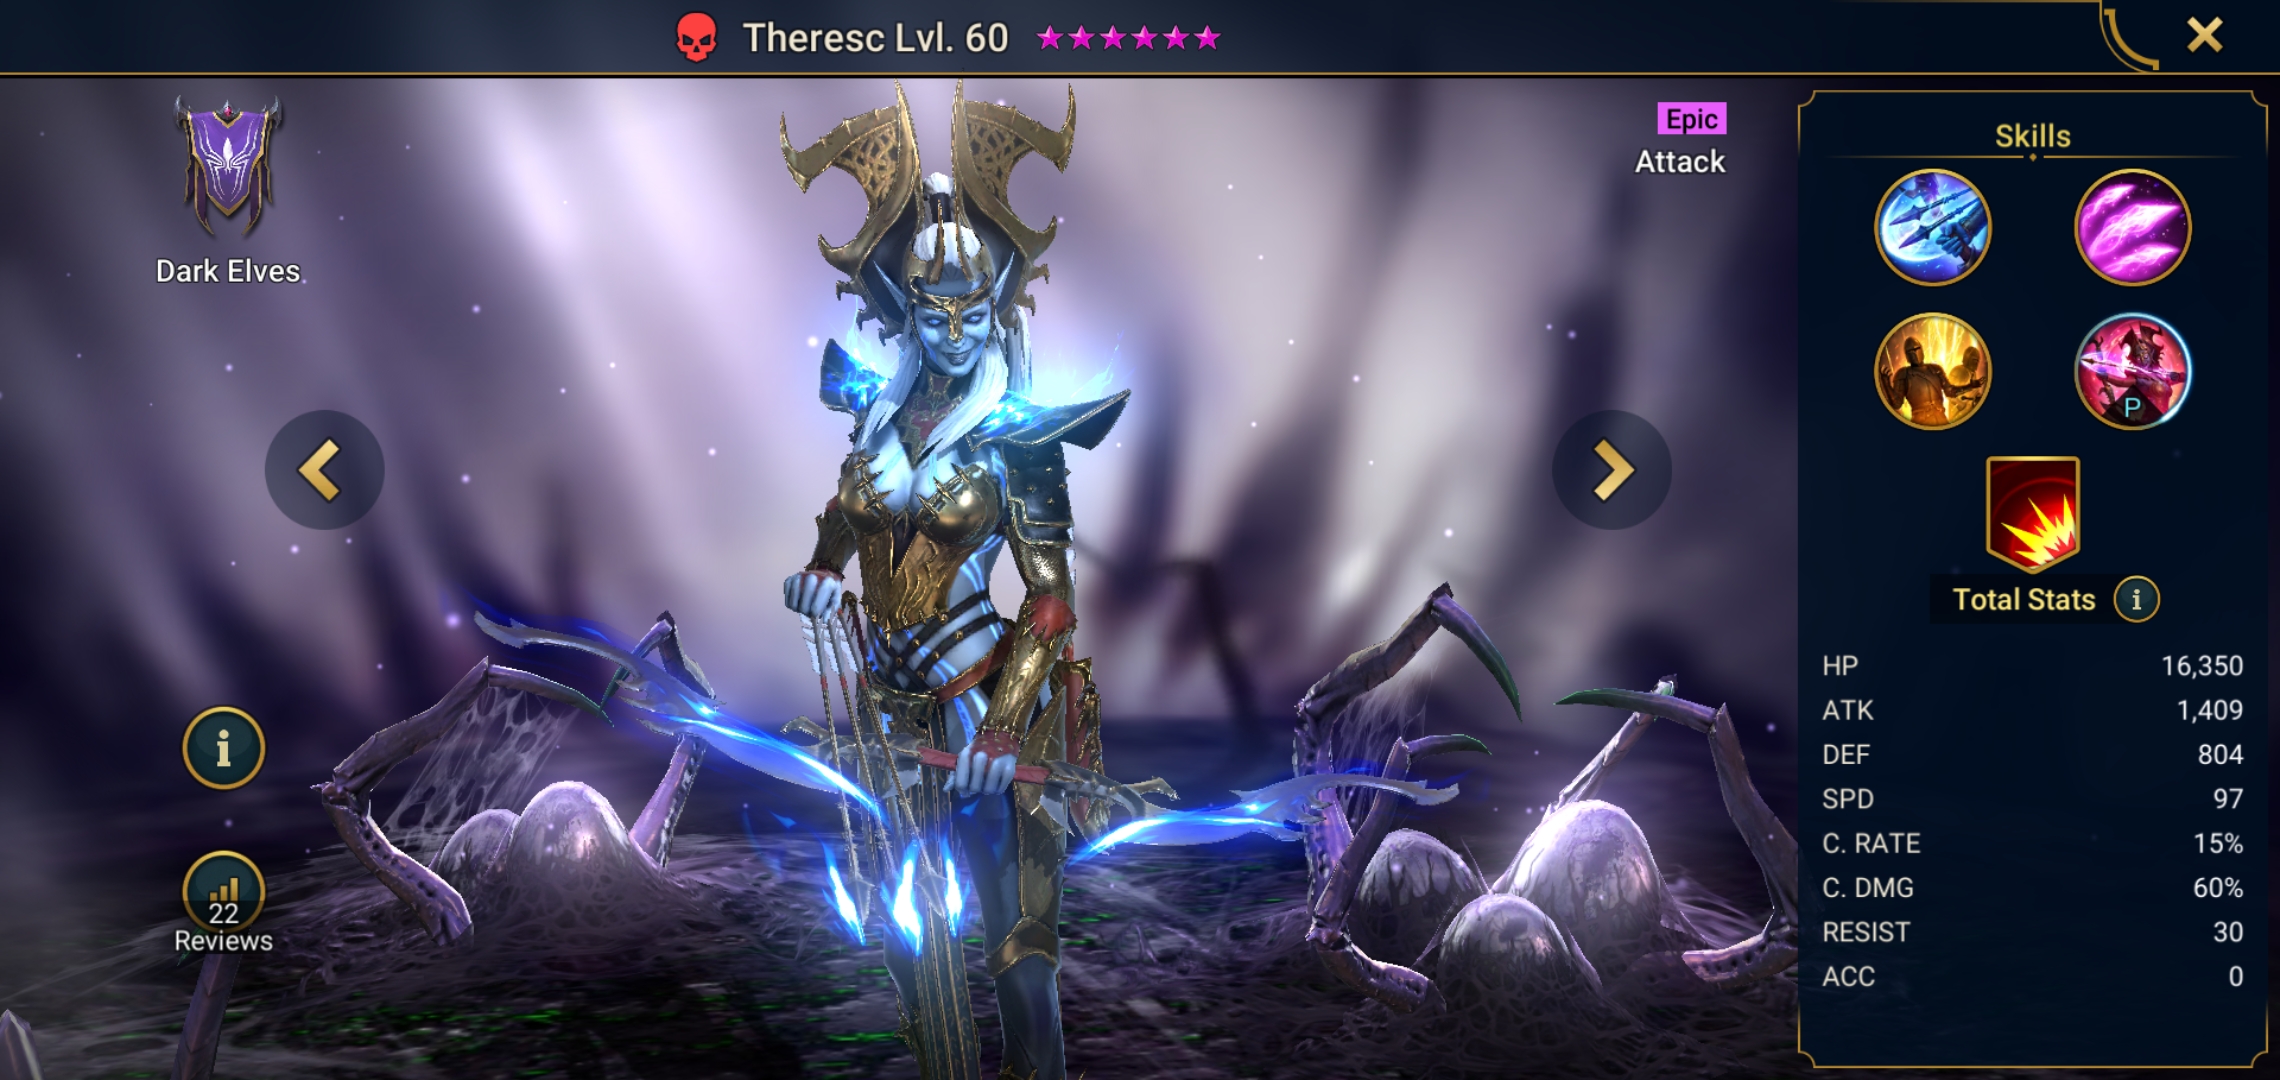
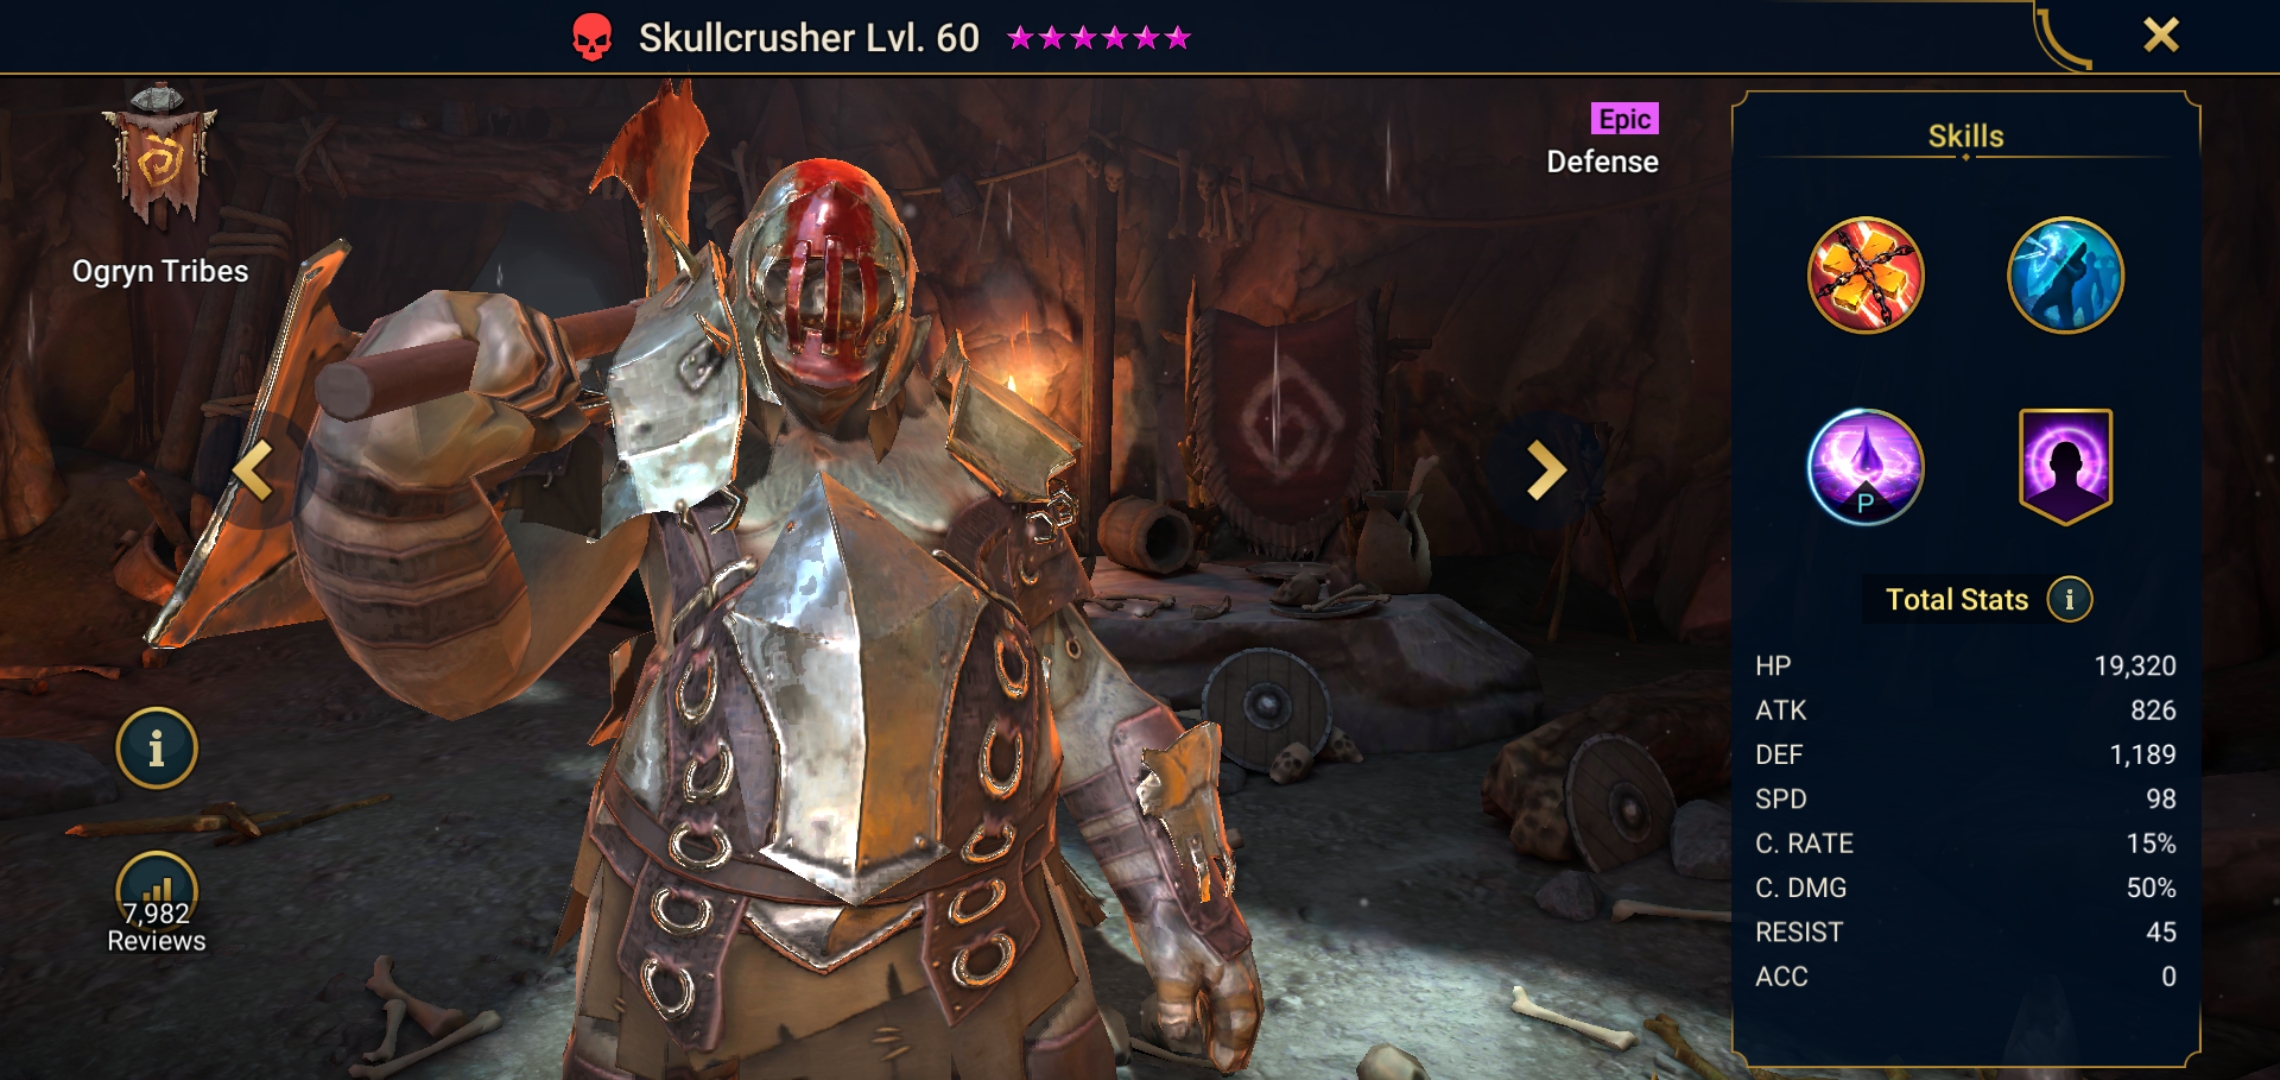
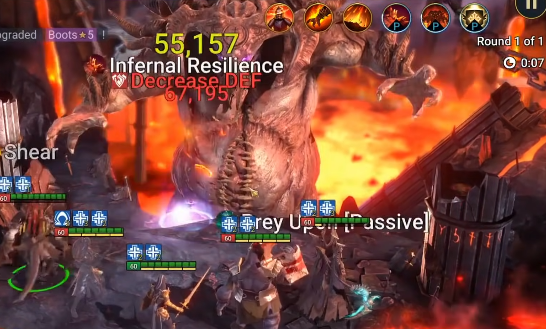
The Ogryn Tribes’ epic, Skullcrusher, is a Force affinity epic. Due to the buff he provides, he is the only epic champion with a counterattack, which is why he is one of the most desired champions in Raid: Shadow Legends. This buff is a tried and tested technique for dealing massive damage against the Clan Boss. Clan Bosses are the best place to obtain skill books and shards. 

As far as Raid: Shadow Legends is concerned, only two other champions have full-team counter-attacks, and those are Martyr and Valkyrie, two Legendary champions. Besides his counter-attack buff, Skullcrusher also gives the team an Ally Protection buff as well as an Unkillable buff to himself. This enables your team to stay alive for a longer period of time. Below is our Raid Shadow Legends Skullcrusher guide that will help you to learn more about this champion.

Skullcrusher gameplay
Skullcrusher gameplay (YouTube)
Read Raid Shadow Legends Ninja Guide – Best Tips and Tricks

What are Ogryn Tribes

The Ogryn Tribes are Subhuman giants with enormous bellies and strength, yet they are lazy, dumb brutes that are easily enslaved. Nonetheless, these terrible giant oafs frequently demonstrate that raw power and stupidity often triumph. They govern Felwin’s Gate, which leads into the Kingdom of Aravia, together with the Skinwalkers.

Raid Shadow Legends Skullcrusher Guide: Skills

Smash

His Attack 1 is Heal reduction, but it’s only a minor version, so you don’t want him to use it, especially against clan bosses. Skullcrusher landing heal reduction, on the other hand, is quite handy if you’re having trouble dealing with fire Knights. So it all depends on how you want to utilize him. 

But, for the most part, he won’t want to land heal reduction because he’s mostly employed in clan bosses. Everyone likes defensive-based champions, therefore he does all of his damage on defense. It implies they take less damage while still dealing a lot of harm.

Stonewall

In terms of his A2, Stonewall gives all allies except this champion a 50% Ally Protection bonus for two turns. For two turns, all allies except this champion get a Counterattack bonus. This champion gains the Unkillable boost for 1 turn.

Because of the allied protection and shared damage, you effectively tank this champion up, allowing your attack dealers to stay alive in engagements for longer. It also lets them to counter-attack, which makes him unkillable if they’re wearing lifestyle gear, which heals and backups him anyhow. As a result, once he’s suffered all of the allied protection damage, he’s unkillable. It is really tough for him to die.

Read Raid Shadow Legends Scion Guide – Best Tips and Tricks

Unshakeable (passive skill)

Raid Shadow Legends Skullcrusher skills
Skullcrusher (Plarium)

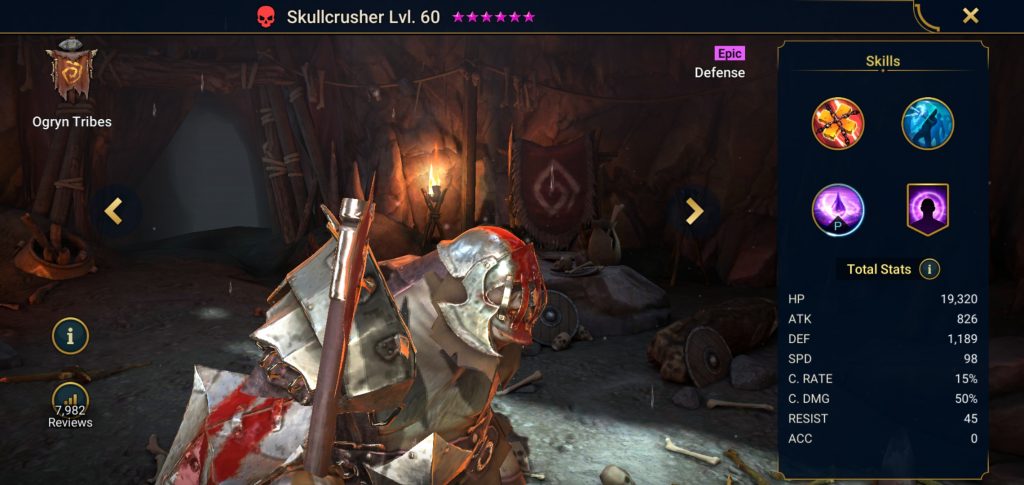
For the arena, his passive is really quite cool. At the start of each turn, it reduces the duration of all debuffs on this champion by one round. He can’t be stunned out of the game, and he can’t be frozen out of the game either. You know you can’t keep him out of the game by making him sleep. He just starts to self-cleanse those deep buffs.

Stunned by the clan boss is the only danger here. Furthermore, if the clan boss stuns him, he will not regain his cooldowns. You don’t want him to be taken down by clan boss since he still doesn’t have his cooldowns.

Raid Shadow Legends Skullcrusher Guide: Best build for PvP

Skullcrusher is not recommended for PvP, however, here are the builds you can go with:

  • Blastproof (defense)
  • Rejuvenation (defense)
  • Deadly Precision (offense)
  • Keen Strike (offense)
  • Tough Skin (defense)
  • Shadow Heal (defense)
  • Resurgent (defense)
  • Life Drinker (offense)
Read Raid Shadow Legends Theresc Guide – 10 Things you should know

Raid Shadow Legends Skullcrusher Guide: Best build for PvE

  • Bring it Down (Offense)
  • Delay Death (Defense)
  • Solidarity (Defense)
  • Methodical (Offense)
  • Retribution (Defense)
  • Deterrence (Defense)
  • Warmaster (Offense)

Best Artifacts for Skullcursher

Artifacts for skullcrusher
Artifacts for Skullcrusher (Plarium)
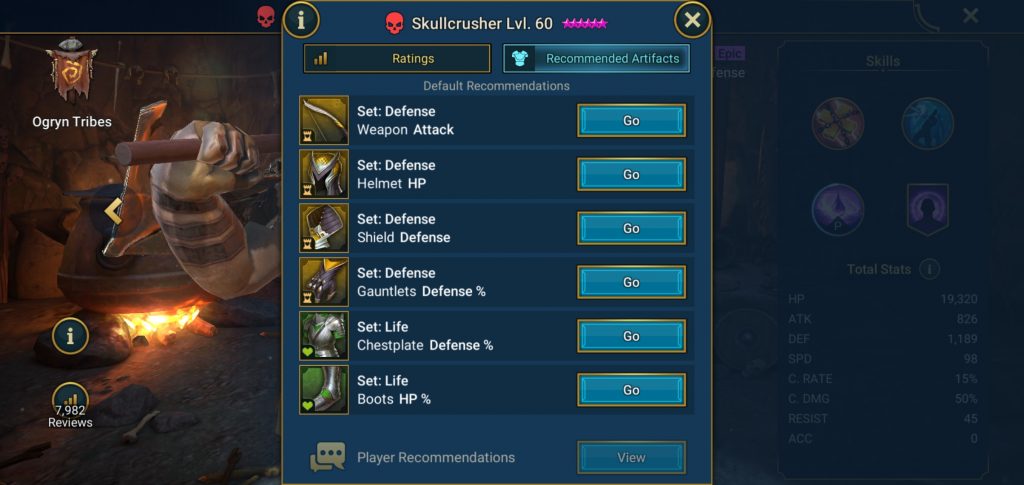
  • Set: Defense, Weapon Attack %
  • Set: Defense, Helmet HP %
  • Set: Defense, Shield Defense %
  • Set: Defense, Gauntlets Defense %
  • Set: Life, Chestplate Defense %
  • Set: Life, Boosts HP %

For more Guides, Tips, and Tricks

You can also check our dedicated Video Games Guides section.

Tapu Koko Pokemon Go – How to beat, Raid Guide, Counters, and more

Here is the Tapu Koko guide that will help you beat Koko, suggest different types of counters, and much more in Pokemon Go.

Throughout your journey outdoors in Pokemon Go, you will run into difficult raid Pokemon. Having a strong team by your side is going to be crucial if Tapu Koko is one of them. The reason is that they can be hard to take down if you don’t have the correct setup.

This month, Niantic is about to introduce Gen 7 to the game as part of the next major expansion. But while there will be many new Pokemon Go events and challenges, catching Tapu Koko is guaranteed to be one of the big draws. The Legendary Electric Fairy type will be available in the first Legendary Alolan Raid, according to Niantic. The Tapu Koko guide will help you learn everything about it.

Tapu Koko cannot evolve
Tapu Koko does not evolve (YouTube)
Read How to beat Cliff in Pokemon Go?

Tapu Koko guide: Weakness

As a Pokemon of the Fairy and Electric types, Tapu Koku possesses quite a unique combination. Therefore, it is weak against Ground-type and Poison-type moves. Both of these move types deal twice as much damage. If you want to take it down easily, you should use these types more often.

Read How to Beat Kyurem in Pokemon GO – Best Counters, Strategies, and more

Tapu Koko guide: Counters

Tapu Koko battle
Tapu Koko gameplay (YouTube)

Pokemon Go is getting Tapu Koko this week, but the Legendary Alolan won’t be roaming the wilds. The game’s Raid system requires some preparation, so you’ll need to plan accordingly. The best time to try and catch Tapu Koko will be between March 2 and March 9 during two special Raid Hours.

These are taking place between 6 p.m. and 7 p.m. local time, although Tapu Koko, an upcoming five-star Raid boss, will also be part of this event. The game will have Tapu Koko available from today until Tuesday, March 15, 2022. It is unlikely that Koko will be a shiny Pokemon, so you will have to wait for an announcement about this opportunity in the future.

Thus, Mega Gengar, Mega Beedrill, Shadow Mamoswine, Excadrill, Rhyperior, and Landorus Therian are the best Pokemon Go Tapu Koko counters.

You can use the following combos too:

  • Excadrill – Mud-Slap and Drill Run
  • Groudon – Mud Shot and Earthquake
  • Rhyperior – Mud Slap and Earthquake
  • Mega Beedrill – Poison Jab and Sludge Bomb
  • Mega Mamoswine – Mud-Slap and Bulldoze
  • Krookodile – Mud Slap and Earthquake
  • Mega Victreebel – Acid and Sludge Bomb
  • Mega Charizard Y – Ember and Blast Burn
  • Golem – Mud Slap and Earthquake
  • RoseRade – Poison Jab and Sludge Bomb
  • Mega Aerodactyl– Rock Throw and Earth Power

How to beat Tapu Koko

Tapu Koko gameplay
Tapu Koko gameplay (YouTube)

Tapu Koko is a Pokemon that is vulnerable to Ground and Poison-type attacks because it is an Electric and Fairy-type Pokemon. To take down Tapu Koko swiftly, you’ll need to bring a team of Pokemon that can use those move types.

If you’re running out of Pokemon to throw at Tapu Koko, simply make sure you don’t bring any Pokemon with Bug, Dark, Dragon, Electric, Fighting, or Flying-type attacks. Tapu Koko is impervious to all of them, especially Dragon. Due to their high resistance to Electric-type attacks, Ground Pokemon will be the best choice.

For more Guides, Tips, and Tricks

You can also check our dedicated Video Games Guides section.

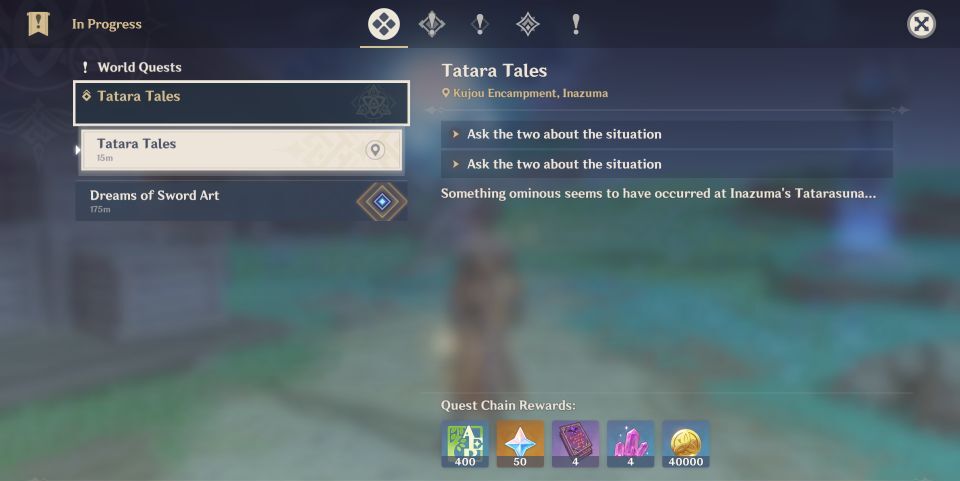
Genshin Impact Tatara Tales Quest Guide – Complete Walkthrough

We have brought you the Genshin Impact Tatara Tales quest guide. The complete walkthrough will help you finish the quest easily.

Tatara Tales is a global quest that is part of Genshin Impact 2.0. Tatarasuna is on the lookout for information concerning Inazuma’s actions. When you arrive in Inazuma, the first thing you should do is explore all of the new locations Genshin Impact has to offer. Once you reach to Kannazuka Island, you’ll discover that a large chunk of the island is protected by an electrical shield, and you won’t be able to explore it.

To break down one of the region’s longest tasks, you’ll need to start with the Tatara Tales. The game can be a little confusing to finish, especially after you understand that Tatara Tales is related to real-world time halfway through. The below Genshin Impact Tatara Tales Quest guide will help you to solve it with its complete walkthrough.

Talk to Miyuki
Conversation with Miyuki (YouTube)

Tatara Tales Quest Guide: How to start

To begin the quest, head to Kujou Encampment on the map. Miyuki and Toranosuke are having a talk. After Toranosuke and Miyuki’s talk, you should speak with them to figure out what’s going on. You must talk with Xavier as soon as you reach the edges of the Mikage Furnaces shield.

Mikage Furnace

The Mikage Furnace can be observed in three different locations, all of which are marked on the map.

  • In one of the observation areas, Fatui surrounds the area. In order to investigate the marked spot, you must defeat the Fatui first.
  • It’s more difficult to observe the second spot. The electrogranum must be obtained first, then the thunder sphere has to be used directly above you.
  • To reveal the observation marker, glide towards the electro-seelie on the rift ahead of you. Once you have examined the matter, you can proceed.
  • The beach area is the last stop before you reach your destination. Observe the furnace with an electrogranum by going through the thunder barrier.
  • Report back to Xavier when you’re done. A map of the Kamuijima Cannon will be given to you.

Activate Kamuijuma Cannons

Kamuijuma Cannons locations
Canon locations (YouTube)

The rift can be destroyed with three cannons in total. A map shows which one to use. It’s located south of Kujou Encampment.

  • At the waypoint, the cannon is located. Either electro status should be applied or the electrogranum must be used to activate the cannon. The electrogranum can be summoned before using it. Aim the cannon at the rift and it will be destroyed. It can be aimed at different heights and directions. It will go farther if you aim higher.
  • Visit the waypoint south of the previous cannon to get to the second cannon. Operate it with electrogranum once again.
  • There is also a third cannon in Kujou Encampment/north of the first cannon. This cannon is on the cliff. You can use it to close the final rift.
  • When you’re finished, report back to Xavier.

Take a picture of Mikage Furnace

Now we must approach the Mikage Furnace. Look at the map to see where it is. You may now get in all the way from Xavier’s position because the barrier has been removed. Continue ascending the tower until you reach the top. Climb the tower all the way to the top. At the summit, you can locate a location near the Mikage Furnace. Take a photo, then return to Xavier to show him the photo. The quest has come to a conclusion.

take pictures
Give picture to Xavier (YouTube)

Tatara Tales Quest Guide: Priority Investigation

In this series, the second quest is Priority Investigation. After completing the previous quest, you can begin this quest immediately. Speak with Xavier to begin. He will ask you to place three beacons this time, all in the same area. Each beacon’s location is marked on the map. 

  • You can go directly from Xavier’s location, just like before. You will soon find the first beacon point. After crossing the bridge, head for the tower.
  • The second beacon should be placed at the top. In this quest, you’ll find the same spot you took the previous photo of.
  • It is simply a matter of gliding down from the last beacon. It is located at the bottom.
  • Xavier must be notified when you are finished. This concludes the quest.

Tatara Tales Quest Guide: Purification Device

On the following day, you will get the third quest. You can begin it by talking to Xavier again. You only need to give him three portions of Crystal Marrow to complete the quest.

Tatara Tales Quest Guide: Data Collection

Data Collection is the next sub-quest. Talk to Xavier again to begin it. At first, you had to place all the beacons. Now all you have to do is collect them from the same spots where you placed them. Report back to Xavier to end the quest when you have collected all three beacons.

Tatara Tales Quest Guide: Process is everything

Tatara Tales Quest Guide for Process is everything
Process everything (YouTube)

Taking photos of Mikage Furnace is required for the next task. On the map, you can find two places to take photos. 

  • You can reach the bottom of the area by going straight all the way from Xavier’s location. A marked spot will be visible there. Make sure you look up at the top and take a picture. 
  • It’s quite simple for the second one. Take a picture of the furnace. 
  • Complete the quest by returning to Xavier and submitting the two photos.

Tatara Tales Quest Guide: Functional Test

Next, we have an easy sub-quest. Xavier only needs three Onikabuto from you. Electro-saturated areas tend to have these bugs on trees. This concludes the quest.

Tatara Tales Quest Guide: Final Preparations

The first thing you need to do is collect planks. To get to the planks, you have to walk straight from Xavier’s location. You will find a Mirror Maiden near the planks. You then need to restore the paths/bridges after picking up the planks. A map shows all the locations. Xavier is right next to the bridge that contains the first two parts. The last part is located across another bridge. Gliding is the easiest way to get there. 

The Last Act

tatara tales the last act
The Last Act (YouTube)

This series concludes with the Last Act. The quest begins with Xavier. Go to Mikage Furnace this time. On the map, you can see its location. Basically, it’s on one of the bridges. Find all the missing parts after talking to him. Near Xavier’s back, they’re all standing near him.

It is possible that some Fatui members spawn there. Dig deeper into the furnace once you have collected all the parts. Talk to Xavier as you approach the area to find out how you can defeat the Fatui members. Once you have defeated them, speak to Xavier again.

After that, head to the furnace’s bottom. The Purification Device must be activated before you can fight the Fatui. Six opponents will participate in the fight, including the usual Fatui members, the Fatui pyro agent, and the Mirror Maiden. Be careful when you are near the balethunder, as it may be dangerous. You can protect yourself by using the electrogranum. Take a look at the situation from the top of the furnace after beating them. Your quest is complete.

For more Guides, Tips, and Tricks

You can also check our dedicated Video Games Guides section.

Genshin Impact Bennett Guide – Tips, Tricks, Weapons, Artifacts, and more

Here is the Genshin Impact Bennett guide with all the tips and tricks to help you understand the character more.

Bennett is a Pyro in Genshin Impact with a 4-star rating. He is without a doubt one of the game’s greatest supporting characters. He not only heals your warriors, but he also increases their assaults! However, in order for him to perform properly, you must carefully select his equipment.

Bennett is a good supporter, caring for and motivating his teammates at the same time. He is a natural fit for practically any squad. You can profit from the elemental resonance Flames of Fervour by playing another Pyro hero, which decreases Cryo effects by 40% and raises ATK by 25%.

Bennett
Bennett (YouTube)

A member of the Adventurer’s Guild in Mondstadt, Bennett leads Benny’s Adventure Team. Having been left an orphan by his parents, he was raised by a group of elderly adventurers. Bennett suffered misfortune throughout his entire life, and everyone around him also suffered. Despite these setbacks, Bennett remains passionate about helping others and seeking adventure, no matter the risks.

Read Genshin Impact Noelle Guide – Weapons, Artifacts, and more

Genshin Impact Bennett Guide: Strike of Fortune

Strike of Fortune, his normal attack, deals with 5 consecutive hits at an enemy. He produces average damage in comparison with other sword users. As a support build, Bennett’s normal attack isn’t viable enough to justify its inclusion. If you plan to use him as a DPS unit, it may be worthwhile to level him up.

Charge multiple attack with the Elemental skill 

Genshin Impact Bennett combat
Bennett gameplay (YouTube)

Bennett’s elemental skill, Passion Overload, allows him to strike his enemy with a swift and fiery attack. There are multiple levels to this attack. A fire strike is triggered by holding the button down. Depending on the level, holding down the skill button will cause him to strike 2-3 times. Depending on his charge level, his cooldown will also vary between 5 seconds and 10 seconds. This elemental skill allows him to replenish his elemental burst with energy. 

His ascension talents further reduce the cooldown of the ability. Using his Level 2 charge has a drawback, as Bennett and every enemy hit will be launched back after using it. While being launched back, Bennett doesn’t suffer any damage. However, the drawback is minimized by Bennett’s Ascension 4 talent.

The elemental burst is the best among all his skills

Fantastic Voyage, Bennett’s elemental burst, is going to be the focal point of most of Bennett’s build. Initially, he will create an initial Pyro burst, which will last for 12 seconds. As long as a player’s health is above or equal to 70%, every ally within this field will gain an ATK bonus. Bennett’s base ATK and HP will be used to determine the HP regeneration and ATK bonus. There is a 15-second cooldown, but 60 energy must be expended. 

Bennett’s elemental burst can be difficult to use without his first constellation because you have to watch your HP%. As a result, his C1 will remove the requirement for HP to calculate his ATK bonus so he can always support his team. The elemental burst that Bennett possesses also allows him to function as a sub healer to restore teammates’ health to 70%. However, your health can never be restored to 100%, so you’ll need a second healer to get your health back.

Read Genshin Impact Stone Slate Puzzle – Bunkoku Enigma Guide

Great for Co-op

Genshin Impact Bennett's basic strike
Bennett gameplay (YouTube)

The ability to buff teammate attacks and heal them simultaneously makes Bennett an excellent choice for co-op play. With his elemental skills, he is also capable of providing reliable support for pyro attacks to break shields. While it might be a hassle to your teammates if he keeps launching back.

Bennett’s passive talents are not of much use, but you can still go for it

The two ascension talents Bennett possesses boost his elemental skill, Passion Overload. He can build up more energy to fill up his elemental burst with the reduced cooldown of both of these talents. The first passive talent of Bennett, ‘It Should Be Safe’, speeds up his expeditions in Mondstadt. If you don’t plan on going on expeditions, this skill isn’t useful because it doesn’t help you in combat.

His second passive talent, Rekindle, reduces the cooldown of his elemental skill and is useful to gather more pyro energy for his burst. His C4 effect also pairs nicely with this talent to increase his damage output.

Boost elemental skills with ‘fearnaught’

fearnaught passive talent
Fearnaught (YouTube)

Bennett’s Ascension 4 talent, Fearnaught, reduces the cooldown of his elemental skill even further when inside the radius of his elemental burst. It will also prevent his elemental skill Level 2 from knocking him back inside his field. Like his Ascension 1 talent, this talent greatly boosts the power of his elemental skill, allowing you to use it more often without the drawback of him being launched.

You will need Constellation 1 

As a result of C1:Grand Expectation, Bennett’s ATK boost will be removed from its HP restriction, and allies within the field will still be able to receive ATK bonuses beneath 70% of their HP. Bennett can provide more stability in his field to teammates with low health, so they can deal more damage and recover health at the same time. The ATK of all units inside the field will also be increased by 20% with this constellation level.

Read Genshin Impact Three Realms Gateway offering guide – All Mirror Puzzles and How to Solve Them

Convert attack into pyro damage

Bennett’s constellation 6, “Fire Ventures with Me,” converts normal and charged attacks into Pyro DMG, and grants everyone in his elemental burst to gain 15% Pyro ATK. In such a constellation, normal attacks might be rendered ineffective against pyro enemies. However, his skill transforms Bennett into a powerful DPS unit with the ability to provide support for himself. Additionally, it will boost the attacks of other pyro users.

Genshin Impact Bennett Guide: play style

Bennett gameplay
Bennett gameplay (YouTube)

It’s now becoming more apparent how Bennett’s play patterns fit into the Genshin Impact metagame. The majority of what he does involves his ridiculously powerful Elemental Burst. By applying Pyro, Fantastic Voyage cleanses negative elements from teammates and deals damage, healing, and buff to their attack. 

Bennett is a viable option in any team composition. His Burst team competitors are the only ones who really care about it. Among other great weapons, you can choose from are the Flute, Lion’s Roar, and the Sacrificial Sword. You can also try Prototype Rancour and Skyrider Sword if you’ve been unlucky with your gacha rolls.

For more Guides, Tips, and Tricks

You can also check our dedicated Video Games Guides section.

Lost Ark Free Mounts and How to Get Them

We have brought you a guide on Lost Ark free mounts and also the method to unlock them. Read the guide carefully and unlock the best free mounts.

Since Smilegate released Lost Ark in South Korea in 2019 so many years ago, the game technically has been around for a few years now. The MMOARPG, however, is now gaining traction internationally thanks to its westernization by Amazon Game Studios.

Arkasia will have companions such as furry creatures and mounts, as is the norm with most MMOs.  Many mounts are available in Lost Ark which can be purchased and used once you decide to use them. The Lost Ark has mounts you can ride, given their various skills and abilities. Because of the abilities and skills that some mounts possess, they can be used in activities or they can be used as part of a photoshoot. In our guide, we will help you to get lost Ark free mounts.

Lost Ark mounts (YouTube)
Read Lost Ark Pest Control Daily Quest Guide

Lost Ark Free Mounts: Yudia, Loghill, Dyorika

Every player who has finished the prologue has this mount, which they may use to ride any of the three horses available: white, black, or brown. It’s the default mount given to players when they arrive in Prideholme, the game’s first city. You may make the horse jump by hitting the Space bar, which increases its speed for a short time.

Lost Ark Free Mounts: Terpeion of Shadow

This mount will be given to all players that log in at least once before March 2nd. They have the option of choosing between white and black. It’s an interesting mount, especially because it flies when you hit the Space bar for a speed boost.

Shadow Wolf

Shadow wolf mount (YouTube)

The Shadow Wolf is a dark variant of the Frost Wolf mount. It may be obtained through building your rapport with the NPC Poppy, who can be found in Shushire’s Icewing Heights. He’s presently the only NPC who gives you a mount if you have a high Rapport level with him.

Red Mane Wolf

The Red Mane Wolf is a random mount found in gold portals in Chaos Dungeons. You can’t obtain it any other way but to farm those dungeons and hope for the best. However, it is still unknown what the drop rates are. When it comes to the remainder of the loot, doing them solo gives you a better chance of earning it.

Gray Stripe Raptor

This mount, which has a distinct appearance, may be obtained by completing the North Vern continent to a 30% completion level. Players will often get entry to this zone once they reach level 50.

Frost Wolf

The Frost Wolf is another mount that players will acquire organically as they go through the game. It will be unlocked after achieving level 50 in the Shushire region and will be awarded for finishing the main quest. As a result, you’ll have to wait.

Read Lost Ark Drumbeat Island Guide – Everything you should know

Moss Turtles: Azure, Green, Yellow

Turtle mount (YouTube)

This mount is becoming increasingly popular. It takes a long time to obtain it, but the quest that leads to it pays you with a lot of money and other items, so it could be worth it. To begin the quest, you must be level 50. It may be found on Turtle Island, which is west of Anikka. 

To get there quickly, purchase a cruise to Changhun Port and manually sail to the Island. Follow the stages of the lengthy questline to the purple exclamation mark. After that, proceed to the Vern Castle and chat with the Luxury Goods Merchant on the city’s southern outskirts. In exchange for the award you obtained for finishing the questline, he’ll offer you a mount.

Cloud Steed

The majority of the secondary missions were neglected by players who just wanted to achieve level 50, and there wasn’t much to persuade them to do so. The one that awards the Cloud Steed, on the other hand, is one of the ones worth finishing.

A Dying Horse is the name of the task. It will lead the players to the completion of The Mane of the Azure Wind, which will result in the prize of the horse. It may be found on the Azure Wind Island, east of Rohendel.

Neugier

Neugier mount (YouTube)

Because it’s a limited-time mount, it’ll only get more precious with time. The mount was made to commemorate the release of Raiders of the Lost Ark in the West. Fans can acquire it before March 2 if they watch Twitch live streams of the game.

After four hours of viewing a broadcast with this particular drop enabled, you will receive this mount as a drop. On the Campaigns tab, look for the suitable channels and your status. When summoned, this horse emits an electrical sound, and players may trigger a speed increase by holding down the Q hotkey.

Dawn Chamkuri

You may have already seen people riding this horse, which is also known as the “chicken mount,” and is one of the most recognized in the game right now. To advance through your Rohendel questline after Shushire and Vern, you’ll need an average item level of 460. Completing one of the major objectives will automatically give you the prize.

Borea Courser

This second horse may be claimed if the Adventurer’s Tome from the East Luterra area has been completed to 40%. To do so, hit N and then pick the tab for the region. Then you must press the Claim button.

Ladybug Mount

Ladybug mount (YouTube)

Following the main missions unlocks the Ladybug mount. You’ll naturally unlock it as you go through the game, but be aware that because it’s the size of a real ladybug, you won’t be able to use it in most of the game’s regions. You can unlock it in any color you like, but you won’t be able to unlock both of the others.

Read Lost Ark Key of Balance and Gate of Harmony – Guide

White Scarab

The Adventurer’s Tome of one region must be completed in order to get this insect mount. You’ll get a token you can use to purchase this mount when you complete the quest. Since you must slay monsters to unlock them, it will take time. However, you will get unique and epic items that can only be unlocked through looting randomly from the monsters of the region.

Keep these things in mind about Lost Ark free mounts

The majority of the quickest mounts are not available for free. You can still purchase them on the Auction House if you have a lot of gold in your account, when people who bought them for Royal Crystals sell them. Keep in mind that all the mounts, as well as the exact methods for unlocking them, have yet to be uncovered. 

For more Guides, Tips, and Tricks

You can also check our dedicated Video Games Guides section.

How to get Nokron Elden Ring – Guide

We have brought you a guide on how to get Nokron Elden Ring. Follow the guide, and you will learn to reach Nokron easily.

Many dungeons can be found in the Lands Between, but none is as impressive as Nokron, the Eternal City. There are many hidden areas, illusory walls, and other hidden secrets in Elden Ring like in other games in the series. But this is no ordinary unlockable room. You can only reach this entire portion of the map by doing a few very optional actions.

Among Ranni’s Black Knife side-quests, Nokron is an important location to learn more about, which you will find in the links below. The Ranni side quest does not require you to complete any steps for Nokron to be unlocked. In spite of her quest chain, you’ll still have the chance to explore the underground world of Nokron, a fascinating city with a second boss fight against the Ancestor Spirit.

How to get Nokron Elden Ring by defeating the boss
Cutscene after defeating Radahn (YouTube)
Read Elden Ring Beginner’s Guide – 10 Things You Should Know

How to get Nokron Elden Ring

The Siofre River region includes Nokron, a hidden section. You can see Nokron in the distance if you enter the Siofre River through the well in the Mistwood, although you won’t be able to reach it from the underground. 

The southern coast of Caelid contains Redmane Castle, which is the key to unlocking Nokron. The fortress is accessible from the outside through a portal. Inside, you have the option of battling Starscourge Radahn, a Shardbearer. There are multiple AI partners available or working together with many other players can defeat this Raid Boss.

A comet crashes into the field south of Mistwood after Radahn is defeated, causing a giant hole to appear. Nokron can be entered by dropping down into this massive hole in Vimgrave. The hardest part is defeating Radahn; you can only proceed to Nokron after defeating him. 

How to beat Radahn: Phase one

fighting Radahn
Radahn fight gameplay (YouTube)

It is advised that you fight the combat on horseback since you must cover a large region. This boss encounter, like many others, is divided into two sections, so be ready for it. Radahn will hurl black darts at you twice at the start of the encounter. When that happens, you’ll have to keep hidden and use the woodblocks you discover on the battlefield to your advantage. As soon as you change the cover, summon all of the NPCs you can, as they will fight with you and be quite useful.

Ensure they’re always nearby, and summon them again as soon as possible if they die. By distracting the boss, striking him hard, and healing you, they can leave you unharmed. When you move from cover to cover, keep moving eastward until you reach Radahn. When you hop onto Torrent to move faster after the second barrage of dark darts he throws at you, it makes a significant difference.

Phase two

For a few seconds, Radahn will disappear from the screen and then shoot into the ground. In this case, you don’t need to change your strategy. Whenever the boss throws an energy blast to the ground, jump over it. You won’t miss those very annoying energy balls he’ll hurl at you if you don’t stay too far from him. The balls are very damaging. Whenever you can, summon fighters and strike them. Keeping your distance and not rushing the fight is the key, as he will use his best attacks on your summons instead of you.

You will get the greater rune after defeating Radahn, allowing you to continue the story. As a reward, you will also receive 70,000 runes, which can be quite useful in a number of ways. 

Read How to Two-Hand a Weapon in Elden Ring – Guide

Things to keep in mind to get Nokron Elden Ring

Nokron Elden Ring
Nokron Gameplay (YouTube)

Naturally, Nokron Eternal City will not display on your global map. However, if you travel quickly to Fort Haight West in Mistwood’s southern section, you can find the route. It’s not far from where you first met Blaidd in the Mistwood Ruins.

Looking around, you’ll notice that the soil has been ripped apart by the meteor’s impact, and floating rocks float in mid-air. Examine the area beneath you for ledges that will bring you underneath. Since you still need to find a campfire, go cautiously across ledges and collapsed structures. The first enemies you’ll face are Black Slimes, who are rather easy to fight.

For more Guides, Tips, and Tricks

You can also check our dedicated Video Games Guides section.

Lost Ark Pest Control Daily Quest Guide

We have brought you the Lost Ark Pest Control guide with all the details so you can complete this daily quest with ease.

Blackfang’s Den has become infested with pests that threaten him. Of those, the Red Shark Pirates pose the greatest danger. Regardless of how many ships we sink with our cannons, they always come back on new ships awoken by shouting, “We’ve come to find Blackfang!”. It is impossible to ignore them because they are so bothersome. It is your responsibility to control them.

During Pest Control quests, you are required to go to an island and kill enemies. No matter how many times you kill them on the current day, they always find a way to come back to the island and attack. Here is the Lost Ark Pest Control guide to help you complete this daily quest.

Lost Ark Pest Control location
Blackfang’s Den location (YouTube)
Read Lost Ark Ghost Ship Guide – Location, Rewards, and more

Lost Ark Pest Control guide 

The first and most basic need is to earn the Lost Ark’s ability to sail Arkesia’s waters, which may be obtained at the end of the East Luterra questline during “Set Sail!” Una’s Tasks, a broad Daily and Weekly Quest selection that becomes accessible once adventurers reach Character Level 50, is the second prerequisite. 

This should happen about the time players complete the North Vern questline. Fulfilling two yellow Side Quests on Blackfang’s Den, a tiny island off the southern coast of Anikka, is the third and final condition for completing “Pest Control.”

Blackfang’s House is the first Side Quest players must complete in Lost Ark. It is a simple fetch quest that requires players to tidy up Blackfang’s house. Players will have to clean up several objects as well as slay trash mobs on this mission. Once “Blackfang’s House” has been completed, “Catch the Rats” will be available. Adventurers have been assigned the task of exterminating pesky Shore Rats x 12 that are causing trouble on the island. The “Pest Control” Daily Quest can be accepted from Una’s Tasks once these Lost Ark Side Quests are complete.

Pest Control Daily Quest

Lost Ark Pest Control gameplay
Pest control daily quest gameplay (YouTube)

Go to the Daily Quests section of Una’s Tasks. Accept the quest “Pest Control” and you will be assigned the responsibility of defeating the pirates who are attempting to attack Blackfang. To accomplish the task, you must battle Captain Lorka or Lieutenant Lorka and slay 5 Red Shark Pirates. 

Go to the docks and board your ship once you’ve accepted the mission. The task may be found in the right corner of the screen. Simply press ALT + Left after clicking on the compass, which will show you the position of the island you need to visit. To begin your journey to the daily quest location, click here.

Read Lost Ark Key of Balance and Gate of Harmony – Guide

You will have to wait for 15 minutes

watch out pirates rewards
Pest control daily quest rewards (YouTube)

When you get to the island, you’ll see that you can’t start any quests and that there aren’t any daily quests at all. The reason for this is that the quest itself has a 15-minute cooldown. If there are no creatures on the map’s bottom east and west ends, it signifies the mobs have been eliminated and you must wait a maximum of 15 minutes for them to respawn.

When the event starts, you’ll be given a mission called “Watch out! Pirates!” After that, you must travel to the map’s east coast to beat Lorka. The next step is to defeat the Red Shark Pirates on the Western shore of the map after you have eliminated Lorka. Once there are no more objectives to accomplish, talk to Ruri inside the shed. Rori is an NPC that you can visit in order to complete your daily quest and receive your reward.

For more Guides, Tips, and Tricks

You can also check our dedicated Video Games Guides section.

Raid Shadow Legends Theresc Guide – 10 Things you should know

Here is the Raid Shadow Legends Theresc guide with some of the best tips and tricks. Follow the guide to learn more about Theresc in detail.

The best champions on your squad can make all the difference when you are facing monsters and bosses. There are a number of champions in the game, as you are probably aware. Affinity, role, rarity, and faction can all be used to categorize them. 

Theresc is one of the champions in Raid Shadow Legends. She is the Epic Champion of the Dark Elves Faction. So, below is our Raid Shadow Legends Theresc guide that will help you to learn everything about her.

Before you start, read Raid Shadow Legends Guide – 10 Things Everyone should know 

When was Theresc added to the game?

Theresc was introduced to Raid Shadow Legends as an Epic champion from the Dark Elves faction during the Karato Foxhunter Fusion in February 2022. As the first champion to receive the debuff for decreasing resistance, Theresc was added to Raid. 

Raid Shadow Legends Theresc Guide: Dual ability

Dual ability is the first attack of Theresc. One enemy is attacked twice. There is a 25% chance that every hit will increase the duration of a random debuff by one turn.

On level 2 and level 4, the damage is increased by +5%. In level 3 and level 5, the Buff/Debuff Chance increases by 5%. On the other hand, at level 6, the Buff/Debuff Chance increases by 15%. It has a 1.6 damage rating.

Raid Shadow Legends Theresc Guide: Dress Down

One enemy is attacked three times. Upon hitting a target, there is a 40% chance of removing a buff from them. On level 2 and level 4, the damage is increased by +10%. At level 3 and level 5, the Buff/Debuff Chance increases by 10%.

Raid Shadow Legends Theresc Guide: Hates Flower

Raid Shadow Legends Theresc's skill
Hates flowers skill (Plarium)

With this skill, you can attack all enemies. There is a 50% chance that it will place a 50% [Decrease RES] debuff for 2 turns. On level 2 and level 4, the damage is increased by +5%. At level 3, level 5, and level 6, the Buff/Debuff Chance increases by 10%. At level 7, there is a -1 cooldown.

Raid Shadow Legends Theresc Guide: Ruthless

This Champion deals 10% more damage to targets whose RES is lower than its ACC.

Read Raid Shadow Legends Ninja Guide – Best Tips and Tricks

Theresc’s Aura

As Theresc’s aura increases the ally C.RATE in all battles by 12%, it will be of great help to you.

Theresc’s Total Stats

  • HP: 16,350
  • Attack: 1,409
  • Defense: 804
  • Speed: 97
  • C. Rate: 15%
  • C. Damage: 60%
  • Resist: 30
  • ACC: 0

What Artifacts should you choose?

Raid Shadow Legends Theresc's artifacts
Artifacts (Plarium)
  • Set: Offense, weapon attack
  • Set: Offense, Helmet HP
  • Set: Offense, Shield Defense
  • Set: Offense, Gauntlets Crit Rate %
  • Set: Critical Rate, Chestplate Attack %
  • Set: Critical Rate, Boots Speed

Theresc’s passive gives more damage 

In addition to her abilities having decent scaling, her passive pushes more damage to anyone with a resistance lower than their accuracy. 

Read Raid Shadow Legends Scion Guide – Best Tips and Tricks

Her ability may be overshadowed

Raid Shadow Legends gameplay
Raid shadow legends gameplay (YouTube)

As she has only a 75% chance of landing this debuff on her A3, this ability may be overshadowed in the future.

For more Guides, Tips, and Tricks

You can also check our dedicated Video Games Guides section.

Elden Ring Smithing Stone Guide – Everything You need to Know

Want to upgrade your weapons in Elden Ring? Do not worry, we have the Elden Ring Smithing Stone guide for you.

Elden’s Ring One of the most precious objects you’ll uncover is a Smithing Stone, which is used to upgrade weaponry. These unique rock fragments can boost the strength of your weapons to +1 and beyond. Elden Ring, FromSoftware’s next brutal action RPG, is now available, and it’s the studio’s most ambitious journey yet. It’s not unexpected that it’s difficult, but you’ll be much better off if you come prepared with an updated weapon.

Smithing Stones and Somber Smithing Stones are found in Elden Ring. If you want to improve your character’s attacking talents even further, you’ll need these items. Below we have the Elden Ring Smithing guide that will help you to upgrade your weapons. Learn everything about where to go and how to get the smithing stones.

Elden Ring Smithing Stone Guide to collect it near the statue
Picking up the smithing stone (YouTube)
Read Elden Ring Beginner’s Guide – 10 Things You Should Know

Difference between Smithing stone and Somber smithing stone

Regular/generic weapons are made with Smithing Stones. The names of the weapons are quite straightforward: Longbow, Hammer, Mace, Kite Shield, Buchering Knife, Nightrider Flail, and so on.

Then there are those with more unusual names, who require Somber Smithing Stones. For weapons that seem like they were once in the hands of a character, dropped from a boss, have a special skill, or are more thematic, they will likely require Somber Smithing Stones instead. 

Smithing stone and Somber smithing stone types

  • Smithing Stone [1]: Reinforce weapons to level 3
  • Smithing Stone [2]: Reinforce weapons to level 6
  • Smithing Stone [3]: Reinforce weapons to level 9
  • Smithing Stone [4]: Reinforce weapons to level 12
  • Smithing Stone [5]: Reinforce weapons to level 15
  • Smithing Stone [6]: Reinforce weapons to level 18
  • Smithing Stone [7]: Reinforce weapons to level 21
  • Smithing Stone [8]: Reinforce weapons to level 24
  • Smithing Stone [9]: Reinforce weapons to level 25
  • Somber Smithing Stone [1] – Reinforce special weapons to +1
  • Somber Smithing Stone [2] – Reinforce special weapons to +2
  • Somber Smithing Stone [3] – Reinforce special weapons to +3
  • Somber Smithing Stone [4] – Reinforce special weapons to +4
  • Somber Smithing Stone [5] – Reinforce special weapons to +5
  • Somber Smithing Stone [6] – Reinforce special weapons to +6
  • Somber Smithing Stone [7] – Reinforce special weapons to +7
  • Somber Smithing Stone [8] – Reinforce special weapons to +8
  • Somber Smithing Stone [9] – Reinforce special weapons to +9
  • Somber Smithing Stone [10] – Reinforce special weapons to +10

Elden Ring Smithing Stone Guide: Location

Location for smithing stone
Limgrave Tunnels location (YouTube)

We propose going to Limgrave Tunnels immediately if you’re seeking Elden Ring Smithing Stones. The cliffs taper to a point northwest of the optional boss encounter dragon Agheel. The entrance to the tunnels itself may be found at the bottom.

A mid-sized dungeon, Limgrave Tunnels has a boss at the bottom – the Stonedigger Troll – but you won’t need to fight him to get your Smithing Stones. However, you’ll find enemies mining for gold in the walls – look for these outcroppings to collect Smithing Stones! You can upgrade your weapon at least a few times since they’re all level one, so they’re not unlimited.

There’s also a broken statue on the cliffs right north of the Stormgate with a light-filled fissure running along with it that can assist. Lure one of the neighboring big trolls up to the statue, which will break if he strikes it, earning you five tier-one Elden Ring Smithing Stones and a tier 2 bonus!

The broken statue
Broken statue (YouTube)

After that, the best area to look for tier 2 Smithing Stones is within Stormveil Castle. They’re strewn throughout the place, but not very frequent. Players had more trouble finding tier 2 Smithing Stones than any other type – but once you’ve been past Stormveil Castle, they’ll be a lot simpler to come across.

Somber Smithing Stones: How to get them

Rarer and less common are Elden Ring Somber Smithing Stones, which are used to upgrade special or unique weapons. Iji the Blacksmith is a giant who operates in West Liurnia, but they can be obtained anywhere in the world. Assuming that you have the runes to spend, he sells unlimited amounts of the first two tiers next to the Road to the Manor Site of Grace. Additionally, he sells limited quantities of tier 3 and tier 4 if you need them. 

Read How to Two-Hand a Weapon in Elden Ring – Guide

Elden Ring Smithing Stone Guide: How to farm

Elden ring blacksmith
Blacksmith (YouTube)

The Raya Lucaria Crystal Tunnel is where you should go. It’s a mine near the bottom of the cliff, with the entrance somewhat obscured by bushes, but it should be alright if you know where to look. The Tunnel is filled with Stones and enemies, but keep going down until you reach the enemy, the Crystalian, a blue, whirling giant composed of blue rock.

Kill the Crystalian. He is in excellent health and has a tendency to float around, shooting forth discs that return to his hand. Play defensively and take advantage of his ability to be backstabbed like a regular person – use summoning to hold his attention, then sneak up behind him and kill him. The Crystalian drops the Smithing Stone Miner’s Bell Bearing [1] after being defeated.

Return to the Roundtable Hold and hand this over to the Twin Maiden Husks. As long as you have the runes, you’ll be able to buy Tier 1 and 2 Smithing Stones from them indefinitely after that.

Keep in mind

You’ll need to take your Smithing Stones to a blacksmith to enhance your weapons after you get them. The little blacksmith area in the Church of Elleh will be your first port of call at the start of the game, but it will only enable you to enhance your weapon up to +3.

Speak with a master blacksmith about future modifications. Smithing Master Hewg at the Roundtable Hold is the obvious person to speak with, but there are other blacksmiths in the game, such as Smithing Master Iji just north of the Kingsrealm Ruins in the west Liurnia.

For more Guides, Tips, and Tricks

You can also check our dedicated Video Games Guides section.

Lost Ark Drumbeat Island Guide – Everything you should know

Here is the Lost Ark Drumbeat Island guide that will help you to learn everything about the island in the game.

Sailboats are one of Lost Ark’s most intriguing features of the end game. You can find several islands scattered around the world when you enter the open seas of Arkesia. Some are large islands, basically continents at the end of the game, while others are smaller islands full of activities. 

During certain calendar events, you can find Lost Ark World Bosses spawning on these islands. Players can also access other islands during certain events that only become available at certain times. Many of the islands in the game are visited and forgotten, as they do not offer any events, daily content, or anything else that can be harvested. 

drumbeat island gameplay
Drumbeat Island gameplay (YouTube)

The calendar will let you know when these islands will be active, so you can plan your day accordingly. The islands rotate each day and at different times. Below, we have the Lost Ark Drumbeat Island Guide for you.

Read Lost Ark Ghost Ship Guide – Location, Rewards, and more

Lost Ark Drumbeat Island Guide

Drumbeat Island might be a potential spawn location for Procyon’s Eye Compass. During the adventure quest that occurs on Drumbeat Island, RNG acquires Drumbeat Island Tokens. You will get to quest from Scholar Orbitan on Drumbeat Island. The first quest name is ‘Mysterious Object’ and the other is ‘With Doubts’. 

Drumbeat Island Rewards

Island token
Island token (YouTube)
  • Drumbeat Island Token
  • Gienah’s Coin x1,000
  • Pirate Coin x10,000

The Drumbeat island token binds when obtained. It is proof that the island has accepted you. You cannot sell this token or dismantle it. It is indestructible. However, you can exchange it for various rewards at Opher, the Lonely Island.

The epic Gienah’s Coin is bound to the roster on pickup. You will receive this reward in the ‘With Doubts’ quest given by Scholar Orbitan. It is a special coin that can only be found in Gineah. You cannot sell this token or dismantle it. It is indestructible. However, you can take this coin to the merchant ship that collects coins.

The pirate coins are the normal ones that you will receive in the ‘Mysterious Object’ quest given by Scholar Orbitan. This coin cannot be dismantled. Pirate coins are the currency accepted only in Arkesia. You can use it with the traveling merchant ships on the sea or by islands that are occupied by pirates.

Read Lost Ark Key of Balance and Gate of Harmony – Guide

Keep in mind

It’s worth noting that there’s no correlation between these islands and the dates accessible. They’re truly random, so plan ahead of time and make a list of any islands you’d like to see. Some of these islands, on the other hand, include commercial ships, pirate NPCs, and pirate currencies like pirate coins. It’s a different type of sailing mechanic.

For more Guides, Tips, and Tricks

You can also check our dedicated Video Games Guides section.