Genshin Impact Fischl Guide – 10 Tips and Tricks

Here is the Genshin Impact Fischl guide with some of the best tips and tricks that will help you understand the character even more.

Fischl is notable for her ability to call Oz, her bird, as well as her use of fantastical speech. Fischl also has a distinct design from the rest of Mondstadt, and for a long time, Fischl was thought to be an S-tier character.

Fischl is unlike any other character in the game when it comes to gameplay. Her agility and usefulness, along with an epic elemental blast, allow her to outsmart her foes. She’s a character that’s rather simple to grasp, but there are a number of intricacies that can boost her damage ceiling and carry potential. Our Genshin Impact Fischl guide will help you know more about her.

Read Genshin Impact Yae Miko – Things We Know So Far

Fischl is Best Against Bosses

Fischl excels when faced with ruin guards or bosses that she can fight with her bow from afar. As a result, she can defeat other archers and practically all elemental bosses, except the Oceanid, who attacks with a combination of monsters. 

Fischl should be paired with another character whose elemental talent draws the opponent’s attention if used as a primary character. This allows her to charge her arrows and unleash devastating electrical damage. For players who enjoy playing with combinations, Ganyu and Fischl might be a potent pairing.

Read How to beat Stormterror Dvalin in Genshin Impact – Guide

Oz is an outstanding help

Fischl's oz is very useful
Fischl gameplay (YouTube)

Whether Fischl is on the battlefield or not, her elemental talent will remain active. As a result, many players consider Fischl to be their primary support. Oz deals continuous Electro damage and is ideal for use just before a burst. Combining attacks with Oz can help characters like Diluc a lot. Hydro catalysts love Oz because they can attack in combination with the bird to deliver more damage.

Another important aspect of playing as Fischl is shooting Oz with a charged shot, which most players appear to be unaware of. Fischl’s passive ability, Stellar Predator, causes him to unleash an AoE attack equivalent to 152.7 percent of the charged arrows’ attack power when he hits OZ with a charged arrow. This is useful when utilizing Baron Bunny or one of Ganyu’s lotuses to gather foes. It is recommended that players practice this shot on a few weaker hilichurls before entering any larger fights.

Genshin Impact Fischl Guide: The Ultimate 

Depending on the circumstances, Fischl’s elemental burst can serve a variety of purposes. Among its functions are repositioning, closing distance, resetting Oz, and dealing area of effect electro damage. Ideally, you should try to coordinate your ultimate and elemental skills as much as possible. 

As a result, your night raven will do more damage in a fight when Oz is on the field for longer. Her ultimate can also save you from exhaustion when your stamina runs out. Due to the nature of kiting, Fischl spends most of his time running out of stamina. Having quick movement allows you to get out of dodge, gain distance, and reset the state of a fight with this ult.

Genshin Impact Fischl Guide: Manage your ultimate

The ultimate is the key
Fischl gameplay (YouTube)

Ensure that you manage your ultimate well. In addition to having the lowest base defense in the game, Fischl is also very risky to use offensively. It is important to understand that your movement speed does not change with your level of progress. The game will not allow you to climb over terrain or pass through units.

Keep Moving

For those unfamiliar with the phrase, kiting refers to attacking while continually moving away from the adversary while keeping inside your character’s maximum range. When playing Fischl, this is an extremely crucial skill. If you’re not attacking, you should be moving the majority of the time. It’s also OK to interrupt your combo to avoid an oncoming attack or to take a break from hitting to create distance between the foes.

Anticipate the Attacks

It is essential to be proactive in your movements and anticipate the sort of attack that may occur. To do so, one must first learn the enemy’s individual patterns and habits, as well as how to space correctly. If you execute this right, you will be able to stay on Fischl for extended periods of time without having to swap out when your HP is low.

Read Genshin Impact Azhdaha Guide – Easy Way to Beat Him

Fischl can see the weak points

Some foes have particular weak areas that only a few characters in the game can exploit. The ruin guardians, ruin hunters, and Regisvines are particularly notable. Fischl’s targeted shot allows you to target certain vulnerabilities and cripple enemies for an extended period of time. You can circulate across your team and do a tonne of damage during this period.

Thundering Fury is the best Artifact

Best artifact for Fischl in genshin impact
Fischl’s artifacts (YouTube)

Overload, electro-charged, and superconduct damage are increased by 40% using Thundering Fury. The duration of the elemental skill’s cooldown is also decreased by one second when these effects are triggered. The effect occurs only every 0.8 seconds.

Genshin Impact Fischl Guide: Patterns

As an enabler, Fischl is a pretty simple role to play. Simply summon Oz, preferably on top of foes, then swap to another character and let the raven back you up, adding elemental DMG. Remember that if you’ve unlocked Lightning Smite, you can unleash Thundering Retribution damage when you generate an Electro elemental reaction!

It’s a little different for DPS. Your goal is to keep Oz away from your main target for as long as possible. This entails calling him on your enemies and then maneuvering him about to keep him near to the victim.

Do not overlap Fischl’s abilities

You can re-summon Oz using Midnight Phantasmagoria when Nightrider is ready to timeout to keep him awake as long as possible. You only have roughly 3 seconds without Oz on the field before you may use Fischl’s Elemental Skill again if you time it correctly. Keep a mind that her powers should not be overlapping!

For more Guides, Tips, and Tricks

You can also check our dedicated Video Games Guides section.

Lost Ark Boss Rush – A Complete Guide

We have brought you the Lost Ark Boss Rush guide. From strategies to rewards, you will get to know everything.

Boss Rush is a tough mode in which you must destroy bosses one after another in levels while staying under a time constraint. In Lost Ark, you may play Boss Rush single or with a group of up to four people.

You can’t modify your Skills, Combat Items, or Equipment after you enter Boss Rush mode and leave the battle waiting area, so make sure you’re ready before you start. You can’t use potions either, but if a member of your group dies, you can revive them after a short delay.

Lost Ark Boss Rush
Boss Rush Gameplay (YouTube)
Related: Lost Ark Chaos Dungeon – A Complete Guide

Lost Ark Boss Rush Guide

Boss Rush is a Lost Ark endgame action that starts during Tier 2 level and continues afterwards. It pits you against 15 waves of difficult monsters scattered around Arkesia. Completing them will provide you with important gems and resources for your character’s advancement. 

To go into Boss Rush, you’ll need an Entrance Ticket. These drop from Tier 2 onwards by fighting the 2nd floor boss in your daily Chaos Dungeon entry. Each week, you can also trade Sylmael Bloodstones for Ticket Chests at the Guild Vendor. Go to the entrance once you’ve received a ticket. To choose who you want to play with, you may go alone, auto-match, or search/create a lobby. 

Include a Bard, Paladin, or Gunlancer in your company since their supporting skills will dramatically increase your chances of survival! Damage dealers should fill the remaining spaces. Please keep in mind that Entrance Tickets may only be obtained through runs that include daily energy! There are a total of 15 continuous waves of bosses to overcome. With each stage level, the number of bosses you face, the time limit, and the prizes rise.

Read Best Way to get Gold in Lost Ark

Lost Ark Boss Rush Guide: Time limit and Rewards

Time limit in Lost Ark Boss Rush
Boss Rush Gameplay (YouTube)

When your timer is about to expire, you lose the time bonus award for that stage (20 seconds or fewer). You also acquire a boost that enhances your Attack Speed by 30% and protects you from Push and Crowd Control. Complete as soon as possible! When the timer runs out, the attempt is completed, and you are awarded for the steps you’ve completed up to that point.

To get the most prizes, you must complete all 15 waves and receive their time bonus award. Every few steps, the prizes improve and include more resources as well as a chance for a Masterpiece. Gems collected here can be sold on the Auction House or utilized to advance your character.

Lost Ark Boss Rush Guide: Strategy

Strategy for Boss Rush
Boss Rush Gameplay (YouTube)

Stages 1-4 always place the boss in the middle of the arena, stages 5-9 place a second boss in the top right, and stages 10-15 place a third boss in the bottom left. Apart from understanding what each boss does, the most efficient approach to beat Boss Rush is to use numerous Bleed skill runes in abilities that have lingering effects or have a short cooldown. Use whatever rarity you have on hand at the time.

  • Save your Awakening talent for level 15, as clearing it without it may be challenging.
  • To shorten the time, it takes to destroy several bosses, use your most powerful strikes on them all at once.
  • Increase your odds of success by using fight equipment like Flame Grenade, Dark Grenade, or Taunting Scarecrow.
  • In later stages, avoid dying, since respawn periods get quite long.

For more Guides, Tips, and Tricks

You can also check our dedicated Video Games Guides section.

Destiny 2 Fire Emblem Codes and How to Use Them – February 2022

We have brought you the latest Destiny 2 Fire Emblem Codes. Do not forget to read how you can redeem the codes.

Season 15 of Destiny 2 is now in progress, with Season of the Lost slated to take us all the way to The Witch Queen in February and the start of Season 16 in March (Season of the Risen). But enough about what’s coming ahead; let’s focus on the present and the plethora of emblems available to personalize your character.

These may be discovered in a variety of areas, including Bungie incentives and tweets from the developer. Although there are no gameplay advantages, shader codes will let you to modify your weapons and armor, while emblem codes will help you stand out as we approach The Witch Queen and Season 16.

Read What are Elemental Wells in Destiny 2

What are Destiny 2 Emblems

Collectible icons and backgrounds for player nameplates are known as emblems. They have no effect on gameplay or stats, and they don’t change your guardian’s armor or appearance in the game. After all, it’s only a nameplate. However, having it handy when other players scan your name in loading screens or waiting to enter Crucible battles like Trials of Osiris is a plus. Some are given out for free, while others are earned by doing good actions like as supporting one of Bungie’s many worthwhile organizations.

Active Destiny 2 Fire Emblem Codes

Destiny 2 Fire Emblem
Bungie rewards (Bungie)

Don’t forget to sign up for Bungie rewards before checking out the list. Not only will you receive a Powerful Engram for registering, but you’ll also have access to the special “Unrelenting Grip” emblem. However, once Season 16 and The Witch Queen are out, it will vanish, so hurry!

  • VA7-L7H-PNC – Get Liminal Nadir by redeeming this code.
  • F99-KPX-NCF – GetShadow’s Light by redeeming this code.
  • 6LJ-GH7-TPA – Get Sneer of the Oni by redeeming this code.
  • PHV-6LF-9CP – Countdown to Convergence by redeeming this code.
  • L7T-CVV-3RD – Get Heliotrope Warren by redeeming this code.
  • 3VF-LGC-RLX Insula – Get Thesauraria by redeeming this code.
  • 7CP-94V-LFP – Get Lone Focus, Jagged Edge by redeeming this code.
  • 7D4-PKR-MD7 – Get Sequence Flourish by redeeming this code.
  • 7F9-767-F74 – Get Sign of the Finite by redeeming this code.
  • 7LV-GTK-T7J – Get Future In Shadow by redeeming this code.
  • A7L-FYC-44X – Get Flames of Forgotten Truth by redeeming this code.
  • FJ9-LAM-67F – Get Binding Focus by redeeming this code.
  • JD7-4CM-HJG – Get Illusion of Light by redeeming this code.
  • JDT-NLC-JKM – Get Ab Aeterno by redeeming this code.
  • JNX-DMH-XLA – Get Field of Light by redeeming this code.
  • JYN-JAA-Y7D – Get Galilean Excursion by redeeming this code.
  • ML3-FD4-ND9 – Get Be True by redeeming this code.
  • N3L-XN6-PXF – Get The Reflective Proof by redeeming this code.
  • RA9-XPH-6KJ – Get Cryonautics by redeeming this code.
  • X4C-FGX-MX3 – Get Note of Conquest by redeeming this code.
  • X9F-GMA-H6D – Get The Unimagined Plane by redeeming this code.
  • XFV-KHP-N97 – Get The Visionary by redeeming this code.
  • YRC-C3D-YNC – Get Spicy Ramen Emblem by redeeming this code.
Other game codes:
Anime Training Simulator Codes for Free Yen and how to redeem them
Fishing Clash Gift Codes
Roblox Demonfall Codes
Robot X Tactics Codes and how to redeem them

How to redeem Destiny 2 Fire Emblem Codes

Destiny 2 Emblem Codes redeem process
Season of the Lost (Bungie)

Because the February Destiny 2 promo codes can’t be used in-game, you’ll have to go to Bungie’s redemption webpage here. Once you’ve arrived, go into your account and enter the codes into the appropriate boxes to receive the rewards when you next log into Destiny 2.

For more Guides, Tips, and Tricks

You can also check our dedicated Video Games Guides section.

Hello Neighbor Act 2 Guide – Tips and Tricks

Love horror and puzzle games? To make sure you get started on the right foot, we have the Hello Neighbor Act 2 Guide for you.

In Hello Neighbor, the player is moving into a new house across the street from a mysterious neighbor who seems to be harboring a secret in his basement and is becoming nervous. The player must break into the neighbor’s house and complete a series of riddles in order to obtain the things required to unlock and enter his basement. 

As the player explores the mysterious neighbor’s house, they must avoid being noticed by the mysterious neighbor, otherwise, they will be pursued and captured if they do not conceal or flee quickly enough. To make it simpler to leave, the player can shock the neighbor by hurling things at him. Throughout the stealth horror game Hello Neighbor, you must outwit the title villain and work your way around his house to unearth secrets, or escape his nasty hands after being trapped. Below is the Hello Neighbor Act 2 Guide 

Before you start, read Hello Neighbor Act 1 Guide – Tips and Tricks

Hello Neighbor Act 2 Guide: Explore

There’s nothing to pick up or toss in the strange, artificial chamber you discovered in the last act, and the door won’t unlock. Peer through the keyhole and gaze left and right until you hear a noise that indicates something has fallen over.

Look at the window where the boards have fallen over; you should hear a click, indicating that the door is now unlocked and ready to be opened. To go through the crawl area, go outdoors and grasp the air duct grate in front of the red light.

Hello Neighbor Act 2 Guide: Locate Levers

Hello Neighbor Act 2 Guide
Lever inside the house (tinybuildgames)

Pull levers on three additional pipes around the region to get the wheel’s gauge into the red. By just following the fence a little further, you may find the first one. Turn around in the yard and look for the second lever on the long pipe that protrudes from the ground and flows into the house. Because it’s so far up in the air, you can’t reach it quite yet. 

The third lever is located within the residence. Depending on the location of the patrolling neighbor. The quickest route is to circle back to the front door and enter by the right-hand door. Outside, near where the pipe protrudes from the ground, break the single window facing the side fence. Place a box in front of the window and walk inside to see a bizarre hallway chamber with a light switch, a door, and a junk-covered blocked-off space. Go in the door and turn on the big boiler once you’ve turned all three levers.

Hello Neighbor Act 2 Guide: How to get the gold key

Gold key in Hello Neighbor Act 2
Golden Key (tinybuildgames)

Take the gold key from the keychain on the wall and enter through the door on the opposite side of the room. If you unlock the door and are being pursued by a neighbor, you now have a more convenient option to go around the neighborhood.

There’s a hole in the middle of the floor here; descend the ladder inside the hole to access a kid’s chamber with a dollhouse. Remove the chair from the door, so you may return later. To return to the main part of the house, exit the room and go down the stairway. Locate a large pump with a red pull lever and trace its cables to a neighboring door. Take the key and open the door so you may utilize it later as a shortcut.

There is something in the Dollhouse

Dollhouse in Hello Neighbor Act 2
Dollhouse (tinybuildgames)

Remember the kid’s room you fell through the roof into? Return to the room and use the key on the dollhouse. If you open the doors inside the miniature dollhouse, you should hear some noises indicating that things have changed within the neighbor’s house as well. This activates a switch that grants entry to the bathroom and a side room.

Read Sifu Guide – Things you should know before you start the game

Flood the room and get the red key

Return home and look for the dollhouse on the floor with the children’s room. Go up the ladder in the corridor outside the kid’s room and look across to see a red faucet. To utilize the wheel again, you must stop and leap down onto the pipes. The faucet will turn on this time, flooding the room.

Return to the corridor outside the kid’s room and open the door adjacent after the room has been flooded. After you’ve switched on all the pipes, flip the switch on the wall next to the gauge, which should be completely red.

The coils in the flooded chamber will switch on, freezing the water. Return to the top of the ladder and sprint through the frozen water to get entry to the door. Grab the red key from the door inside the next room. Return to the first level and use the kitchen door to get the entrance to the bathroom. Take the crowbar-wielding big Lego man off the toilet.

Place the Lego person in the dollhouse

Lego person inside the dollhouse
Lego person inside the dollhouse (tinybuildgames)

Return all the way to the kid’s room and place the Lego person in the dollhouse’s toilet. You may now leave him there and return to the restroom. The Lego person will mysteriously return to the toilet, and the crowbar will be freed — take it from the Lego guy’s grip!

Head to the front of the house, then to the right side of the porch, with the crowbar in hand. Using the crowbar, remove numerous black metal tacks from a section of fence near the ground. Crouch down and crawl out after the tacks are gone to start a cutscene.

These were all the important things that you must know. There are some parts that will be more interesting if you play it on your own.

For more Guides, Tips, and Tricks

You can also check our dedicated Video Games Guides section.

Genshin Impact Yae Miko – Things We Know So Far

Here is a guide on Genshin Impact Yae Miko. We have covered all the things that we know so far. The release date is February 16, 2022. 

Major upgrades to Genshin Impact’s 2.5 Special Program were revealed, including new events, Character and Story Quests, and the introduction of the two featured Character Banners. Yae Miko, the Grand Narukami Shrine’s head shrine maiden, has been announced as the first highlighted 5-star. Raiden Ei from Genshin Impact and Kokomi from Hydro will both appear in the second half of Version 2.5.

Yae Miko originally appeared as an NPC in the Genshin Impact Version 2.0 update, alongside the new area of Inazuma. The Traveler encounters Yae Miko in the Grand Narukami Shrine, where she is attempting to uncover the riddle of a rumoured demonic possession. She then confesses that she has high hopes for the visitor, ominously foreshadowing the future.

Yae Miko is very intelligent due to her Kitsune ancestry. She frequently employs her humour and intellect to attain her objectives and to defuse potentially harmful situations. This is seen towards the end of Version 2.1’s Archon Quest when she gives the Gnosis to Genshin Impact’s Sixth Harbinger, Scaramouche, in return for Paimon and the Traveler’s safety. Yae Miko, as the Electro Archon’s right hand, proves to be a formidable and astute ally.

Read Genshin Impact Azhdaha Guide – Easy Way to Beat Him

Release Date and Voice Actor

The release date for the Yae Miko banner is February 16, 2022. This is the same day as the release of version 2.5, and Yae Miko will be featured in the very first banner.

The complete list of Yae Miko’s voice actors are below.

  • English VA: Ratana
  • Korean VA: Moon Yoo-jeong
  • Japanese VA: Ayane Sakura 
  • Chinese VA: Mingya Du 

Genshin Impact Yae Miko: Story quest

Genshin Impact Yae Miko
Yae Miko (Genshin Impact)

Yae Miko will have her own Character Quest in Genshin Impact 2.5, so players will be able to discover more about her. Characters are given a major role in these missions that they would not get in the regular Archon Quests. 

Players must first complete both parts of Raiden Ei’s Story Quest, “Imperatrix Umbrosa Chapter: Act I” and “Act II,” to unlock Yae Miko’s Story Quest, “Divina Vulpes Chapter: Act I.” Yae Miko’s Story Quest is planned to explain more about Inazuma’s history, showcasing its past and how it came to be as it is known to the Traveler now.

Read How to beat Stormterror Dvalin in Genshin Impact – Guide

Genshin Impact Yae Miko: Skill and Abilities

Yae Miko is the first 5-star Electro-user to wield the Catalyst weapon in Genshin Impact. Spiritfox Sin-Eater, Yae Miko’s Normal Attack, delivers Electro DMG with every hit. Yae Miko, like other Catalyst users, will be able to apply her Element consistently with each assault. 

Yae Miko’s Elemental Skill, Yakan Evocation: Sesshou Sakura, lets her dart ahead quickly, leaving behind a Sesshou Sakura, a fox-shaped Electro construct. These Sesshou Sakura serve as warning lights for lightning strikes that will occur on a regular basis. At any given time, up to three Sesshou Sakura can exist.

Yae Miko’s Elemental Burst is extremely powerful, just like the other Elemental Bursts in Genshin Impact. In a tremendous Tenko Thunderbolt strike that descends from above, Tenko Kenshin lets Yae Miko unseal all adjacent Sesshou Sakura. 

With every Sesshou Sakura destroyed during her Elemental Burst, Yae Miko’s first passive Talent, “The Shrine’s Sacred Shade,” she can reset the cooldown for one charge of her Elemental Skill. The damage done by the Sesshou Sakura will be boosted dependent on the degree of her Elemental Mastery, thanks to Yae Miko’s second passive Talent, “Enlightened Blessing.”

Genshin Impact Yae Miko
Yae Miko Trailer (Youtube)

When creating Character Talent Materials, Yae Miko’s last passive Talent, “Meditations of a Yako,” gives players the possibility to get one additional Talent Material of the same area of a random sort. The given Talent Material will have the same rarity as the material that was used to manufacture it. Players that require a large number of Talent Books for their characters will profit from this.

Genshin Impact Yae Miko: Weapon

She uses the mystical power of Electro to wreak havoc on the enemy. You may improve this by using her unique Kagura’s Verity weapon, which works in tandem with her three-stack Skill. Your DMG will rise by 12% for 12 seconds after performing an Elemental Skill. You get a bonus of 12 percent — up to 48 percent — after you reach three stacks. In Genshin Impact Version 2.5, this weapon will be shown on a weapon banner alongside Yae Miko’s character banner.

Yae Miko’s Role in Archon Quest of Inazuma

Genshin Impact Yae Miko
When the Sakura Bloom poster (miHoYo)

Raiden Ei abolishes the Vision Hunt Decree, which was imposed by Genshin Impact’s Fatui, and instructs the Shogun to release the captured Visions to the Vision-holders at the end of “Chapter II, Act III: Omnipresence Over Mortals.” 

The Shogun puppet, however, has probably opted to defy her creator in order to impose the notion of eternity that Raiden Ei had previously led her to accomplish, as suggested in the Genshin Impact Version 2.5 teaser. Raiden Ei appears to be entering the Shogun’s land in order to fight her. In Raiden Ei’s absence, she entrusts Inazuma to Yae Miko.

Rather than supporting Raiden Ei in the realm, Yae Miko sent the Traveler to assist the Electro Archon in his battle with the Shogun puppet. Yae Miko is thought to be guarding Inazuma from the outer world. Yae Miko may have a larger role in assisting Hydro-user Kokomi in protecting the underground region now that there is unrest in Enkanomiya, which has materialized in formidable new creatures and weird darkness. In addition to assisting Raiden Ei with the Shogun, the Traveler must be prepared to assist in the defense of Enkanomiya against Dainichi Mikoshi’s darkness.

For more Guides, Tips, and Tricks

You can also check our dedicated Video Games Guides section.

Xyz Summoning in Yu-Gi-Oh Master Duel – Guide

Here’s a detailed guide on Xyz Summoning in Yu-Gi-Oh! Master Duel. Learn what it is, how to perform it, and much more.

There are many methods to summon strong monsters from your extra deck onto the battlefield in Yu-Gi-Oh! Master Duel, but Xyz Summoning is one of the most versatile and surprising. Xyz Summoning, first seen in the Yu-Gi-Oh! ZEXAL anime, turns your monsters into materials that may be used to power up your Xyz Monsters.

Xyz is the center point for many of the game’s most popular archetypes, whether you’re playing in paper or on Yu-Gi-Oh! Master Duel. Here is a guide on Xyz Summoning in Yu-Gi-Oh! Master Duel.

Read Yu Gi Oh Master Duel Review: Could be improved to become the best Yu Gi Oh game

What is Xyz Summoning

In Yu-Gi-Oh! Master Duel, XYZ Summoning is a very versatile sort of Special Summoning that allows players with practically any deck construction to use XYZ Monsters in their Extra Deck. The fourth Yu-Gi-Oh! Anime series, Yu-Gi-Oh! Zexal, featured XYZ Monsters, which introduced a new mechanism that enabled players to link tributed Monsters to the XYZ Monster as XYZ Materials. XYZ Summoning is simple to learn, and players may employ this powerful mechanism to summon some extremely powerful Monsters.

How to Xyz Summon

Xyz Summoning
Yu-Gi-Oh Master Duel (Image credit: Konami)

You’ll usually need two monsters on the field under your control to Xyz Summon, and both of them must be the same level as the Xyz Monster you want to summon. If you wish to Xyz Summon a Time Thief Redoer, for example, you’ll need two Level 4 Monsters as Materials.

In rare circumstance, the Xyz Monster may have additional prerequisites. Some Xyz Monsters require more than two ingredients. They might even request a certain type or archetype of monster, Spellcaster-type monsters or Noble Knight monsters.

Read Yu-Gi-Oh! Master Duel Guide – Tips and Tricks

You’re ready to Xyz Summon the Xyz Monster from your Extra Deck after you’ve gathered your ingredients. Instead of going to your graveyard like they would with a Synchro or Fusion summon, your cards become the materials stack beneath your Xyz Monster.

You can Xyz Summon into a field where every monster slot has been filled since Xyz Summoning eliminates monsters to transform them into materials. The Xyz Monster will simply enter the field where one of its materials has previously occupied.

How to activate

Xyz Summoning
Yu Gi Oh Master Duel (Image credit: Konami)

The effects of an XYZ Monster can be activated by detaching its XYZ Materials, which are then sent to the graveyard unless otherwise stated by an active card effect. Some XYZ Monsters have extra effects that become active after no XYZ Materials are linked to them. While some of these consequences are beneficial to the player, others may be harmful. Even Yu-Gi-Oh! ‘s most iconic Monsters are no longer considered Monsters while working as XYZ Materials.

Read How to unlock all Mates in Yu-Gi-Oh Master Duel

They aren’t regarded on the field because they are a component of the XYZ Monster. If an XYZ Monster is sent to the graveyard or removed from the field with its XYZ Materials attached, the Materials are also sent to the cemetery. XYZ Monsters, on the other hand, will not get any XYZ Materials when Special Summoned unless a card effect expressly grants them any.

Keep these things in mind for Xyz Summoning

  • In Yu-Gi-Oh! Master Duel, players must stack two face-up cards of the same level on the field as XYZ Materials, then attach an XYZ Monster of the same rank to the Materials to complete an XYZ Summon. 
  • XYZ Monsters do not have levels, but the number of black stars written beneath the card title indicates their rank. 
  • The needed resources for each XYZ Monster are listed in the card description.
  • Some XYZ Monsters, on the other hand, need the summoning of a specific type or attribute of XYZ Material. 
  • XYZ Monsters, like all other Special Summons, cannot be Special Summoned from the graveyard or banished zone unless they have been properly XYZ Summoned beforehand.

For more Guides, Tips, and Tricks

You can also check our dedicated Video Games Guides section.

Death End Re;Quest 2 Guide – Everything You Need to Know

Here is the Death End Re;Quest 2 guide that will help you to know everything so that you can have a good start in the game.

Compile Heart and Idea Factory has created Death End Re;Quest 2, a role-playing game. It is the sixth game in Compile Heart’s “Galapagos RPG” series, and the sequel to Death end Re;Quest. Gameplay follows Mai Toyama in her investigation of strange events in European village Le Choara. The game’s universe is the same as the original Death End Re;Quest.

Death end Re;Quest 2 follows in the footsteps of the original Death end Re;Quest in terms of RPG gameplay. All of the first game’s “hacking” mechanisms have been eliminated, and characters no longer die when their corruption reaches 100%.

The narrative is divided into two parts: “day” and “night.” Day portions depict daily living in and around Le Choara, with the option of conversing with fellow dormmates. Players take control of Mai and her pals as they explore Le Choara and fight in traditional turn-based combat during the night phases.

Read Dying Light 2 Guide – Tips and Tricks

Death End Re;Quest 2 Guide: Day/Night Cycle

The second part of Death End re;Quest is divided into two parts. These are nattering during the day and roaming at night. In terms of mechanics, this is demonstrated by the game’s inclusion of two distinct genres. Death End re;Quest 2 is mostly a Visual Novel with some light decision-making tossed in for good measure. By night, the game transforms into a traditional JRPG Dungeon Crawler with a twist.

It is entirely up to you how much speaking you do. If you want to see every plotline and side character, you may do so by clicking through the menu-based portions during the day and absorbing Wordsworth’s trope-filled pleasure. If you’re all in on it, bypassing each day and diving right into Le Choara is a realistic option.

Read Lost Ark Abyssal Dungeon – A Complete Guide

Death End Re;Quest 2 Guide: Battle

Death end re;Quest 2 Guide
(Image credit: Idea Factory)

A ring will develop once participants engage in a fight, and this will be the battleground. Players and adversaries can walk about inside the ring, putting themselves in opportune locations to gain the upper hand. The character with the fastest reaction time will take the lead. Each character may move about freely on the field at the start of each turn, allowing you to make combinations with your character or strike from outside the enemy’s range to keep soldiers safe.

To do three actions within one character’s turn, it’s always ideal to utilize the Triact. Triple attacks will be used to deliver a greater amount of damage, followed by a knock back to end the combination. Selecting three guards increases its efficacy, allowing characters to survive more powerful blows.

Death End Re;Quest 2 Guide: Explore

Death end re;Quest 2 is a part-time JRPG in which you must gain strength in order to proceed. This may be accomplished in a number of ways, the most important of which being levelling up and purchasing equipment. You’ll be thrown back into Le Choara time and time again, so retreading the same cobblestone lanes and dusty hills may seem meaningless – yet that’s where the secret is.

Each region expands as you play. There may be a new path or hidden cache where previously there were barriers to proceed. New chests will frequently occur in previously visited locales, containing strong weapons or vital cures.

Death End Re;Quest 2 Guide: Overkill

Death end re;Quest 2 Guide
(Image credit: Idea Factory)

Another benefit of utilizing your talents freely is the additional damage they provide. This is linked to the Overkill system, which gives you a lot of points for dealing a lot of damage. To put it another way, the more brutal the kill, the more EXP and Eni you get.

This benefit is also not insignificant. Every fight, maxing up your Overkill might double your prize, which is nothing to sneeze at. Because this increase is so significant, you may keep fighting in the early stages of the game and still reap the benefits owing to Overkill.

Death End Re;Quest 2 Guide: Elements

Every adversary, attack, and character in Death end re;Quest 2 is susceptible to the elements, which are represented by a basic ‘rock, paper, scissors’ system. Sun, Moon, and Star are examples of these. The system is summarized as follows: Moon>Sun>Star>Moon.

You may find out an enemy’s and your own Element by using the Search tool, and your skills will tell you their Element in their description. Keep in mind that the element of a character has no bearing on the talents they may master. The majority of characters can gain talent from all the elements; they are only vulnerable to certain ones.

Knockback is a great way to end your combos

Death end re;Quest 2’s fundamental fighting mechanism is the Triact system. Every figure on the battlefield has complete freedom of movement and can perform up to three actions every round. Your combinations are made up of these actions, and the stronger your combo is, the more damage you cause. Ending a combination with a Knockback is the greatest method to make it stronger.

Death end re;Quest 2 Guide
(Image credit: Idea Factory)

Death end re;Quest 2 is similar to snooker in that if you smash an adversary hard enough and with enough skill, they will bounce around the arena like an 8-ball. They do greater harm each time they bounce. When one opponent collides with another, the knockback is shared and the damage multiplies enormously. 

Even better if an enemy collides with one of your characters. This will result in a Knock Blow, which will launch the offending enemy for even more damage. Relying just on physical strength won’t get you very far; instead, focus on your enemies.

Do not ignore Bugs 

Bugs are shimmering specks that appear all over the battleground. In Death End re;Quest 2, bugs play an important part, and engaging with them will considerably improve your fighting effectiveness. Each Bug has a distinct effect, which is activated by collecting that bug. This might be a gain in ATK or a short burst of damage, similar to a mine.

Bugs may be collected in a variety of methods, but the two most common are stepping over them and slamming adversaries through them using Knockback techniques. In any case, you will be affected by the Bug. Breaking Bugs with an enemy’s body has the extra bonus of increasing your EXP and Eni award when the battle is over. You want to shatter as many Bugs as possible in each combat since they are helpful to your health, resources, and growth.

For more Guides, Tips, and Tricks

You can also check our dedicated Video Games Guides section.

How to Beat Hades Final Boss – A Complete Guide

Here is a complete guide on how to beat Hades final boss. We have listed the weapons and boons you can select for this fight.

At the River Styx in Hades, the most dedicated and skillful players will eventually find themselves. They’ve slain the Furies, the Bone Hydra, and even Asterius and Theseus all at the same time. Each of the Gods of Olympus has done everything they can to assist them, and the player is ready to enter the mortal realm’s chilly air. When they take a step out into the snow, they glimpse an unmistakable figure: Hades himself.

The God of the Dead is Hades’ final boss, and he is a huge hassle. Every one of his strikes is aimed at robbing Zagreus of as much health as possible and returning him to his home. Furthermore, because Hades’ health regenerates after being slain the first time, players are compelled to kill him twice. This is a difficult battle, but one that can be won.

Players will require their most formidable weapons and boons to defeat Hades himself. Because defeating Hades is a difficult endeavor, players must be well-equipped. There are two phases to the boss battle, both of which are identical. Players must, however, be wary of Hades and maintain a safe distance from him. In this guide, we will tell you how to beat Hades Final Boss.

Read How to beat Stormterror Dvalin in Genshin Impact – Guide

How to Beat Hades Final Boss: Weapons

Your weapon will be the most important component in defeating Hades. Everyone has a distinct preferred play style, and each weapon should be utilized for a certain build. Close-range strikes are possible with sword and shield, for example. They’re ideal for gamers who don’t mind swooping in and out of battle. From a distance, though, the pistol and bow deliver less damage. They’re ideal for cautious gamers.

Stygius – Aspect of Poseidon

The Aspect of Poseidon’s special strike dislodges cast ammunition from enemies. It allows you to accumulate damage from casts that stick into foes, which is particularly useful for cast-oriented setups.

Aegis – Aspect of Chaos

The Aspect of Chaos is frequently regarded as the finest weapon to utilize for a quick victory, owing primarily to the shield-throwing special, which aids in spreading damage beyond the initial target, clearing traps, and keeping crowds under control.

Varatha – Aspect of Hades

Varatha’s Aspect of Hades lets you increase extra damage by up to 150 percent for 10 seconds, giving a significant boost for cautious warriors.

Twin Fists – Aspect of Gilgamesh

Despite slowing Zagreus’ attack speed, the Claws of Ekidnu still strike rapidly and deal significant damage. The additional Maim damage is especially useful in the Hades boss fight, although you must be cautious not to get assaulted before the status effect expires.

You might like Brothers A Tale of Two Sons Guide – Best Tips and Tricks

How to Beat Hades Final Boss: Boons

How to Beat Hades Final Boss
Hades (Image credit: YouTube)

Your Boons are the second most significant factor in combat success. These affect your gameplay and the way your weapon does damage to the enemies. It’s up to you to decide which Boons you want. There is, however, one unique setup that beginners may employ to quickly defeat Hades. Privileged Status, one of the greatest Mirror of Night improvements, is required.

The Privileged Status will increase your overall damage by 40% if you employ God-specific Boons to ensure that your basic strikes always apply at least two status effects. Privileged Status is the closest Hades has to playing on easy mode, because boons already impact your raw damage and status effects increase damage over time. You can become nearly unstoppable when combined with the Shattered Shackle or Pierced Butterfly. Below are some of the boons that you can use in defeating the final boss.

  • Aphrodite’s Aid
  • Divine Dash
  • Hyper Sprint
  • Aphrodite’s Aid
  • Curse of Agony/Curse of Pain
  • Blinding Flash 

How to Beat Hades Final Boss: First Phase

How to Beat Hades Final Boss
Hades (Image credit: YouTube)

The only way to defeat Hades, like all the other bosses in the game, is to learn his attacks and when to retaliate. If players wish to defeat Hades, they must learn the patterns of both phases of the combat.

  • Vanish – Hades will mysteriously vanish from the map. This makes him difficult to trace and removes any unfavorable status effects he may have acquired.
  • Dash – Hades will lunge at the player after vanishing, stabbing him with his spear.
  • Spin Attack – Hades will spin in a circle while wielding a spear.
  • Cast Attack – This attack resembles Zagreus’ own casting attack. It inflicts Boiling Blood, which deals damage over time if it hits. Before bursting, it will detach from Zagreus.
  • Spawning – Hades will unleash Bombers and Witches after his health is down significantly.

The key to the first part of this encounter is to remain a safe distance from Hades and attack him with distant strikes or assaults that keep the player out of his spin attack’s range. If he tries to Cast, players can hide behind one of the numerous pillars in the area or use one of Artemis’ Boons to redirect it back at him. Continue to move in order to bring Hades down. Phase 2 will commence after his health has been completely drained.

How to Beat Hades Final Boss: Second Phase

How to Beat Hades Final Boss
Hades (Image credit: YouTube)
  • Soul Vase – On the map, there will be several vases that Hades and Zagreus can destroy. This summons phantom hands, which seize Zagreus and temporarily paralyze him.
  • Laser – Hades will come to a halt and unleash a barrage of huge lasers that will whirl around him. Only by hiding behind a pillar, you will be able to evade this assault.

These two attacks are added to Hades’ attack list in the second phase, although he can still utilize his other attacks. To avoid taking damage from Hades, players must just keep moving and shelter behind a pillar whenever necessary. Keep in mind that the optimal tactic is to use ranged assaults like casting and to carry the most powerful Godly Boons with you.

It will be easier to defeat the final boss with the help of boons such as Divine Dash, Blinding Flash, Hyper Sprint, and Aphrodite’s Aid. Additionally, players can benefit from boons such as Privileged Status, which increases an enemy’s damage by 40% if the enemy is afflicted by two status effects at once.

For more Guides, Tips, and Tricks

You can also check our dedicated Video Games Guides section.

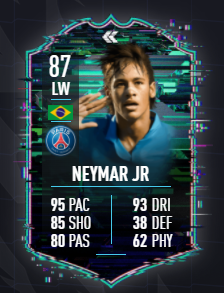
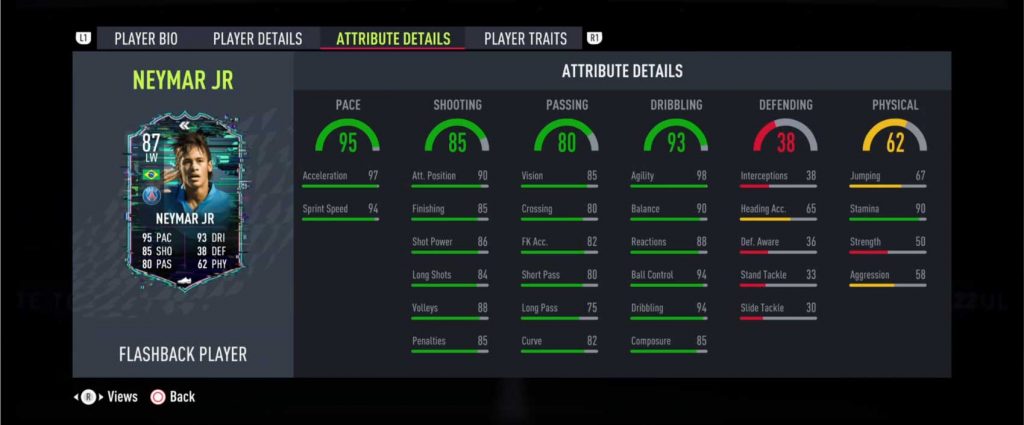
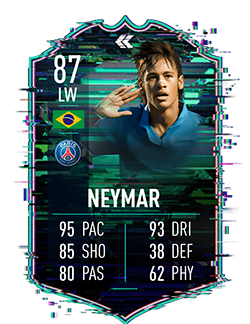
How to complete FIFA 22 Flashback Neymar Jr SBC

We have brought you a guide on how to complete FIFA 22 Flashback Neymar Jr SBC. Below are the requirements and solutions.

In addition to the new dual potential stars for the Future Stars promo in FIFA 22, a fresh new Flashback card for Neymar Jr has been revealed. The card won’t be able to compete with the other Neymar Jr cards out there, but the positional difference might be the deciding factor.

The career of Neymar Jr. has been full of memorable moments. While some occurred while he was in Barcelona, others happened while he was at PSG. But one often forgets he had a tremendous impact on Santos FC as well. Flashback to FIFA 22 Between 2003 until 2009, Neymar Jr. SBC was a member of Santos FC. At the time, he was still just in the youth squad, but it was evident that they had a generational talent on their hands.

Read FIFA 22 Future Stars – Team 2 Released, Stats and Everything You Need to Know

FIFA 22 Flashback Neymar Jr SBC stats

The 87 OVR card is a downgrade over his ordinary 91 OVR gold card in various ways. In other ways, though, it is an improvement. It boasts +4 speed and +2 shooting, but -6 passing and -1 dribbling – which, depending on your playstyle, is a reasonable tradeoff.

What is SBC?

Squad Building Challenges (SBCs), on the other hand, allow you to create unique Squads utilizing your Player Items based on various challenge requirements, which you can then submit to gain prizes. Some SBCs feature many challenges, each with a separate payout and a bigger group award for finishing all of them. Others are little more than a single challenge.

Some SBCs can be repeated. There’s a chance you’ll get a different prize each time you submit the Squad, but there’s also a chance you’ll get a repeat award. SBCs are accessible in all versions of FIFA 22, however, they may change depending on what platform you’re playing on. Rewards may differ depending on the platform.

FIFA 22 Flashback Neymar Jr SBC Requirements and Solutions

In order to unlock Neymar Jr’s new card in FIFA 22, you have to play with two different squads. Our solution for both of them is provided below, along with their requirements.

Flashback Neymar Jr. SBC
Flashback Neymar Jr. SBC (Image credit: EA Sports)
Read How to complete Arthur Cabral SBC in FIFA 22 Ultimate Team

Selecao

  • Squad Rating: Min 85
  • Team Chemistry: Min 65
  • IF Players: Min 1
  • Number of players from Brazil: Min 1
  • Number of players in the Squad: 11
  • Reward: 1 Prime Electrum Players Pack

Solution

  • LW: Insigne
  • ST: Immobile
  • CF: Ilicic
  • CDM: Brozovic
  • ST: Morata
  • CM: Arthur
  • ST: Livaja
  • CB: Acerbi
  • GK: Szczesny
  • CB: Kjaer
  • ST: Ibrahimovic

Ligue 1

  • Squad Rating: Min 86
  • Team Chemistry: Min 60
  • IF Players: Min 1
  • Number of players from Ligue 1: Min 1
  • Number of players in the Squad: 11
  • Reward: 1 Rare Mixed Players Pack

Solution

  • ST: Lukaku
  • LW: Mane
  • CDM: Hojbjerg
  • CM: Kovacic
  • CM: Partey
  • RM: Bailey
  • CB: Skriniar
  • CB: Matip
  • GK: Mendy
  • CB: Stones
  • RWB: Gulbert

FIFA 22 Flashback Neymar Jr SBC Cost

Flashback Neymar Jr. SBC
Flashback Neymar Jr. SBC (Image credit: EA Sports)

In comparison to comparable SBCs, we’ve seen in the past, Neymar Jr.’s FIFA 22 Flashback SBC is reasonably priced. Only 255,000 FUT Coins on PlayStation, 245,000 on Xbox, and 260,000 on Origin PC are required. However, keep in mind that pricing might change at any time. As a result, there’s a significant likelihood that the price of these (and other) options will differ. Regardless, it’s a great card to have, and it’ll be available until February 26.

For more Guides, Tips, and Tricks

You can also check our dedicated Video Games Guides section.

Genshin Impact Azhdaha Guide – Easy Way to Beat Him

We have brought you the Genshin Impact Azhdaha guide which will give you an easy way to beat him. Follow our tips and win this boss fight with ease.

In Genshin Impact 1.5, Azhdaha was added as a tanky boss. He is a weekly boss that may be found after completing Zhongli’s second narrative. The Azhdaha you’ll battle with Zhongli, on the other hand, is substantially weaker than the weekly boss. This is due to Azhdaha’s ability to swap components, forcing players to react swiftly in order to oppose his new form. 

This monster has a lot of health, so whittling him down will take a long time, especially if you battle him on one of the harder tiers. Many gamers have reported that Azhdaha is far more challenging than the Childe fight. Below, we have the Genshin Impact Azdaha guide that will help you to beat him.

Genshin Impact Azhdaha Guide
Genshin Impact (Image credit: YouTube)
Read How to get ‘Perfect Quality’ for Golden Calendula Swirl firework – Genshin Impact Guide

Genshin Impact Azhdaha Guide: First Phase

Azhdaha’s fight is divided into three different phases, which develop in succession as you reduce its HP by two levels. Azhdaha performs Geo attacks in the first phase. Be aware of falling boulders within the arena, which are denoted by yellow runes on the ground, throughout this phase. You can easily avoid them, but be careful not to expend too much vitality. 

Stamina is one of the most crucial resources for the length of this battle. Depending on your proximity to Azhdaha’s body, it may frequently stamp its feet or swish its tail. If you wander too far, it will fire homing boulders at your character, although these are simple to escape.

You should pay attention to a certain vocal line from Azhdaha. It is the beginning of his transfer to the next level. The beast will charge for a tremendous attack while speaking, which can easily wipe off your characters. Move away from the center, where it will unleash large AoE damage pulses, once it jumps high off the ground. Azhdaha often moves on to its second phase, the Hydro phase, after this encounter.

Genshin Impact Azhdaha Guide: Second Phase

Genshin Impact Azhdaha Guide
Genshin Impact (Image credit: YouTube)

Azhdaha will be able to inflict a Hydro state and deal Hydro damage in the second phase. If it isn’t neutralized, it will continue to cause Hydro harm over time. You may counteract this by equipping a shield on your character, regardless of the element. Azhdaha’s basic attacks are the same as in the first phase, however, now it does Hydro damage instead of Geo. 

It will also begin to produce mobile Hydro spheres that deal damage and cause status effects. Azhdaha will shift to the third phase after dealing enough damage and will repeat the seismic assault from the first phase, which you must dodge or neutralize.

Read How to beat Stormterror Dvalin in Genshin Impact – Guide

Genshin Impact Azhdaha Guide: Third Phase

Azhdaha enters its third phase after completing the transformation, this time coping with electrical damage. The number of hard-hitting attacks that you must continually evade makes this period the most difficult. Azhdaha digs deep, leaving its tail protruding out very high in the air, and rains lightning down from the sky in one strike. 

The locations of lightning strikes will be indicated on the ground, so stay away from them at all costs. Staying towards the center allows you to avoid it more easily. This gives you plenty of space to go from one secure position to the next.

When Azhdaha is done with this move, he returns to the surface and resumes his normal attacks. Its Electro Spheres have a status effect identical to the Hydro phase, which may be negated by any shield. Azhdaha, on the other hand, is far more aggressive and can repeat its earlier strikes, including the big earthquake that now causes tremendous Electro damage.

To make this weekly monster simpler, you’ll need to master a number of mechanics. Investing in characters that thrive in this battle will pay off in the long run. Also, because you’ll only be fighting Azhdaha once a week, ingesting food that boosts your stats, particularly ATK, DEF, and stamina intake, is a good option that doesn’t need a lot of money.

What characters are needed?

Genshin Impact Azhdaha Guide
Genshin Impact (Image credit: YouTube)

Azhdaha is different from the other bosses in that he demands either exceptional dodging or the use of a shield character. To be careful, take the help of Zhongli, Noelle, Xinyan, Beidou, and Diona. You should also prepare a lot of food ahead of time, have lots of healing goods on hand, and store up on food that increases your attack and defense. 

You should bring some revives with you as well. It’s strongly encouraged that you invite Qiqi or Barbara to your team as well. Azhdaha does a lot of damage, and it’s doubtful that you won’t come across a character that isn’t in good shape during the fight.

It’s difficult to pick a DPS since Azhdaha changes components. Because being near Azhdaha may be incredibly risky, your best chance is to go with your favorite and attempt to place a ranged character like Ganyu or Amber in your spare slot.

Extra tips to beat Azdaha

Extra tips to beat Azdaha
Genshin Impact (Image credit: YouTube)

Azhdaha is a powerful fighter who is particularly dangerous up close. Don’t let him catch you off guard; he can attack with his head, feet, torso, and tail. Remember that if you go too far away from him, he has methods like charging and digging to close the distance. It’s simple to avoid them; simply stay moving. 

Azhdaha’s elemental form makes him more aggressive, and as he generates shockwaves, he will discharge floating orbs, homing circles, and elemental damage. You won’t be marked if you use a shield, but you should still try to avoid as many strikes as possible.

A bow user or a catalyst keeps a safe distance from Azhdaha, one of the best ways to damage her. To quickly reduce Azhdaha’s health bar, be sure to cause as many reactions as possible. Be sure you have healing ready and a shield equipped if you intend to use a close-range attack style.

For more Guides, Tips, and Tricks

You can also check our dedicated Video Games Guides section.