Hello Neighbor Act 1 Guide – Tips and Tricks

Love horror and puzzle games? To make sure you get started on the right foot, we have the Hello Neighbor Act 1 Guide for you.

In Hello Neighbor, the player is moving into a new house across the street from a mysterious neighbor who seems to be harboring a secret in his basement and is becoming nervous. The player must break into the neighbor’s house and complete a series of riddles in order to obtain the things required to unlock and enter his basement. 

As the player explores the mystery neighbor’s house, they must avoid being noticed by the mysterious neighbor, otherwise, they will be pursued and captured if they do not conceal or flee quickly enough. To make it simpler to leave, the player can shock the neighbor by hurling things at him. We have the Hello Neighbor Act 1 Guide for those who have just begun the game and are confused about what to do and how to do it.

You might like Brothers A Tale of Two Sons Guide – Best Tips and Tricks

Hello Neighbor Act 1 Guide: Use the boxes

Hello Neighbor Act 1 Guide
Hello Neighbor (Image credit: tinybuildgames)

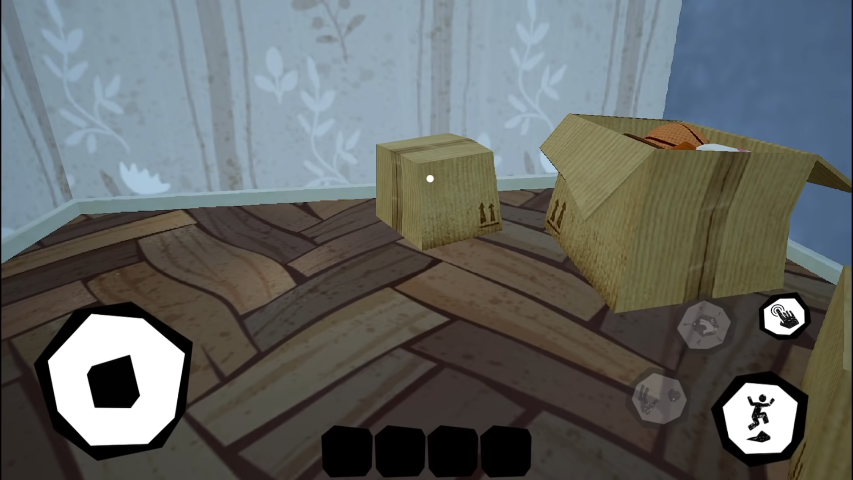
Your primary plan should not be to explore all of the rooms in the home, but rather to utilize boxes to climb to the roof and get access to the top level. Open the closet behind the stairs in your house to receive four boxes for free before going to the neighbor’s house. It’s simpler to get the boxes here than in the neighbor’s yard, where he may see you through the window.

Because of the faulty controls and the ease with which boxes can fall off the roof, it is suggested that you smash out the second-floor window before going up there. Simply take anything off your house’s wall, such as a ball or a strange eye painting, and throw it up at the window from near the fence. After that, double-check that your inventory has at least two boxes and climb up the yellow shelves to the left of the front entrance.

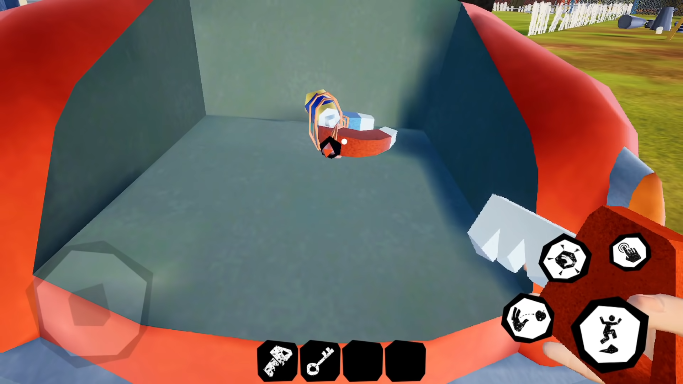
Hello Neighbor Act 1 Guide: Gold Key

Hello Neighbor Act 1 Guide
Hello Neighbor (Image credit: tinybuildgames)

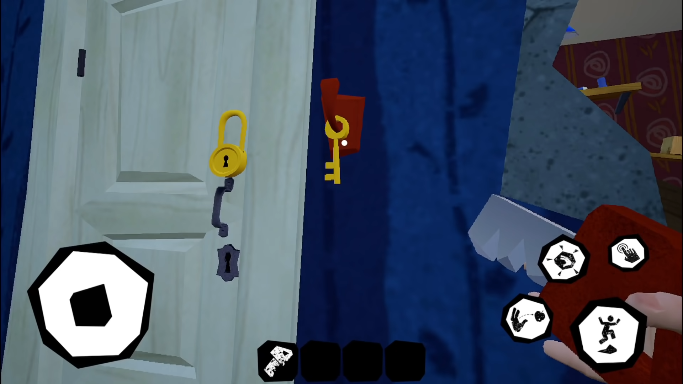
Grab the gold key next to the door in the purple chamber and open it to make it simpler to pass through. Look for a keychain on the wall to your right and take the red key. This one will allow you to return to the lawn and access the trunk of the red automobile. Return to the bedroom window and walk down to the automobile. To obtain the magnet, unlock the trunk and use it to take metal things from afar.

Hello Neighbor Act 1 Guide: Lock pick and Wrench

Hello Neighbor Act 1 Guide
Hello Neighbor (Image credit: tinybuildgames)

A small open window high enough in the ceiling so that you can’t quite reach it is the perfect place to look. In front of the work shed, place a few boxes so you can jump up and look inside. As of now, the wrench can’t be grabbed with the magnet, but you can get the silver lock pick by pulling it from the top left of the shelves.

You may now use the lock pick to unlock the door to the left of the stairwell in the hallway. That door goes to the shed where the lock pick was stolen. Instead of utilizing the magnet, you may now physically grab the wrench off the wall. Return to the location where you created the box tower and took the lock pick.

Hello Neighbor Act 1 Guide: Basement

Hello Neighbor Act 1 Guide
Hello Neighbor (Image credit: tinybuildgames)

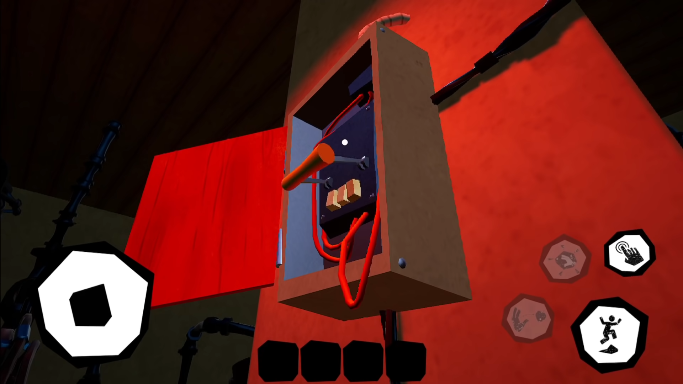
After sprinting down the stairs, unlock the old-fashioned washing machine against the wall to find a secret route to the next level. When you open the door, you’ll find yourself in a strange place where a whole artificial world has been built to deceive someone. To depart the false chamber stage and get entry to the remainder of the basement, pull one of the paintings depicting an open window off the wall. 

You can switch off a wall breaker but don’t just yet. Instead, use the adjoining wall switch to open the grating and get access to a huge area to explore. You’re looking for a portion near another grate that has a red light bulb and a marionette.

Now you can enjoy the game as we have covered all the hard parts of Act 1. What fun will it be if we tell you every single thing to do right? 

Read Sifu Guide – Things you should know before you start the game

Tips that you should keep in mind

Remember that a startling sound and the screen turning dark indicate that your neighbor is approaching. Better flee to your house; you’ll be safe there because the neighbor won’t be able to intrude on your land. When fleeing, be cautious since your neighbor may attempt to slow you down by tossing glue jars at you.

Make use of the hiding spots. After entering the neighbor’s house, you must maneuver between rooms with dexterity while avoiding being detected. When sneaking about isn’t enough, you can hide, for example, inside a closet, when you see (or hear) your neighbor approaching.

It’s important to remember that your character only has three inventory spaces. You can only carry four objects at a time during the game. As a result, consider storing valuables at home, where they will be protected.

For more Guides, Tips, and Tricks

You can also check our dedicated Video Games Guides section.

Lost Ark Gunslinger Guide – Best Build for PvP and PvE

Here is the Lost Ark Gunslinger Guide. In this guide, we will give you all the information along with the best build for PvP and PvE.

The Gunslinger is a flexible class with a variety of effective setups for both PvE and PvP of Lost Ark. While the traditional Mage and Warrior classes may appeal to you more, Lost Ark’s Gunner class provides a unique combination of high damage DPS and fast-paced action that strikes the right balance of all things strong.

The Gunslinger is divided into four Advanced Classes, each of which uses three distinct weapons to attack her opponents: dual pistols, a shotgun, and a sniper. It’s one thing to combine this diverse weaponry to form flawless combinations, but having the perfect build will ensure your success. So, below is the Lost Ark Gunslinger Guide.

Lost Ark Gunslinger Guide
Lost Ark (Image credit: YouTube)
Related: Lost Ark Chaos Dungeon – A Complete Guide

Lost Ark Gunslinger Guide

The Gunslinger’s utility weapon is a pair of pistols. She may cast buffs and debuffs while wielding them, as well as making full use of her high mobility stats. The Gunslinger’s burst attack is the shotgun, which specializes in inflicting close-range damage. However, if you chose the Time to Hunt engraving as your final specialty, you will not be able to utilize it. The rifle is a formidable weapon that may be used to cause long-range damage. The Peacemaker engraving gives this weapon a double dose of added functionality.

The Gunslinger has a number of benefits, including speed, mobility, and high damage output. The disadvantages of this class are her low HP and defense numbers. While her needed placement is far from the fiddliest of Lost Ark classes, her controls can take some getting used to. Setting up her optimum range while simultaneously keeping an eye on cooldowns and controlling weapon rotations may take some time to get used to.

Lost Ark Gunslinger Guide: Skills

Unsurprisingly, much of the Gunslinger’s usual talents revolve around making the most of the mini-arsenal she carries about with her, with a variety of ways to enhance her marksmanship. Her top-tier mobility speed is also set to improve over time, and skill-based grenades may be added to her already-impressive loadout.

Lost Ark Gunslinger Guide
Lost Ark (Image credit: YouTube)

Bullet Rain: Increases the Crit rate by 20%. Bullet Rain’s duration is enhanced by 3 seconds, and its damage is raised by 60%. Every opponent hit greater odds of the skill’s cooldown ending instantaneously by 30%.

Equilibrium: For 12 seconds, affected enemies have a -10% Crit resistance to attacks from all party members. Equilibrium transforms into a 360-degree move that deals 100 percent more damage to enemies at Challenge difficulty or lower. It also increases the Crit rate by 60%.

Focused Shot: Reduces the time it takes to aim. The affected enemy is stunned for 3 seconds after every third attack.  Increase damage by 150% after aiming to inflict Kill Confirmation.

AT02 Grenade: Increases the grenade’s AoE radius by 20 percent. Outgoing damage is reduced by 75%, but enemies are frozen in place, allowing follow-up attacks simpler.

Spiral Flame: Speeds up aiming by 50%. When fighting enemies with fewer than 50% HP, crit rate increased by 60%.

Dextrous Shot: Attack speed is increased by 10%.

Spiral Tracker: For 12 seconds, all party members can attack affected enemies with a -10% Crit resistance.

Awakening skills

Eye of Twilight: Debuffs slow down movement and attack speed for a brief period of time, but when triggered, they do damage to foes within a radius while also applying Stagger and Weak effects. When the skill expires, all debuffs are removed.

High-Calibre HE Bullet: The Gunslinger lunges backward while launching an AoE attack, stuns enemies in the burst radius, and deals substantial damage.

Read Best Way to get Gold in Lost Ark

Lost Ark Gunslinger Guide: Engravings

Lost Ark Gunslinger Guide
Lost Ark (Image credit: YouTube)

Engravings can be applied to a Lost Ark character after they reach Level 50. Engravings are part of the endgame content in the Lost Ark, and they enable you to add a number of buffs and boosts to your character’s equipment. In addition to the general engravings available to all characters, each class gets two “class bonus” engravings that are only available to that class. These effectively allow you to choose a subclass for them to specialize in.

Peacemaker and Time to Hunt are the engravings for the Gunslinger class. Both are excellent possibilities for PvE Gunslinger builds; the decision comes down to whatever playstyle appeals to you more. 

Peacemaker boosts attack speed by up to 16 percent in Handgun Stance, improves critical rate by up to 25% in Shotgun Stance, and increases damage by up to 10% in Rifle Stance. Furthermore, when in Rifle Stance, strikes to foes with less than 50% HP will stack on an extra damage benefit of up to 30%. Time to Hunt increases the Crit rate by up to 30% for Handgun and Rifle abilities but prevents the usage of the Shotgun Stance.

Lost Ark Gunslinger Guide: Best Build for PvP

  • Quick Step (Pistols)
  • AT02 Grenade (Pistols) (Skill level 7/10)
  • Spiral Tracker (Pistols) (Skill level 7/10)
  • Somersault Shot (Pistols) (Skill level 4/10)
  • Death Fire (Pistols) (Skill level 10/10)
  • Dexterous Shot (Pistols) (Skill level 10/10)
  • Peacekeeper (Pistols) (Skill level 7/10)
  • Flurry of Bullets (Pistols) (Skill level 4/10)
  • Last Request (Shotgun) (Skill level 4/10)
  • Dual Buckshot (Shotgun) (Skill level 7/10)
  • Precise Aim (Sniper) (Skill level 4/10)
  • Catastrophe (Sniper) (Skill level 10/10)
  • Perfect Shot (Sniper) (Skill level 10/10)
  • Focused Shot (Sniper) (Skill level 10/10)
Read Best Lost Ark Bard Build – PvP and PvE

Lost Ark Gunslinger Guide: Best Build for PvE

  • Quick Step (Pistols) (Skill level 4/10)
  • Spiral Tracker (Pistols) (Skill level 4/10)
  • Equilibrium (Pistols) (Skill level 4/10)
  • Dexterous Shot (Pistols) (Skill level 4/10)
  • Peacekeeper (Pistols) (Skill level 4/10)
  • Shotgun Rapid Fire (Shotgun) (Skill level 10/10)
  • Last Request (Shotgun) (Skill level 4/10)
  • Dual Buckshot (Shotgun) (Skill level 10/10)
  • Sharpshooter (Shotgun) (Skill level 10/10)
  • Catastrophe (Sniper) (Skill level 4/10)
  • Perfect Shot (Sniper) (Skill level 7/10)
  • Focused Shot (Sniper) (Skill level 10/10)
  • Target Down (Sniper) (Skill level 10/10)

For more Guides, Tips, and Tricks

You can also check our dedicated Video Games Guides section.

Brothers A Tale of Two Sons Guide – Best Tips and Tricks

We have brought you the Brothers A Tale of Two Sons Guide with some of the best tips and tricks to solve the chapters.

A man who is clinging to his life. His two boys are left with just one alternative if they want to save their dying father, they must embark on a quest to locate and return the “Water of Life.” However, they must rely on one another to survive.

Using specially built twin virtual joysticks, guide two brothers, Naia and Naiee, on an epic fairy tale quest. In single-player mode, you may control both brothers at the same time and enjoy cooperative action. Solve puzzles, visit beautiful settings, and face boss fights by combining the strengths, sizes, and speeds of the big and small brothers in this game.

Read Best Way to get Gold in Lost Ark

Brothers A Tale of Two Sons Guide: Interactions

There are various potential interaction points throughout the game, particularly in the initial chapters, such as individuals you may chat with or simple things you can interact with. Most of the time, depending on which Brother you use to engage with it, the interaction will be different. Optional interactions are usually little additions that have no bearing on your progress. The benches that can be sat on can often be found along with the other interaction points. They are often used for simply enjoying the view.

Brothers A Tale of Two Sons Guide: How to unlock the wishing well

Brothers A Tale of Two Sons Guide
Brothers A Tale of Two Sons (Image credit: YouTube)

If you choose, you may engage with the grandmother on the left at the start; Big Brother will ask for information, while Little Brother will play with her. Following that, you’ll witness a child having fun with a ball. Take the ball from her and head back to the right, where you’ll find a well. To open the wishing well, toss the ball into it.

Brothers A Tale of Two Sons Guide: How to fend off the wolves

When Naia wakes up to the sound of wolves on the prowl, quickly grab a burning stick from the brothers’ fire to fend them off. When a wolf approaches, keep Naiee close to Naia and flick the torch around to scare it away. You’ll arrive at a graveyard once you’ve reached the end of the gloomy woodland. Look to your right for an angel statue, and engage with it for a bit with Naiee. Soon enough, a shooting star will appear in the backdrop.

Read FIFA 22 Future Stars – Team 2 Released, Stats and Everything You Need to Know

In chapter 4, how to prevent a man from committing suicide

After climbing two stone hills, look for a guy on a stool who is about to hang himself. Hold him up with Naia to keep him from dying, then untie the rope with Naiee to get him back on the ground. Walk to the right side of the tree and drop down to a ledge after the man is on the ground. To cheer him up, shimmy around to the opposite side of a burned-down home, likely his own, and give him the music box inside.

Ride quickly to the wooded area

Naiee must now cross through several bars to reach a windmill, where he must jump to the other windmill in order to reach a crank on the opposite side of a bridge. When Naiee stretches the bridge, Naia must lift his section of the bridge so that it may fall into the metal holes on Naiee’s side. You should see some goats in an enclosure once the brothers find a wooden cottage higher up the mountain. Open the gate and strap each brother to a goat for a little trip into the woods.

How to defeat the spider in the final chapter

Brothers A Tale of Two Sons Guide
Brothers A Tale of Two Sons (Image credit: YouTube)

About a minute into the last chapter, the brothers will stumble into a trap. When you’re up against the spider, use the curved edges of her cave to help little brother get some more speed, so he can roll her off of Naia, then tear a leg off using Naia’s power. As she comes down to tackle big brother again, dodge the weight of her fall, and repeat until most of her legs have been severed.

The brothers will soon discover the large tree they’ve been searching for. Climb to the top and get the elixir they’ve been looking for, then return it to them. Before you conclude the tale from here, there will be a couple more portions of mild interactivity.

For more Guides, Tips, and Tricks

You can also check our dedicated Video Games Guides section.

Best Way to get Gold in Lost Ark

Who does not want gold in the game? Every Lost Ark player will look for more golds. Here is the best way to get gold in Lost Ark.

Lost Ark gold is mostly utilized as a medium of exchange between players, but it also feeds into some of the game’s item upgrading mechanisms. It’s one of seven currencies shared by all characters on a player’s account, and it’s a lot rarer than silver, the basic free in-game currency.

There is a tax that must be paid when trading gold between players. This is also true when purchasing or selling items in the in-game auction house, which normally costs gold. Gold may also be used to decorate a player’s private residence or converted into premium money such as blue crystals. Below is a guide that will show you the best way to get gold in Lost Ark.

Read our Lost Ark Guide – 10 Tips Everyone Should Know

Best Way to get Lost Ark Gold:

Una Tokens

Get Una Tokens by logging in regularly and completing your daily and weekly tasks. The progress bar will fill up when these are available on the left side. Then take the gold caskets and other rewards to any major town’s Gold Merchant to obtain Gold currency.

  • You can obtain a Gold Pouch for 80 Una tokens, which is worth at least 200 gold.
  • You can receive a Gold Chest for 200 Una tokens, which is worth at least 600 gold.
  • Furthermore, you can obtain a Gold Casket for 500 Una tokens, which is worth at least 1,250 gold.

Life Skills

Items can also be crafted with resources obtained from life skills such as mining and herbalism. You can then sell it at the auction house. If more players enter the game, the price is likely to fluctuate based on what is in high demand.

Lost Ark Gold
Lost Ark (Image credit: YouTube)

Crafting and Rapport

Selling player-crafted things, like in most MMOs, can also help you in earning gold. If you build rapport with any NPCs, you will receive one-time gold prizes of varying quantities.

Gateway maps and Adventure Islands

Completing a gateway map for a gateway earns gold prizes and is linked to co-op Voyage Missions.

You may go on every day excursions to adventure islands. Although not all adventure islands feature gold prizes, you can obtain gold based on your item level.

Dungeons

Lost Ark Gold
Lost Ark (Image credit: YouTube)

For a handful of reasons, Chaos Raids are well worth your effort to finish. Some feature hidden areas where you may pilfer treasures and subsequently sell them at an auction. There’s also the possibility that you’ll receive tickets for special Ticketed Events. Completing them unlocks the opportunity to earn Combat Books, which sell for a high price at the auction house.

Related: Lost Ark Chaos Dungeon – A Complete Guide

For more Guides, Tips, and Tricks

You can also check our dedicated Video Games Guides section.

FIFA 22 Future Stars – Team 2 Released, Stats and Everything You Need to Know

The FIFA 22 Ultimate Team has released the Future Stars Team 2. Here is everything you need to know about it.

One of the biggest young stars in football is featured in the FIFA 22 Future Stars promo. The incredible talent of these footballers has made them household names despite their young age. There are now a number of special cards available across all the packs in the game, added by Team 2.

However, players should be aware that these special cards are very rare to obtain from packs. FIFA 22 players will have to spend a lot of FUT coins to get them from packs. Because of the freshness of the promo and the stats of many of these cards, their costs are also higher. Below we have the list of future stars in team 2 and all the things that you need to know.

Related: How to complete Future Stars Saliba SBC in FIFA 22

FIFA 22 Future Stars Team 2 released

  • CM: Pedri (93 OVR)
  • CM: Ryan Gravenberch (92 OVR)
  • CAM: Florian Wirtz (92 OVR)
  • CB: Maxence Lacroix (90 )VR)
  • LM: Bryan Gil (89 OVR)
  • ST: Patson Daka (88 OVR)
  • CDM: Tyler Adams (87 OVR)
  • CDM: Maxence Caqueret (87 OVR)
  • LW: Darwin Nunez (87 OVR)
  • ST: Giacomo Raspadori (87 OVR)
  • CB: Roger Ibanez (86 OVR)
  • LB: Juan Miranda (86 OVR)
  • CB: Mohammed Salisu (86 OVR)
  • RB: Issa Kabore (85 OVR)

Future Stars Team 2 Stats

If players are fortunate enough, they can add some truly stunning Team 2 cards to their Ultimate Team roster. Pedri, Gravenberch, and Wirtz, three cards of outstanding quality, are all outstanding in their own rights. The card Wirtz has with 90 Pace and 88 Shooting is amazing, but the other two cards are similarly impressive.

Maxence Lacroix’s incredible speed has made him a favorite among players for years. The 90-rated CB received a major upgrade to 93 Pace. Although the base card is mediocre defensively, the Future Stars card has 89 Defense and 86 Physicality, which is phenomenal compared to the base card. Below are some of the best team 2 player’s stats

Pedri (Image credit: EA Sports)

Pedri

  • Pace – 90
  • Shot – 84
  • Pass – 93
  • Dribble – 95
  • Defense – 85
  • Physical – 78

Ryan Gravenberch

  • Pace – 91
  • Shot – 86
  • Pass – 90
  • Dribble – 92
  • Defense – 85
  • Physical – 86
Read How to complete Arthur Cabral SBC in FIFA 22 Ultimate Team

Florian Wirtz

  • Pace – 90
  • Shot – 88
  • Pass – 93
  • Dribble – 94
  • Defense – 62
  • Physical – 76

Maxence Lacroix

  • Pace – 93
  • Shot – 44
  • Pass – 70
  • Dribble – 74
  • Defense – 89
  • Physical – 86

What is FIFA 22 Future Stars

FIFA 22 (Image credit: EA Sports)

Future Stars are special cards given out to the most promising young players in world football as part of Ultimate Team’s promotional events. Future Stars cards are only available to players under the age of 23, so they provide plenty of new options for your FUT team.

The Future Stars cards will depict players as they are supposed to become, rather than as they are right now. The Future Stars card line has released some insane cards over the years, and this year is no different.

For more Guides, Tips, and Tricks

You can also check our dedicated Video Games Guides section.

Best Lost Ark Bard Build – PvP and PvE

Here is everything you need to know about Lost Ark’s Bard. Also, we have the best Lost Ark Bard Build for PvP and PvE.

A Bard in Lost Ark wields a Magical Harp and is a Mage type. Pan Flute is their musical instrument. Bards are mostly Ranged Support classes, focusing on buffing and shielding members of their parties. They can also perform some healing but to a lesser extent. The Bard is a great choice for players who thrive on finding knowledge about difficult encounters and who enjoy preventing damage and saving lives.

While using skills and dealing damage to enemies, the Serenade Meter fills up to three bars. If more bars are filled, then the identity skill will have a greater effect. The player has two Identity Skills to choose from once the bar is full: Serenade of Courage or Serenade of Salvation. Bards’ damage increases with the Serenade of Courage, as well as the damage for their party members. In the Serenade of Salvation, party members standing within the area of effect are healed.

Best Lost Ark Bard Build
Read our Lost Ark Guide – 10 Tips Everyone Should Know

Strengths and Weakness

  • Provides self and party members with shields.
  • Increases attack power by providing an aura buff.
  • Provides an Aura Buff that reduces the amount of damage absorbed.
  • Provides a victim with a debuff that increases the amount of damage taken.
  • Heals himself and other members of the party.
  • Overall harm is reduced. (Weakness)
  • Leveling alone is difficult. (Weakness)

Skills

Conviction Core: Summon three Cores to protect yourself for ten seconds. When a foe is within 4 meters of a Core, it explodes, dealing 82 damage.

Dissonance: Creates a clash of musical notes at the target location, dealing 21 Damage every 0.5 seconds for 5 seconds and decreasing Move Speed by 60% for 1 second.

Rhapsody of Light: Affects the target location with stunning sound waves, dealing 149 damage every 1.5s three times. Changing your location will cancel the channeling.

Sound Shock: Pull the string of the harp to fire a pinpoint of light that explodes on impact, dealing 125 damage to nearby enemies and the target.

Sound Wave: Create a beautiful melody that inflicts 26 Damage and pushes enemies away.

Stigma: Place a Stigma where you want it. After 4 seconds, the Stigma attacks foes every 0.7 seconds for 60 damage. A maximum of 5 times. The faster Stigma pulses, the more damage it deals.

Wind of Music: Produces a fierce wind that inflicts 49 damage and pushes enemies away. Once it has spread wide, it causes 73 damage to all enemies within 1 meter of it.

Sonic Vibration: Lift enemies at the target location, causing 115 Damage, and then slam them down again, causing 289 Damage. This skill’s melody lasts for 3 seconds and inflicts 43 Damage four times.

Rhythm Buckshot: Pull the string of the harp to cause the note to explode, dealing 210 damage to your enemies.

Soundholic: Channel a blinding ray of light for 3 seconds, hitting targets 10 times to inflict 31 Damage every 0.3 seconds. Light rays can be changed, but channeling will be interrupted if you move.

Prelude of Storm: A powerful tune summons a storm that inflicts 179 damage to foes and stuns them for 3 seconds.

Heavenly Tune: Deal 156 damage to nearby enemies. Within a 24 meter radius, the speed for all party members increases by 3.5% and MP Regen speed increases by 12% for eight seconds.

Note Bundle: Continuously inflicts 32 Damage and -40% Move Speed while traveling at low speed. Each note can hit the same target as many as 84 times.

Prelude of Death: When played, the Prelude of Death deals 119 Damage to nearby enemies, applying Death’s End, a debuff that lasts 3 seconds, causing 80 additional damage. Each stack of Death’s End reduces Move Speed by -20% up to 40% and increases Damage when it expires by 50%.

Harp of Rhythm: Call on the harp with a will of its own. A guided musical note from the harp inflicts 76 damage on enemies within a radius of 14 meters.

March: Using the harp, summon musical notes every one second. Each note deals 38 damage to the closest enemy. Move Speed is lowered by 50% for two seconds.

Guardian Tune: Play on the harp. All party members within a 24-meter radius will suffer damage of -20% for 8 seconds.

Best Lost Ark Bard Build for PvP

Best Lost Ark Bard Build
Lost Ark (Image credit: YouTube)
  • Dissonance (Skill level 8/10)
  • Heavenly Tune (Skill level 10/10)
  • Prelude of Storm (Skill level 10/10)
  • Sonic Vibration (Skill level 10/10)
  • Sound Shock (Skill level 7/10)
  • Soundholic (Skill level 10/10)
  • Stigma (Skill level 10/10)
  • Wind of Music (Skill level 10/10)
Related: Lost Ark Chaos Dungeon – A Complete Guide

Best Lost Ark Bard Build for PvE

Best Lost Ark Bard Build
Lost Ark (Image credit: YouTube)
  • Dissonance (Skill level 10/10)
  • Heavenly Tune (Skill level 10/10)
  • Prelude of Death (Skill level 10/10)
  • Sonic Vibration (Skill level 7/10)
  • Sound Shock (Skill level 7/10)
  • Sound Wave (Skill level 10/10)
  • Soundholic (Skill level 10/10)
  • Stigma (Skill level 10/10)

For more Guides, Tips, and Tricks

You can also check our dedicated Video Games Guides section.

How to Beat Master Kohga in Zelda: Breath of the Wild

In this Zelda: Breath of the Wild guide, we will be helping you on how to beat Master Kohga. This boss battle is not so hard if you follow our guide carefully.

Sheikah, the Clan hunting Link on a ceaseless mission, are opposed by the Yiga Clan, and the leader of the Yiga Clan is Master Kohga. The Sheikah’s secrets are known to be held by Master Kohga. In spite of his reputation as an authority figure, Master Kohga spends the majority of his time napping and loafing. It is the bananas that Master Kohga loves most. You’ll meet Master Kohga in The Legend of Zelda: Breath of the Wild’s Divine Beast Vah Naboris questline. 

Yiga Clan has a group of ninjas capable of teleporting around and unleashing powerful attacks. Taking a hit from Master Kohga is quite powerful. The good news is that he’s actually pretty easy to defeat once you know what you’re doing and can be the most straightforward boss encounter in the game. This will be easy if you have a couple of arrows and some melee weapons. During the fight, the only Rune power that can be selected is Magnesis, but it will only be for the end. Below, our guide will help you to understand how to beat Master Kohga.

How to Beat Master Kohga
Zelda: Breath of the Wild YouTube
Other guides
How to beat Dark Beast Ganon – Zelda: Breath of the Wild
Zelda Breath of the Wild: How to Find Leviathan Bones
Divine Beast Vah Medoh Guide – Zelda: Breath of the Wild

How to Beat Master Kohga: Phase one

How to Beat Master Kohga
Zelda: Breath of the Wild (YouTube)

The battle with Master Kohga is divided into three phases. In the first phase, he will place a blue forcefield in front of him, which you should ignore. Simply aim your bow and wait for him to summon a rock above his head, which will cause the shield he created to vanish. 

The rock will fall on his head when you shoot him in the face, causing enormous damage, and burying him. Run up to him and do as much damage as you can before he reappears. Repeat this until he has lost nearly half of his health and enters the second phase.

How to Beat Master Kohga: Phase two

How to Beat Master Kohga
Zelda: breath of the wild (Image credit: YouTube

Master Kohga floats above a bottomless pit during the second phase. This time, he’ll create two rocks at his sides, so don’t shoot him right away. As you wait for the rocks to start rotating around Master Kohga, keep your bow aimed at him. If one of them is above his head, shoot him. As he flies forward, he lands in front of you on the ground. Beat him up until he wakes up and repeat until the last phase.

How to Beat Master Kohga: Phase three

How to Beat Master Kohga
Zelda: Breath of the Wild (YouTube)

He has a blue shield that appears permanently in the last phase, but don’t be concerned. Take Magnesis and put your bow away. A large, spiked metal ball will appear above the head of Master Kohga this time. Activate your power and release it as soon as it spawns on his head, so it deals a lot of damage. 

You don’t have to worry if Master Kohga starts using his own Magnesis before you do if you are too slow. The spiked ball will still pass over his head because yours is stronger. There is a possibility that you will need to do this twice, at which point the fight will be over.

Things To Remember

A blue shield protects him during all phases. In the first two stages, it disappears when he goes offensive but remains during the third. When he is hit with an Ancient Arrow, it acts like a regular arrow, and Stasis cannot stop Master Kohga or his boulders.

For more Guides, Tips, and Tricks

You can also check our dedicated Video Games Guides section.

Lost Ark Abyssal Dungeon – A Complete Guide

Our Lost Ark Abyssal Dungeon guide will help you get through the dungeon and complete it with ease. Check out how!

Abyss Dungeons are group dungeons in Lost Ark that can be completed for special rewards. Since they are related to Character Specific Lockouts, you can only get standard treasure from each dungeon three times each week. The Abyss Dungeon is group content, therefore you’ll need a party of four to complete it. You can’t do it solo as you can with Chaos Dungeons

Citadel of Illusions in Abode of Dreams, for instance, can be run three times per week per character. Similarly, you can run the other Abyss Dungeon like Aurelsud Palace 3 times per week per character, and this keeps going on.

Before going ahead, read our Lost Ark Guide – 10 Tips Everyone Should Know

What are Abyssal Dungeons?

Abyss Dungeons are an important part of Lost Ark’s gear advancement. You may get the ingredients you need to build Legendary Equipment for your class by clearing Abyss Dungeons. If you’ve ever played on the Russian servers, you’ll know that Abyss Dungeons are known as Void Dungeons there.

Lost Ark Abyssal Dungeon: List of Dungeons

There are a total of nine Abyss Dungeons. We have listed them on the basis of their area.

Ancient Elveria area

The first Abyss Dungeon is the Demon Beast Canyon in the Ancient Elveria area. It is tier 1 and requires a 325+ item level.

The second Abyss Dungeon is Necromancer’s Origin in the Ancient Elveria area. It is tier 1 and requires a 340+ item level.

If the game is blocked in your region, read How to play Lost Ark in Blocked Countries – Guide

Abode of Dreams area

Citadel of Illusions is the third Abyss Dungeon that is also tier 1 and requires a 460+ item level.

Aurelsud Palace is the next in this area with tier 1 and a 460+ item level is required.

Great Gate area

Oblivion Sea, Perilous Abyss, Underwater Sanctuary are all the Abyss Dungeons in this area. All are tier 2 and require a 960+ item level.

Oreya’s Heart area

Eye of Aira and Oreha Prabasa are the last two Abyss Dungeon. They are tier 3 dungeons that require a 1325+ item level.

Lost Ark Abyssal Dungeon: How to unlock?

Lost Ark Abyssal Dungeon
Lost Ark (Image credit: YouTube)

To access the Abyss Dungeons in Lost Ark, you must travel to Northern Vern. You should be able to continue your Blue World Quest path once you’ve reached level 50 and arrived in Vern. Continue the Blue World Quests in the Northern Vern region until you reach “Waiting and Leaving” and finish it. 

When you finish this task, a large message will flash on your screen briefly informing you that Abyss Dungeons has been opened. After you unlock these dungeons, you can either go to any city and look for the dungeon icon on the map.

You may go there to find out more about Abyss Dungeons and sign up for groups to run one once you’ve found it. Alternatively, you may use the Group Finder to locate a group. The group finder is located to the right of your screen, beneath your minimap. You may pick Abyss Dungeons from the left side of the UI once you’ve opened the Group Finder. You may then apply to an existing group or establish your own group and have people apply to it by using the top right button.

For more Guides, Tips, and Tricks

You can also check our dedicated Video Games Guides section.

How to play Lost Ark in Blocked Countries – Guide

We have brought you a guide on how to play Lost Ark in blocked countries. Also, we have some additional tips for you at the end.

Smilegate RPG’s Lost Ark is finally accessible in North America and Europe, courtesy of Amazon, after years of only being played in Asia and Russia. The top-down, free-to-play MMORPG is brimming with things to see and do, and the world of Arkesia might be overwhelming if you’re jumping in for the first time.

The good news is that most of the things about Lost Ark appear to be simple at first sight. Spend some time with the game and its numerous features, and things will begin to fall into place sooner or later. Many of the game’s varied activities, as well as most of the optional material, can be safely disregarded, allowing novice players to jump right into the game’s primary plot quest to discover the eponymous lost ark.

Many of you might be facing problems about how to play Lost Ark in the blocked Countries. Do not worry as below we have a guide that will help you to play the game even if it is not available in your region or country.

How to play Lost Ark in Blocked Countries without a VPN

You can play Lost Ark without using any VPN too. Yes, you read it right. If you don’t want to use a VPN to play the game, you may have a friend in the NA or EU area create a new Steam account for you. Then inquire about the account’s details. Then, open your Steam client and begin downloading the game.

Related: Lost Ark Chaos Dungeon – A Complete Guide

How to play Lost Ark in Blocked Countries with a VPN

How to play Lost Ark in Blocked Countries
Lost Ark (Image credit: Youtube)

If you don’t have a buddy in any of the areas, use a VPN and follow the procedures below to play Lost Ark in any region or nation.

  • To begin, download any free VPN, such as Proton VPN or any VPN of your choice.
  • Then connect to a server that is close to you.
  • You must now create a free Steam account.
  • After you’ve completed all of the main tasks, open the Steam client and log in.
  • Start playing Lost Ark on your PC.
After successfully starting the game, read our Lost Ark Guide – 10 Tips Everyone Should Know

Tips when you start the game

Do not skip the prologue if you are new to Lost Ark and have just created your first character. It will provide the basis for the game’s Main Story while also introducing a number of the game’s key elements. While many of the gameplay features introduced in Lost Ark will be familiar to action-RPG gamers, it’s still worth playing, especially because it only lasts approximately 30 minutes. However, if you want to bypass it on consecutive characters, you may.

For more Guides, Tips, and Tricks

You can also check our dedicated Video Games Guides section.

Sifu Guide – Things you should know before you start the game

Are you a Kung-Fu fan? Then this game is for you. In our Sifu guide, we have covered all the things that you should know before you start.

Sifu is a difficult game in which you must learn the art of Kung-Fu while pursuing vengeance against those who murdered your family. The protagonist has a magical talisman that allows them to resurrect after death, but each death increases their age. 

Your aim is to complete the game before your talisman loses its power and you die of old age. Since Sifu is one of the most challenging games to date, you’ll want to be prepared with as much information as possible. Our Sifu guide will help you to know everything before you start.

Start with the first level to get accustomed to how things work

When you go through the first level of Sifu, you’ll discover that things are quite challenging. It is, however, by far the simplest level to accomplish. As a result, you’ll need to go through it a few times to become acquainted with how parrying, evading, blocking, and experience function.

This will be even more helpful when you begin the second level, The Club. Things really pick up here, with more difficult adversaries, a more difficult encounter, and a considerably longer wait until you acquire a keycard for the shortcut. If things become too difficult, return to the first level and brush up on your fundamentals.

Read How to complete Future Stars Saliba SBC in FIFA 22

Sifu Guide: Invulnerability-Frames

You can use some attacks to make yourself invulnerable to other opponents for a short period of time while the animation plays out. These are known as invulnerability frames (i-frames), and you should make maximum use of them. The Triangle + Circle finisher, which occurs when you shatter an enemy’s Structure, is one of the most prevalent techniques in this category. 

This technique not only takes down your opponent instantaneously, but it’s also a good strategy to prevent being hit by someone else. Similarly, holding the Circle button on a downed enemy will give you i-frames for a short time.

Sifu Guide: Permanent Unlocks

Sifu Guide
Sifu (Image credit: PlayStation)

The game features a few ways for you to carry over progress if you feel things are a little too roguelike and not enough roguelite. These methods include shortcuts and permanent unlocks.

There is a category below the move options where you can spend XP to permanently unlock it. If you want to keep the skill permanently, you will need to put XP into it five times. Sifu can be defeated by mastering the moves and not spending XP on them every time you run. Furthermore, replaying previous missions can also provide you with more XP.

As you go through Sifu, you’ll discover keys that lead to level shortcuts (or even previous levels). All levels have a shortcut that allows you to swiftly go to the boss from an early point in that stage, thus we encourage revisiting a level as soon as possible to finish it with a lower age counter.

Sifu Guide: Block, Parry, and Dodge

Most enemies cannot be defeated by merely pummeling them. You’ll be blocked, parried, and dodged if you try it. Instead, for greater outcomes, learn to combine your attacks with a good defense. To parry an opponent, you can hit the block button followed by an attack on a regular basis. Even if the timing of your attacks isn’t perfect, stopping an opponent boosts their Structure, which is just as crucial as lowering their health.

Grab Your Opponent

Sifu Guide
Sifu (Image credit: PlayStation)

The ability to grab after parrying an attacker by pressing square and cross at the same time is one of the tools you’ll have from the start. This causes your character to drive whichever enemies are parried in the direction you’re targeting. This move is useful for transporting enemies across the battlefield, but it also serves another function.

The main objective for using the grab is to attempt to fling adversaries from great heights. Both you and your enemies are extremely prone to stumbling, even off a tiny balcony or down several stairs. Almost every level has locations where you can throw foes, so if you want to get rid of enemies quickly, try throwing them about a little.

Read Best Weapons for Low-Rank Players in Valorant – Iron, Bronze, Silver

Dodging is VERY Crucial

Dodging is very crucial
Sifu (Image credit: PlayStation)

If you are new to Sifu, you may believe that the key to beating your opponents is parrying and blocking. Yes, but dodging is equally important. You can dodge an attack by moving in whatever direction your enemy attacks from when you hold the block button. A shimmer will appear around your enemy when you do this at the right time, allowing you to perform a combo on them.

If you dodge and open up to a combo, any boss in Sifu will be much weaker than if they parry and block in order to break down their structure meter. Trying to throw off your opponent every once in a while may seem like the riskier move, but it’s actually better to let your opponent attack you.

Sliding Kicks are Very Helpful

The Sliding Kick is the one you’ll want to grab as quickly as possible. After running, this technique allows you to sweep your opponent’s leg, and practically everyone is easily knocked down by it. It’s the game’s most useful technique, especially when paired with a punch while the opponent is down. Some adversaries will block it, but virtually all of them will collapse instantaneously, allowing you to kick the snot out of them right away.

Sifu Guide: Structure System

Sifu Guide
Sifu (Image credit: PlayStation)

Let’s speak about the Structure system because it’s something that’s easy to ignore. A bar at the bottom of your screen rises each time you block an assault. This is the Structure bar, and if it fills all the way to the top, you’ll be shocked for a short while, leaving you vulnerable to terrible strikes. 

Enemies have a Structure meter as well, and it will fill up even if you block or parry their blows. Use this to your advantage, especially against a difficult-to-hit opponent. It’s ideal to block their blows, load their Structure meter, and then deliver a lethal strike of your own against these opponents.

Maintain a low Structure meter at all times. To get the fight to lower back down, you could back away during it. While you’re not sprinting or attacking, the Structure meter will go down. You can regain structure by using the environment as cover.

Use Focus Wisely

In Sifu, the attention meter will be your closest buddy. You may gain concentration by blocking strikes and fighting back, which you can then utilize for special attacks on foes. These can’t be blocked, and they’re in great condition for follow-up attacks. You’ll start with a nice one, and you’ll be able to unlock more as you go.

These maneuvers are fantastic but don’t use them just for the sake of it. They’re meant for Sifu’s toughest foes, not the haphazard grunts that can be dispatched with a few strikes. You’ll need them especially for the boss fights, which might already feel unjust.

Sifu Guide: Weapons

Weapons
Sifu (Image credit: PlayStation)

You may utilize weapons in Sifu, which is a kung-fu game that focuses on hand-to-hand fighting. Swords, staves, bats, pipes, and sticks are among the things scattered across each stage. The fact is, if you play your cards well, you can often start many fights with a weapon. Before moving on to the next area, go return to an earlier region to get a metal bat, or search about the room to see if you can find a pipe that can aid you in the battle ahead. 

Even boss bouts allow you to bring weapons. Keep in mind that weapons do break, but there are ways to make them last longer. When you’re younger, make increasing weapon durability a priority. Shrines, which are symbolized by little green dragon sculptures, may be found on each level. 

These Shrines provide you with stat enhancements like higher Structure, more Focus bars, and the opportunity to earn additional Focus after a successful dodge or parry. Certain boosts, such as the one that offers increased weapon durability, are, however, restricted to particular age groups. This category may only be utilized if your Sifu is 25 or younger, so make the most of it first.

For more Guides, Tips, and Tricks

You can also check our dedicated Video Games Guides section.