All Killstreaks In COD Warzone Mobile

If you are a player who really depends on killstreaks then this list of COD Warzone Mobile Killstreaks will help you.

In the fast-paced world of Call of Duty: Warzone Mobile, mastering the use of killstreaks can be the key to victory. These powerful rewards can turn the tide of battle and provide a strategic advantage to those who wield them effectively. In this guide, we will go into all the available COD Warzone Mobile Killstreaks.

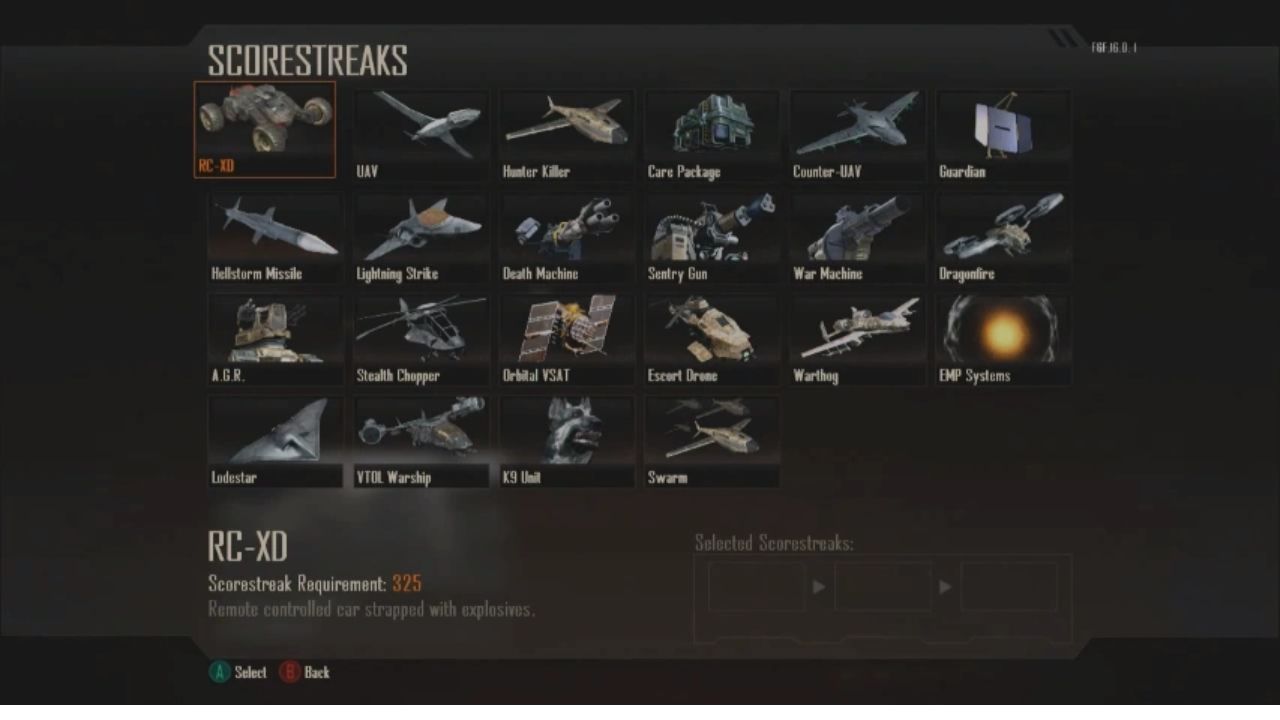
All COD Warzone Mobile Killstreaks 

UAV – Unleashing Tactical Superiority

The UAV (Unmanned Aerial Vehicle) is a vital asset that grants you tactical superiority. By acquiring a 4-kill streak, you can activate this powerful recon ship that reveals enemy locations on the minimap. Keep a watchful eye on your adversaries and plan your moves accordingly.

Care Package – Aerial Support at Your Fingertips

Achieving a 5-kill streak allows you to call in a random killstreak care package to your precise location. This valuable resource grants you access to a variety of powerful tools and weaponry, providing a much-needed advantage in intense firefights.

Counter UAV – Disrupting Enemy Intelligence

With a 5-kill streak, you can deploy the Counter UAV to disrupt enemy minimaps with static interference. This powerful device can be shot down with a single rocket, leaving enemies disoriented and vulnerable.

Cluster Mine – Tactical Explosive Supremacy

Strategically positioning the Cluster Mine can wreak havoc on unsuspecting foes. Upon reaching a 5-kill streak, this lethal asset automatically detects enemy players within a short radius and deploys four mines, effectively neutralizing threats.

Cruise Missile – Unleashing Unprecedented Firepower

With a 6-kill streak, the Cruise Missile becomes available, offering a game-changing advantage. Take control of this mid-air deployed missile and gradually guide it towards the battlefield, obliterating foes in its path. Accelerate its arrival to catch enemies off guard.

Mortar Strike – Decimating Enemy Strongholds

Signal the devastation with the Mortar Strike killstreak. Achievable at 6 kills, this devastating ability calls forth several waves of mortars to relentlessly rain down upon a designated location. Watch as structures crumble and adversaries scatter in fear.

Sentry Gun – Automated Defense and Annihilation

A true force multiplier, the Sentry Gun becomes accessible at the 7-kill mark. This automated turret diligently scans for nearby enemies, unleashing incendiary-based rounds upon detection. Deploy this formidable guardian to secure your position and suppress enemy advances.

Overwatch Helo – Skyborne Surveillance and Elimination

Attain an 8-kill streak, and you can summon the Overwatch Helo to provide unparalleled surveillance and elimination capabilities. This escort helicopter patrols the skies, pinpointing nearby enemy locations and engaging them with lethal force, allowing you to strike with precision.

Wheelson-HS – Unleashing Mechanical Mayhem

Commandeer the Wheelson-HS with a 10-kill streak and dominate the battlefield with this remote-controlled UGV (Unmanned Ground Vehicle). Armed with a powerful airburst turret, the Wheelson-HS decimates adversaries, providing unrivaled firepower and tactical superiority.

Emergency Airdrop – A Bounty of Rewards

With a 10-kill streak, you can request an Emergency Airdrop, delivering three random killstreak care packages to your location. 

Advanced UAV – Direction

With a 12-kill streak, you can bring up an Orbital UAV that will reveal the location of the enemy’s direction. You can see it on your mini-map and take down enemies quickly.

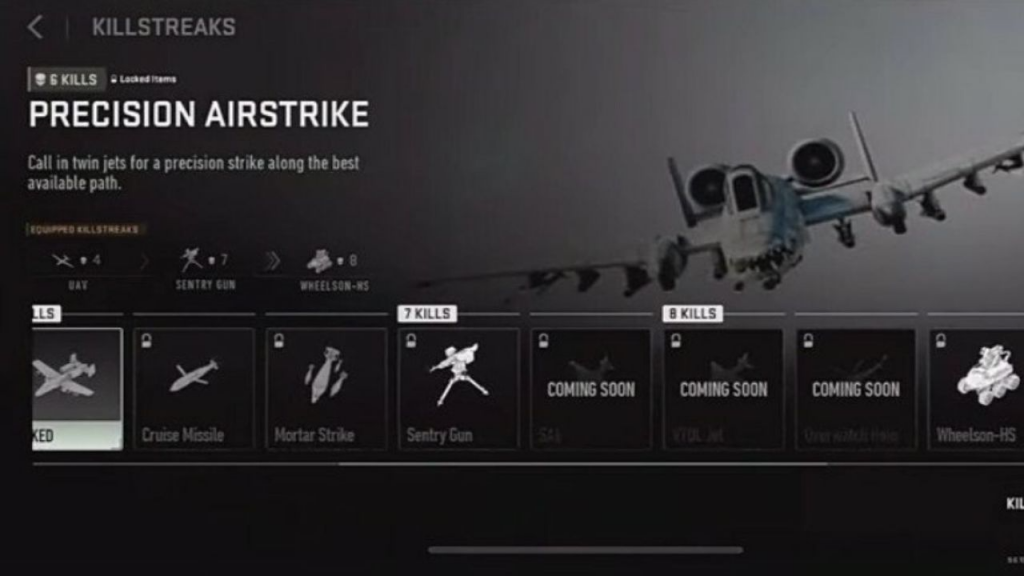
Precision Strike – Devastating Airstrike Tactics

At the 6-kill mark, players can call in a Precision Strike, unleashing a devastating airstrike on a targeted area. By selecting a precise location, explosive payloads rain down from the skies, obliterating enemy positions and turning the tide of battle.

Airstrike killstreak

Coming Soon COD Warzone Mobile Killstreaks 

The developers have unveiled COD Warzone Mobile killstreaks that are set to make their appearance in the game in the near future. These highly anticipated additions are sure to bring a whole new level of intensity and strategic gameplay 

Bomb Drone – 4 kills

One of the first killstreaks on the list is the Bomb Drone. This remote-controlled drone is equipped with a powerful C4 charge, making it a formidable weapon in the hands of skilled players. With just four kills, you can unleash this drone upon your enemies, wreaking havoc and causing chaos from above. The ability to surprise opponents with a well-placed explosive adds a new dimension to tactical gameplay, providing opportunities for strategic plays and devastating results.

S.A.E. – 7 kills

The S.A.E. (Surveillance and Attack Equipment) killstreak offers a unique advantage to players. Upon activation, the player pulls out a Tablet to perform a flyby. This flyby drops explosives that can obliterate any enemy, killstreak, or equipment that is left vulnerable. By utilizing this killstreak effectively, you can gain invaluable intelligence about enemy positions and swiftly eliminate threats. The S.A.E. is poised to become an essential tool for those who crave the upper hand in the battlefield.

VTOL Jet – 8 kills

While details on the VTOL Jet killstreak remain scarce, the very mention of this powerful aerial vehicle is enough to pique the interest of avid Warzone Mobile players. With a requirement of eight kills, this killstreak promises an unparalleled level of dominance in the skies. Whether it rains down relentless gunfire or deploys devastating aerial strikes, the VTOL Jet is bound to leave a lasting impact on the battlefield, ensuring that your enemies are left in awe and at a disadvantage.

Stealth Bomber – 10 kills

As the killstreak requirement increases, so does the destructive potential. The Stealth Bomber, unlocked at 10 kills, brings forth a formidable force capable of turning the tide of any battle. With a single call, a bomber will soar across the map, releasing a torrent of explosives that decimate everything in its path. The Stealth Bomber allows for precise strikes on enemy positions or can be strategically used to disrupt chokepoints, forcing opponents to rethink their strategies.

Chopper Gunner – 10 kills

The Chopper Gunner killstreak grants players control over an assault chopper armed with a powerful turret and air-to-land missiles. With a swift activation at 10 kills, you can take to the skies, reigning down devastating firepower upon your foes. This killstreak provides unparalleled mobility and offensive capabilities, allowing you to swiftly eliminate threats and turn the tide of battle in your favor. The Chopper Gunner is a force to be reckoned with and guarantees an adrenaline-fueled experience like no other.

Gunship – 12 kills

Prepare for the ultimate display of power as you unlock the Gunship killstreak. Upon achieving 12 kills, you can call in a fearsome Mi-24 Hind gunship. Assuming full control of this beastly machine, you gain the ability to rain down death and destruction from above. With its powerful miniguns and devastating missiles, the Gunship is the epitome of firepower. It provides an unprecedented advantage, allowing you to clear enemy positions.

So these were all the COD Warzone Mobile Killstreaks that you should know. Use the COD Warzone Mobile Killstreaks properly and become the king.

For more Guides, Tips, and Tricks

Check out our Video Games Guide Section for more dedicated guide

Where to Find Thornfruit in Tower of Fantasy

Looking for Tower of Fantasy Thornfruit? This guide will help you to find it and make good recipes that will help you.

Tower of Fantasy is an immersive and thrilling game that offers players a vast and dynamic world to explore. Within this captivating realm, players can encounter a variety of valuable resources and items, one of which is the Tower of Fantasy Thornfruit. 

This exquisite berry fruit, reminiscent of raspberries, not only serves as a delectable food source but also holds significant importance as an ingredient in various recipes. In this guide, we will unveil the secret to locating Tower of Fantasy Thornfruit and delve into the multiple ways it can benefit you.

Gameplay
Gameplay

Tower of Fantasy Thornfruit Location

To embark on your quest for Thornfruit, you must venture into the depths of the Confounding Abyss, a network of intricate dungeons nestled beneath the floating city of Mirroria. Within the Confounding Abyss, you will encounter three sublevels that are key to your search:

  • City Gate: The first sublevel of the Confounding Abyss, serving as an entry point to the labyrinthine depths. While Thornfruit cannot be found here, it is a crucial waypoint on your journey.
  • Third City: Proceeding further into the Confounding Abyss, you will reach the Third City. It is within this sprawling area that the coveted Thornfruit can be discovered. Be prepared to navigate the labyrinthine corridors and explore the hidden nooks and crannies of this intriguing cityscape.
  • Third City Ruins: As you delve even deeper into the Confounding Abyss, you will stumble upon the ruins of the Third City. While the ruins hold their own mysteries and treasures, Thornfruit is not among them. Focus your search within the Third City itself to maximize your chances of locating this prized fruit.

Spotting Thornfruit: A Rarity Amidst the Wilderness

Once you find yourself amidst the Third City’s vibrant surroundings, keep a keen eye out for the Tower of Fantasy Thornfruit. The berries exhibit a striking red hue that sets them apart from their surroundings, making them relatively easy to spot. Look for clusters of Thornfruit, as they tend to grow in groups rather than as solitary specimens. This means that with each discovery, you are likely to harvest multiple Thornfruit, enhancing the value of your find.

Tower of Fantasy Thornfruit: Food and Recipe Potential

Thornfruit in Tower of Fantasy serves a dual purpose, as it can be consumed as a standalone food item or used as a key ingredient in various recipes. Let’s explore both options:

Gameplay

Consumption Benefits: If you opt to consume Thornfruit directly, you will reap valuable buffs that can enhance your gameplay experience. Eating Thornfruit grants the following benefits:

  • Regenerate 2 satiety: Satisfy your character’s hunger and sustain their energy levels.
  • Restore 5% + 4,000 HP: Replenish your character’s health points, bolstering their vitality and resilience.
  • Culinary Creations: Alternatively, you can utilize Thornfruit as a crucial ingredient in several delectable recipes available within Tower of Fantasy. These recipes not only offer nourishment but also provide unique bonuses to your character’s attributes. Let’s take a closer look at two notable recipes:

Thornfruit Soda

Craft this refreshing beverage by combining 2 Thornfruit, 1 Honey, and 1 Carbonated Water. Sipping on Thornfruit Soda will restore 500 endurance and revitalize your character by restoring 15% + 20,000 HP.

Desert Salad

Combine 2 Thornfruit, 1 Ball Cactus, and 1 Salad Dressing to create a succulent Desert Salad. This exquisite dish regenerates 10 satiety and restores 15% + 20,000 HP, making it a wholesome choice for adventurers.

Against War Guide – 10 Tips and Tricks for Beginners

If you are new to Against War game then you might face some problems. But do not worry, because we have Against War guide for you.

Against War is an amazing strategy and card-based game that has recently been released for mobile gamers. It’s an exciting game that features a battle between two kingdoms, where players use their deck of cards to take down their opponent’s walls and claim victory.

The game is filled with many valuable features that are easy to access and beneficial for players. In this Against War guide, we’ll dive straight into the game and help beginners become pros with the best tips and tricks.

Understand the Gameplay Mechanics

Against War is a card-based game that requires players to use strategy when going to war against an opponent kingdom. The gameplay mechanics and UI are simple to handle, making it easy for players to go for a quick win in no time. Players must identify the best spots for each card and place them accordingly by sliding the card from the deck to that exact location, and the card will then do the rest.

Destroy the Walls and Claim Victory

In the game Against War, the objective for players is to destroy their opponent’s left and right walls, as well as the main center entry hall. This requires players to carefully strategize and use their resources wisely to gain an advantage over their opponents. The concept of destroying walls and entryways is similar to that of Clash Royale, another popular game that shares similarities with Against War. Both games require players to carefully manage their resources and deploy units strategically in order to gain the upper hand in battle.

Victory in Against War brings with it some great rewards, which can help players progress further in the game. These rewards might include new cards, upgrades to existing cards, or other bonuses that can help players improve their decks and become stronger in battle.

Against War Guide: Explore the Lobby

The lobby is a section where players can check out all the important aspects of the game and access them. Important aspects of the game include:

  • Battle
  • Recruit
  • Workshop
  • Spell Lab
  • Command

The Battle option is where players can connect with another player and start matchmaking. These aspects are also part of the most important features of Against War, and we will discuss them further in detail.

Against War Guide: Workshop

The workshop is the section where players can upgrade many options and make their base stronger. Players can use resources such as grains, crystals, and silver coins to level up aspects such as guild, spell lab, recruiting, command, castle, commander, deck, castle wall, and castle guards. Upgrading them will help players become much stronger and build a base that cannot be easily destroyed by other players.

Plan Your Strategies Well

In Against War, planning your strategies well is essential to winning battles. You should study the moves of your opponents, counter their plans, and defeat them with your armies and troops. A great way to do this is by scouting your opponents’ bases before attacking them.

This will help you identify their weaknesses and strengths, and create a plan that can exploit their weaknesses. You should also experiment with different army compositions and tactics to find the ones that work best for you.

Collect More Cards

To become a skilled player in the game Against War, one must understand the importance of having a great deck of cards. In order to build such a deck, players need to collect resources and recruit more cards. Resources can be obtained by winning battles or completing certain tasks in the game. These resources can then be used to purchase new cards or upgrade existing ones. By doing so, players can improve the overall strength of their deck and increase their chances of winning battles.

Recruiting new cards is also crucial to building a great deck. Players should look for cards that complement each other and have abilities that can be used in combination to gain an advantage over their opponents. It’s important to remember that having a diverse range of cards in your deck can give you more options during battles.

Having a great deck of cards not only increases your chances of winning battles, but it can also make the game more enjoyable. It’s satisfying to see your hard work pay off when you win a tough battle thanks to your well-crafted deck.

In order to truly become a pro at Against War, players must also understand the importance of strategy, skill, and luck. While having a great deck is important, it’s not the only factor that determines the outcome of battles. Players must also develop their own unique strategies and use their skills to outmaneuver their opponents.

Against War Guide: Upgrading the Workshop

The Workshop is a crucial element of the game that allows players to upgrade their walls, castles, and spells. To make the most out of your workshop, you should upgrade its entities regularly. Upgrade the wall builders to make stronger walls, the castle builders to build bigger and better castles, and the spell makers to create powerful spells. 

Additionally, you should focus on upgrading your resources such as gold mines, elixir collectors, and dark elixir drills. Upgrading these entities will help you gain more resources that you can use to upgrade other elements of your workshop.

Gameplay
Gameplay

Build the Best Possible Deck of Cards

The key to winning battles in Against War is to build a strong and balanced deck of cards. To achieve this, you need to study the details of each card that you own and categorize them according to their classes.

This way, you can create a deck that includes all classes and can help you win battles with ease. Some of the classes that you should consider including in your deck are tanks, damage dealers, and support units. You should also upgrade your cards regularly to make them more powerful.

Go for the Quest Missions

Completing quest missions is an excellent way to gain resources and in-game currencies from the Against Pass. These resources can be used to upgrade the required elements of your workshop and improve your gameplay. Quest missions also help you level up faster and unlock new cards and spells. To complete quest missions, you need to choose the right army composition and tactics that match the mission’s objectives.

Against War Guide: Join a Clan

Joining a clan is one of the best ways to improve your gameplay and win battles in Against War. Clans allow you to team up with other players, share resources, and participate in clan wars. By participating in clan wars, you can earn extra resources and in-game currencies that can help you upgrade your workshop and cards. You can also learn from your clanmates and share your strategies with them to become better players.

For more Guides, Tips, and Tricks

Check out our Video Games Guide Section for more dedicated guide

How to Beat the Dark Ages Champion Challenge in Clash of Clans

Facing difficulties in completing the COC Dark Ages Champion Challenge? Do not worry and just follow our guide.

Clash of Clans has become one of the most popular mobile games in the world. It is a strategy game that requires players to build their own villages, train troops, and defend against enemy attacks. One of the most challenging aspects of the game is completing the various challenges, such as the Dark Ages Champion Challenge. 

The COC Dark Ages Champion Challenge is one of the toughest challenges in the game. It requires players to defeat a Town Hall 15 base with Scattershots and other defenses. The troops provided are effective but players need to use the right strategies to take down the base and get a three-star victory. The rewards for completing the challenge include extra resources, 400 XP, 25 Gems, and a Builder Potion. In this guide, we will discuss how to beat this challenge and earn the rewards.

Gameplay
Gameplay

COC Dark Ages Champion Challenge Base

The COC Dark Ages Champion Challenge is a challenging base that requires careful planning and execution. The base has four Scattershots around it, which are the main threat to your troops. The Town Hall 15 is also a threat, as it can activate and activate the defenses. It is important to plan your attack carefully and take out the Scattershots and Town Hall 15 to get a three-star victory.

COC Dark Ages Champion Challenge: Troop Composition

The troop composition for the Dark Ages Champion Challenge is critical. The strategy provides three each of P.E.K.K.A, Witch, Bowlers, Super Bowlers, Hog Rider, and Headhunter. This suggests that you should target two corners and the center of the base to distribute troops evenly. You should deploy the Flame Flinger Siege with the Super Dragon inside on one side of the base to clean up the base from one end. Make sure your Grand Warden is set to ground, as this is a ground strategy.

Attack Strategy

To beat the COC Dark Ages Champion Challenge, you need to follow a specific strategy. Here is a step-by-step guide to help you win:

  • Start the attack on one side of the base and deploy the Super Dragon Siege on the opposite side to clean up the base.
  • Use Earthquake spells to crack open the middle of the base and deploy the Super Wallbreakers on two corners near the Scattershots.
  • Deploy the PEKKAs on three sides and the Witch on the behind.
  • Once the two Scattershots are destroyed, follow up with both types of Bowlers behind.
  • Follow up with the Grand Warden and the Royal Champion and deploy the Hogs and Headhunter to take out the Town Hall.
  • Use the Warden Ability to shield your troops once the defense is about to activate.
  • Use the Royal Champion Ability if necessary to take out the Scattershot and nearby defenses.
  • Deploy the Super Dragon if summoned to clear the rest of the base.
Victory in the challenge

Conclusion

The Dark Ages Champion Challenge in Clash of Clans is a challenging base that requires careful planning and execution. The troop composition is critical, and you should target two corners and the center of the base to distribute troops evenly. Use the Flame Flinger Siege with the Super Dragon inside to clean up the base from one end and follow the attack strategy to get a three-star victory. 

By following these tips, you can beat the COC Dark Ages Champion Challenge and earn the rewards. Remember, practice makes perfect, and the more you play, the better you will become at Clash of Clans.

For more Guides, Tips, and Tricks

Check out our Video Games Guide Section for more dedicated guide

How to Unlock the Forgotten Hall in Honkai Star Rail 

Want to know how to unlock the Honkai Star Rail Forgotten Hall? This guide has all the information you need to know.

Honkai Star Rail has taken the gaming world by storm with its impressive features and in-depth gameplay. One of the most popular features in the game is the Forgotten Hall, which is similar to Spiral Abyss in Genshin Impact. 

Players can challenge themselves in the Forgotten Hall by battling a set number of enemies and completing each level according to specific conditions. In this Honkai Star Rail Forgotten Hall Guide, we will provide players with a detailed walkthrough on how to unlock the Forgotten Hall and earn rewards.

Gameplay
Gameplay

Where to Find the Honkai Star Rail Forgotten Hall

The Forgotten Hall is located in the Astral Express Parlor Car and can be accessed at any time by players. To unlock the Forgotten Hall, players must complete the Fleeting Lights Adventure Mission, which is available after reaching trailblaze level 23. Once players receive the mission, they will need to complete two types of story missions to unlock the Forgotten Hall: The Last Vestiges of Towering Citadel Stages and Frostscar Reverie Stages.

The Last Vestiges of Towering Citadel Stages and Frostscar Reverie Stages

The Last Vestiges of Towering Citadel Stages consist of 15 individual stages, while Frostscar Reverie Stages has 10 individual stages. Players can gradually progress through each stage to ultimately unlock the Forgotten Hall. Upon starting the Fleeting Lights quest, Pom-Pom will message players about something strange happening on the Express. 

Players will then investigate the matter and stumble upon the Forgotten Hall. There will be a strange mirror in the Parlor Car, and upon investigation, a strange guide from the mirror will accompany players into the Forgotten Hall where they will take on enemies to earn rewards.

How to Earn Stars in the Forgotten Hall

Players can earn stars in the Honkai Star Rail Forgotten Hall by fulfilling the conditions set by the game in each Memory Stage. Typically, there are three conditions per Memory Stage. For example, for a certain number of cycles, you need to complete the challenge and the condition that you complete them without letting a single character faint. Completing all three feats would result in maximum rewards for players. The pre-stated conditions will be different for each stage, keeping players on their feet at all times.

Unlock New Characters in the Game

In Honkai Star Rail, players have the opportunity to unlock new characters by completing the challenge in the Forgotten Hall. This feature adds an extra level of excitement for players who are always looking for ways to add new characters to their collection. Once the challenge is completed, players will receive rewards, including these new characters, which can be added to their inventory. 

These new characters are often unique and offer different abilities and skills that can be useful in various levels and challenges throughout the game. This provides players with an added incentive to complete the challenge and unlock these new characters, making the game even more engaging and rewarding. Whether players are looking to enhance their collection or explore new abilities, the Honkai Star Rai Forgotten Hall offers a unique opportunity to do both.

Honkai Star Rail Forgotten Hall Memory Stages Rewards

The Honkai Star Rail Forgotten Hall consist of several Memory Stages that the players must complete to earn rewards. Each Memory Stage offers unique challenges and rewards, which vary in value. Players can expect to earn valuable resources such as Lost Crystals, Lucent Afterglow, Adventure Logs, Condensed Aether, and Credits upon completing the Memory Stages.

List of Memory Stages

Here is a list of the rewards that players can expect to earn upon completing each Memory Stage in the Honkai Star Rails Forgotten Hall:

  • Memory Stage 1: Lost Crystal x6, Lucent Afterglow x20, Adventure Log x10, Condensed Aether x6, Credit x10000
  • Memory Stage 2: Lost Crystal x6, Lucent Afterglow x20, Adventure Log x10, Condensed Aether x6, Credit x10000
  • Memory Stage 3: Lost Crystal x6, Lucent Afterglow x20, Adventure Log x10, Condensed Aether x6, Credit x10000
  • Memory Stage 4: Lost Crystal x6, Lucent Afterglow x20, Adventure Log x10, Condensed Aether x6, Credit x10000
  • Memory Stage 5: Lost Crystal x6, Lucent Afterglow x20, Adventure Log x10, Condensed Aether x6, Credit x10000
  • Memory Stage 6: Lost Crystal x6, Lucent Afterglow x20, Adventure Log x10, Condensed Aether x6, Credit x10000
  • Memory Stage 7: Lost Crystal x6, Lucent Afterglow x20, Adventure Log x10, Condensed Aether x6, Credit x10000
  • Memory Stage 8: Lost Crystal x6, Lucent Afterglow x20, Adventure Log x10, Condensed Aether x6, Credit x10000
  • Memory Stage 9: Lost Crystal x6, Lucent Afterglow x20, Adventure Log x10, Condensed Aether x6, Credit x10000
  • Memory Stage 10: Lost Crystal x6, Lucent Afterglow x20, Adventure Log x10, Condensed Aether x6, Credit x10000
  • Memory Stage 11: Lost Crystal x6, Lucent Afterglow x20, Adventure Log x10, Condensed Aether x6, Credit x10000
  • Memory Stage 12: Lost Crystal x6, Lucent Afterglow x20, Adventure Log x10, Condensed Aether x6, Credit x10000
  • Memory Stage 13: Lost Crystal x6, Lucent Afterglow x20, Adventure Log x10, Condensed Aether x6, Credit x10000
  • Memory Stage 14: Lost Crystal x6, Lucent Afterglow x20, Adventure Log x10, Condensed Aether x6, Credit x10000
  • Memory Stage 15: Lost Crystal x6, Lucent Afterglow x20, Adventure Log x10, Condensed Aether x6, Credit x10000
Gameplay
Gameplay

Conclusion

In conclusion, the Honkai Star Rail Forgotten Hall is an exciting feature that provides players with challenging battles and rewards. By completing the Fleeting Lights Adventure Mission and the required story missions, players can unlock the Forgotten Hall and earn rewards by completing each level according to specific conditions. By fulfilling these conditions, players can earn stars and even unlock new characters in the game.

For more Guides, Tips, and Tricks

Check out our Video Games Guide Section for more dedicated guide

How To Find A Lost Dinosaur in Ark Survival Evolved

Are you also frustrated because of the Ark Survival Evolved Lost Dinosaur? Do not worry because we will help you to get it back easily.

In Ark: Survival Evolved, players can explore a vast and dangerous world filled with all sorts of creatures, including prehistoric dinosaurs. However, it’s easy to lose track of a tamed dinosaur, especially when exploring unfamiliar territories. Fortunately, there are several ways to find lost dinosaurs in Ark: Survival Evolved. In this guide, we will explore some of the most effective methods for locating your lost pets.

Hunting Dinosaurs
Hunting Dinosaurs

Find Ark Survival Evolved Lost Dinosaur: Whistle Follow All

In Ark: Survival Evolved, using the Whistle Follow All command is one of the more straightforward approaches to tracking down lost dinosaurs. You can use this command to call all of your tames within a specific radius to follow you if you want them to. 

Simply hit the letter “T” on your keyboard, choose the Whistle menu option, and then click the Follow All button to utilize this command. After that, all of your tames that are within the radius you chose will follow you. This command can be helpful for locating missing dinosaurs that are in the nearby region, but if your dinosaur has gone too far away, it is possible that it won’t work.

Ark Survival Evolved Lost Dinosaur: Transponder Nodes

By attaching Transponder Nodes to your tames, you can easily track them from a distance and keep them from getting lost. Transponder Nodes are essentially small devices that allow you to keep tabs on your tames. To attach one of these devices to a tame, you’ll need to craft a Transponder Tracker and a Transponder Node. Once you have both of these items, you can attach the Transponder Node to your tame and activate it using the Transponder Tracker.

This will allow you to locate your lost tame from a distance, making it much easier to find them if they wander off or get separated from you. With this handy tool at your disposal, you’ll be able to explore the Ark: Survival Evolved world with confidence, knowing that you can always keep track of your tames and avoid losing them.

How to Craft Transponder Trackers

To craft a Transponder Tracker, you’ll need to unlock its engram for 30 Engram Points after you reach level 66. Next, you’ll need to locate a Fabricator or Tek Replicator to craft the Transponder Tracker. The materials you’ll need to craft it are:

  • 80 Electronics
  • 25 Crystal or Primal Crystal
  • 30 Cementing or Achatina Paste
  • 20 Metal Ingots or Scrap Metal Ingots
  • 50 Corrupted Nodule, Polymer, or Organic Polymer.

Once you have crafted a Transponder Tracker, you can use it to locate any Transponder Nodes that you have attached to your tames.

How to Attach Transponder Nodes to Your Tames

To attach a Transponder Node to your tame, you’ll first need to craft one. You can do this by unlocking the Transponder Node engram for 20 Engram Points after you reach level 66. Once you have unlocked the engram, you can craft a Transponder Node using the following materials:

  • 14 Electronics
  • 12 Crystal or Primal Crystal
  • 12 Cementing or Achatina Paste
  • 3 Metal Ingots or Scrap Metal Ingots
  • 10 Corrupted Nodule, Polymer, or Organic Polymer.

After you have crafted a Transponder Node, you can equip your Transponder Tracker in your hotbar and use it to track any tames that have nodes attached to them. This method is particularly effective for finding lost dinosaurs that have wandered far away from your base.

Gameplay
Gameplay

Using Console Commands to Find Lost Dinosaurs

Console commands are a useful tool available to players in single-player sessions and private servers. However, players on official or private servers may not have access to them. To use console commands to find your lost dinosaurs, you’ll need to be an admin.

The first step is to open up the console menu by pressing the Tab key. Once the console is open, type “DestroyWildDinos” and hit enter. This command will kill all the wild creatures on the map, making it easier to find your lost tame.

Next, you’ll need to find the ID of the tame you lost. You can do this by visiting a website that provides a list of dinosaur IDs, such as arkids.net. Once you have the ID, type “GetAllState <Creature ID>” in the console and hit enter. This command will display a list of all the tames of that variety that exist around the map.

Finally, you can teleport to your lost tame by typing “TeleportToActorLocation <Creature ID + _Number>” in the console and hitting enter. Remember to replace “Creature ID” with the ID of the specific dinosaur you’re looking for and “Number” with the number of your individual tame.

If your lost creature is flying high above the ground, it’s essential to bring a parachute or use the “GCM” command to turn on creative mode. Otherwise, you’ll fall to your death.

For more Guides, Tips, and Tricks

Check out our Video Games Guide Section for more dedicated guide

Diablo 4 Toxic Shredder Werewolf Build

With the help of the Diablo 4 Werewolf build, you can use the Toxic Shredder with full potential and become stronger in the game.

As the highly-anticipated Diablo 4 release approaches, players are eagerly looking for ways to optimize their gaming experience. One of the best ways to do so is by taking advantage of the various class types and skill trees available in the game. While some players may overlook the Druid class due to its perceived lack of power, the Toxic Shredder Diablo 4 Werewolf build offers an exciting and powerful option for those looking to dominate in the endgame.

Diablo 4 Werewolf Build Skills

To fully realize the potential of the Toxic Shredder Diablo 4 Werewolf build, players must focus on the right skills. The primary skills that players will need to prioritize are Shred, Vine Creeper, Rabies, and Claw. These skills work together to apply poison damage over time against enemies while also providing crowd control. By investing in these skills, players can quickly drain enemy health while keeping a safe distance from danger.

Shred

Shred is the core skill for any Werewolf-based Druid build in Diablo 4. After initially investing points in Claw, Shred becomes a player’s primary means of melee attacking. What sets Shred apart from Claw is its stacking of increased damage percentages for each hit in its 3-hit combo sequence. Once Shred has been fully leveled-up to rank 5, it becomes indispensable in a melee-focused Diablo 4 Werewolf build for Druids.

Vine Creeper

Vine Creeper is a crucial skill for the Toxic Shredder Werewolf build, as it applies both passive and active poison damage to enemies. By summoning vines that immobilize and poison enemies, Vine Creeper allows for the Druid class to be effective long before hitting max level. To maximize the poison damage over time effect, players should invest in the core Vine Creeper skills and at least one point into Enhanced Vine Creeper and Ferocious Vine Creeper.

Claw

As the fundamental skill in the Druid’s core skill cluster, Claw allows the class to transform into a werewolf. As the foundational Diablo 4 Werewolf build skill for the Druid class, it is essential for the Toxic Shredder build and unlocks the Shred skill, which will become players’ primary melee attack later on.

Rabies

Rabies is an important skill to prioritize for the Toxic Shredder Werewolf build in Diablo 4. This skill is the first poison damage ability that players need to unlock, allowing their Druid to transform into a werewolf and deliver a poisonous bite to enemies. What makes Rabies even more essential for this build is its crowd control ability, allowing the poison to spread from one enemy to others.

By investing points into Rabies and upgrading the skill, players can enhance its potency and range of infection, turning their Druid into a formidable class for taking on large enemies in the game. The ability to spread poison to multiple enemies simultaneously is a huge advantage in Diablo 4, especially in areas where players face swarms of foes. With Rabies, players can take down multiple enemies at once, making it an excellent skill for any player looking to dominate the game with their Druid build.

Diablo 4 Werewolf Build: Dominating Strategy

The Toxic Shredder Werewolf build is a formidable strategy for taking down enemies and bosses in Diablo 4. By using Vine Creeper and Shred/Claw, players can immobilize their foes and stack damage on top of them through the DoT poison effect. Here’s how to utilize this build effectively:

Gameplay
Gameplay

Primary Strategy: Vine Creeper and Shred/Claw

The key to the Toxic Shredder Diablo 4 Werewolf build is the Vine Creeper skill. Activating Vine Creeper will immobilize enemies in a large area while poisoning them with a damage-over-time effect. Once enemies are immobilized and poisoned, players can use the Shred/Claw skill to deal massive melee damage. If Vine Creeper is on cooldown, Rabies can be used as a substitute poison-delivering skill that also spreads the effect to nearby enemies.

The goal of the primary strategy is to both control enemy mobs and quickly move through Diablo 4’s dungeons. By using Vine Creeper and Shred/Claw together, players can eliminate enemies quickly while minimizing the risk of taking damage.

Secondary Strategy: Aspect of the Dark Howl and Debilitating Roar

In addition to the primary strategy, the Toxic Shredder Werewolf build has a secondary strategy that involves using Aspect of the Dark Howl. This gear transforms Debilitating Roar into a Werewolf skill that immobilizes enemies even further.

By using Debilitating Roar on enemies that are already poisoned and immobilized, players can separate their party from enemy mobs. The poison damage will cause enemies to “bleed out” from a safe distance while players deal with other threats.

The Druid Advantage

When facing particularly challenging enemies like the Ashava world boss, having a Druid in your party can make all the difference. Druids are excellent crowd controllers that can help immobilize enemies even further and keep your party safe.

For more Guides, Tips, and Tricks

Check out our Video Games Guide Section for more dedicated guide

Digital Girls Idle RPG Beginners Guide – 10 Tips and Tricks

With the help of the Digital Girls Idle RPG Guide, beginners, and even other players can get strong. It has the best tips and tricks.

Are you a fan of RPG games and looking for a new one to try? Look no further than Digital Girls: Idle RPG. Developed by Winway Entertainment Limited, this game offers a unique experience where you collect monsters that evolve into powerful Goddesses. In this Digital Girls Idle RPG guide, we’ll walk you through the basics of the game and share some tips and tricks to help you become a master in no time.

Digital Girls Idle RPG Guide: Heroes and Elements

In Digital Girls: Idle RPG, heroes are key to your survival. There are over 100 heroes to choose from, each with their own element – wind, water, fire, earth, light, and dark. There are also different classes of heroes – Attack, Support, Dexterity, Controller, and Defense – to consider when building your team. Evolving your heroes into Goddesses will make them even stronger.

Formation Strategy

When you’re gearing up for battle in Digital Girls: Idle RPG, it’s crucial to take the time to set up your formation before charging in. With so many positions and types to choose from, it can be overwhelming at first. But don’t worry – with a little bit of strategy, you’ll be able to choose the perfect formation to take down even the most challenging enemies. The formation in Digital Girls: Idle RPG is split into three distinct rows: front, mid, and back. 

  • The front row is the first line of defense, so it’s best to place your tankiest heroes there. They’ll be able to soak up the most damage and protect your team from harm.
  • In the mid-row, you’ll want to position your damage dealers. These heroes deal high amounts of damage and are crucial to taking down enemy defenses quickly. With their high attack power, they can clear the way for your team to move forward and complete each stage with ease.
  • Finally, in the back row, you’ll want to place your support heroes. These heroes can heal your other heroes, provide buffs, and debuffs to the enemy team. They play an essential role in ensuring your team’s success, so be sure to choose the right support heroes for the job.

When choosing your formation, be sure to consider the types of enemies you’ll be facing. Different formations work better against different types of enemies, so choose wisely to give yourself the best chance of success. With a well-placed formation, you’ll be able to take on even the toughest foes and emerge victorious.

Digital Girls Idle RPG Guide: Summon Monsters 

With this system, players can summon monsters that can evolve into beautiful anime girls. However, the summoning system can be confusing for beginners, and it’s important to learn how to use it effectively.

To get the best monsters for your gameplay, you need to understand the different summoning options available. Each option requires different currencies to perform summons, so make sure you have enough currencies before performing a summoning. Once you have enough currencies, you can choose to summon one monster or ten monsters at a time.

Moreover, Digital Girls: Idle RPG has a pity system in place that guarantees players a five-star hero after ten times summonings. This system is a great opportunity to power up your gaming experience, and it’s important to take advantage of it. The more times you perform a summoning, the higher your chances of getting a five-star hero, which is one of the best monsters in the game.

Upgrading Heroes

To increase your combat power and beat tougher enemies, focus on upgrading your heroes. Use Hero EXP and Gold to level them up, and unlock their latest skills by Tiering Up when they reach level 30. Star Up is also an option, but it requires a clone of the hero and multiple heroes with the same tier and element. For newbies, gear is not necessary yet, but to unlock it, you need to reach level 60.

Dungeon Strategy

If you’re looking to upgrade your heroes, it’s essential to have a good supply of materials and resources. Thankfully, there are many dungeons available in the game that can provide you with everything you need. One of the best places to start is Suburbs. It offers five different types of dungeons. These five dungeons are Gold, EXP, Demon, Hero, and Empower. Each of these dungeons has its own set of rewards and difficulty levels. 

For example, if you’re short on gold, the Gold Dungeon is a great place to start. If you need to level up your heroes quickly, the EXP dungeon is the way to go. On the other hand, if you’re looking for specific hero materials or demon stones, you can try the Demon and Hero dungeons, respectively.

Regardless of which dungeon you choose, make sure to pay attention to the difficulty level. The higher the level, the tougher the enemies you’ll face, but the greater the rewards you’ll earn. So, it’s important to strike a balance between the two and choose a dungeon that you can handle without too much difficulty.

Digital Girls Idle RPG Guide: Element Restraints

In Digital Girls: Idle RPG, each element has its own restraint. Wind restrains water, water restrains fire, fire restrains earth, and earth restrains wind. Light and dark elements restrain each other. Use this knowledge to your advantage and choose heroes with the element that restrains your enemy to increase your Crit Rate by 10%. But be aware that if your allied hero’s element is restrained, their Crit Rate will decrease by 10%.

Assign the Best Monsters to Your Team

Assigning the best monsters to your team is critical for your gameplay, as only the best ones will guarantee victories. Every monster has different factions and roles. Understanding the role of each monster is essential to know which field it is specialized in. For instance, if the monster is a warrior, you must assign it to the front row of the battle formation because warriors are good at attacking and defending.

To get the maximum advantage from each character, position them correctly in the battle formation according to their roles. Additionally, when assigning monsters to your battle team, make sure you assign the best ones with higher tiers as they’ll give you better odds of winning. So, always assign the best monsters in the right positions of the battle formation for greater advantages throughout the game.

Follow Missions – Daily, Weekly, and Achievements

In Digital Girls: Idle RPG, completing missions is a crucial way to earn rewards and make your gaming experience more enjoyable. There are different types of missions, including daily and weekly missions, as well as missions connected to the main adventure of the gameplay.

Daily missions are only valid for a day, and even if you don’t complete them, the progression will reset, and you’ll receive a new set of daily missions. On the other hand, weekly missions are valid for a week and will reset every week. Achievements have no time limit, so you can complete them at your own pace.

Each mission comes with various difficulty levels and rewards, making them a great way to earn valuable resources. By completing missions perfectly, you’ll be able to gain access to rare items and experience points, which can help you progress through the game quickly. Therefore, it’s essential to make sure that you complete as many missions as possible to maximize your rewards and enhance your gaming experience.

Gameplay
Gameplay

Digital Girls Idle RPG Guide: Special Element Aura 

Special Element Aura is a powerful technique that can give you an edge in battles in Digital Girls: Idle RPG. By deploying at least 3 heroes with the same element in a team or using 2 teams of heroes with different elements, you can activate this technique and unleash its special effects.

To activate the Special Element Aura, you need to carefully select the heroes in your team and choose the right combination of elements. For example, you can choose to deploy three water heroes or three fire heroes to activate the aura. Alternatively, you can create two teams of heroes with different elements, such as 3 water heroes and 3 fire heroes.

Once you have activated the Special Element Aura, you can enjoy the additional effects it brings to your battles. These effects can vary depending on the elements you have chosen and can include increased attack power, improved defense, or higher critical hit rate. By using this technique effectively, you can gain a significant advantage in battles and progress further in the game. 

Understand all Formations

The first formation is called Origin, which features 1 front row, 2 mid rows, and 3 back rows. This formation is ideal for players who want to avoid area-of-effect attacks, as the middle is relatively empty.

Next up is Blackhole, a formation that’s perfect for players with strong damage-dealing and support heroes. These heroes are positioned toward the back and can easily blend in with the rest of the team.

For players who prioritize full-on damage, the Starcloud formation is a great option. You can position your high-damage heroes in the mid-row, with tanks in the front and support in the back.

The Termination Formation is a well-balanced formation that doesn’t favor any one particular hero. Finally, the Photon formation is the opposite of Blackhole, while the Reverse formation is the opposite of Origin. Choosing the right formation for your team can give you a significant advantage in battle.

For more Guides, Tips, and Tricks

Check out our Video Games Guide Section for more dedicated guide

How to Clean the Fish Tank in Star Wars Jedi Survivor

Want to know how to clean the Jedi Survivor Fish Tank in Star Wars? This guide will give you all the important details you are looking for.

If you’re a Star Wars Jedi: Survivor player, you know that the game is packed with exciting activities, including cleaning the fish tank in Pyloon’s Saloon. The fish tank may not look so good, but with the right steps, you can have it looking sparkling clean. In this article, we’ll guide you on how to clean the Jedi Survivor fish tank and where to find the fish to populate it.

Gameplay
Gameplay

Finding a Fisherman on Koboh

To start, you need to find a fisherman who will help you populate the fish tank. You can find Skoova Stev located in Prospector’s Folly on Koboh. To get there, exit Pyloon’s Saloon in Rambler’s Reach and turn right. Run up the slope towards the Foothill Falls, and you’ll find a zipline that will take you to a waterfall and a small hovering boat at a nearby pool.

Tell Skoova about the Jedi Survivor fish tank back at the saloon, and he will agree to help you populate it. If you talk to him again, he will catch the See Fish for the tank right there and then. After you return to Skoova at the saloon in Rambler’s Reach, he’ll be available at various watering holes across Koboh and Jedha. Speaking to him at each of these will cause him to jump into the water to catch a new fish while also regaling you with some of his past exploits.

Finding Fish on Koboh and Jedha

To populate the tank, you’ll need to catch different fish in various locations across Koboh and Jedha. Here are the areas where you can find the fish:

  • Rambler’s Reach Outpost, Koboh: Fingertip Garpon
  • Smuggler’s Tunnels, Koboh: Barbed Hookfish
  • Gorge Crash Site, Koboh: Frilled Newt
  • Bygone Settlement, Koboh: Blue-Finned Crayfish
  • Rift Passage, Koboh: Big Mouth Faa
  • Devastated Settlement, Koboh: Blinding Ray Fish
  • Arid Flats, Jedha: Snakefish
  • Crypt of Uhrma, Jedha: Fantailed Laa
  • Mountain Ascent, Koboh: Mee Fish
  • Viscid Bog, Koboh: Glottsamcrab
  • Phon’Qi Caverns, Koboh: Viscid Lurker
  • Pyloon’s Saloon, Koboh: See Fish

Once you’ve caught all twelve fish, the tank in the saloon will clear up completely. You can now marvel at your aquatic collection.

How to Clean the Jedi Survivor Fish Tank

With the fish in the tank, it’s now time to clean it up. Follow these simple steps to make the tank sparkling clean:

  • Remove the fish from the tank and put them in a separate container with some of the tank water.
  • Remove any plants, rocks, or other decorations from the tank and clean them thoroughly with hot water.
  • Using a scraper or sponge, remove any algae or dirt from the glass walls of the tank.
  • Drain the water from the tank and use a gravel vacuum to remove any debris from the bottom of the tank.
  • Refill the tank with clean water and add a water conditioner to neutralize any harmful chemicals.
  • Return the decorations and plants to the tank, and then return the fish.
  • Test the water quality using a water testing kit to ensure the water is safe for the fish.

Conclusion

In conclusion, cleaning the Jedi Survivor fish tank in Star Wars requires catching a variety of fish from different locations on Koboh and Jedha. By enlisting the help of Skoova Stev, a fisherman found at Foothill Falls in Prospector’s Folly, you can begin to populate the tank in Pyloon’s Saloon in Rambler’s Reach.

As you catch more fish and return to Skoova, the tank will gradually clear up until you have a complete and impressive aquatic collection. With these tips, you’ll be able to take care of your Jedi Survivor fish tank and enjoy your Star Wars gaming experience to the fullest.

For more Guides, Tips, and Tricks

Check out our Video Games Guide Section for more dedicated guide

Lost Ark Slayer Guide – Skills, Events, and More

Are you aware of the Lost Ark Slayer class? There are lots of things about this class along with some events that you will learn below.

On May 10, the highly anticipated Slayer will make her debut in the Arkesia region of Lost Ark. This powerful Warrior Advanced Class is the fifth in the lineup and offers players an exciting melee combat experience with her massive greatsword and Burst Mode.

The Slayer is a female variant of the Berserker class, and she comes with a range of unique abilities and playstyles that set her apart from her male counterpart. With her exceptional speed, movement, and devastating attacks, the Slayer is a force to be reckoned with on the battlefield. Below you will find the Lost Ark Slayer Guide along with many other details of events and more. So read this guide till the end to learn everything about Slayer and other updates coming to the game.

Lost Ark Slayer Burst Mode and Bloodlust

One of the key features of the Slayer is her Fury Specialty Meter, which fills up with successful attacks. Once the meter is full, the Slayer can activate Burst Mode, increasing her damage and movement speed significantly. During Burst Mode, the Slayer can also use her Specialty skill, Bloodlust, to unleash a flurry of powerful slashes and stabs.

In Burst Mode, the Slayer’s Atk. Speed, Move Speed, and Crit Rate are significantly increased. Atk. Speed and Move Speed gets a boost of 20%, and Crit Rate goes up by 30%. With Bloodlust, the Slayer can quickly slash her foes, inflicting massive damage and following up with a powerful stab, knocking them away for even more damage.

Lost Ark Slayer Class Engravings

To help players get the most out of their Lost Ark Slayer, there are two Class Engravings to consider:

Punisher

Punisher increases the Slayer’s damage while in Burst Mode and Bloodlust, with a maximum of 25% at Level 3. It also gives a Crit Rate boost of up to 20%, but at the cost of Fury gain (-25%) and Burst duration (-50%). However, when Burst ends, the Slayer will not experience Exhaustion.

Predator

Predator is another Class Engraving that focuses on Fury gain and MP recovery. It gives the Slayer up to a 10% Fury Meter boost and a 3% MP boost, depending on the level. When activated, the Slayer gains Crit Damage (up to 40% at Level 3) in Burst Mode. However, the Slayer also gains Fatigue every 3 seconds, causing the Fury Meter to decrease more quickly and preventing the use of Bloodlust. When Burst Mode ends, the duration of Exhaustion is reduced based on the number of Fatigue stacks accumulated.

Lost Ark Slayer Skills

The Slayer class in Lost Ark Academy comes with a variety of powerful skills that players can use to defeat their foes. Let’s take a closer look at each of these skills and what they can do in combat.

Flash Blade

With Flash Blade, the Lost Ark Slayer performs a diagonal slash that deals damage to her enemies.

Cross Blade

Cross Blade is a wide-sweeping X-shaped attack that inflicts damage with each swing.

Fury Blade

Fury Blade allows the Slayer to jump and swing her greatsword to inflict damage and launch foes into the air. She can then strike down with her sword to deal additional damage and knock them down.

Wild Stomp

The Wild Stomp skill allows the Slayer to stomp the ground with one foot, creating an earthquake that damages all enemies within a 4-meter radius.

Wild Rush

Wild Rush allows the Slayer to charge 7 meters toward a target location and deal damage to any foes in her path.

Punishing Draw

With Punishing Draw, the Slayer pins her greatsword to the ground, creating a crack in the earth that raises her enemies high into the air. She can then deal damage to them while they are in the air.

Ground Smash

Ground Smash is a skill that lets the Lost Ark Slayer thrust her greatsword into the ground to deal damage to her enemies. She can then pull it out and send a shockwave that pulls her foes toward her and inflicts additional damage.

Furious Claw

Furious Claw is a menacing attack where the Slayer slashes her greatsword to the left and right, dealing damage. She then spins her body to attack and deal even more damage. If she attacks an airborne foe, she can launch them into the air once more.

Spinning Sword

With Spinning Sword, the Slayer can move while swinging her greatsword to deal damage. This skill allows her to ignore collisions with adventurers and normal monsters while she is moving.

Flying Strike

Flying Strike allows the Slayer to leap up to 8 meters to a target location and strike downward with her greatsword, inflicting damage and knocking down any foes in her path.

Cruel Pierce

Cruel Pierce is a skill where the Slayer grabs her greatsword with one hand and stabs her enemies with ferocious energy, dealing damage.

Final Blow

Final Blow is a charging attack where the Slayer charges 4 meters toward a target location and slashes at her foes, launching them into the air. She can then follow up with a spinning attack that deals damage before landing a downward blow that inflicts even more damage.

Fatal Sword

With Fatal Sword, the Slayer thrusts her greatsword down to deal damage to her enemies.

Hurricane Sword

Hurricane Sword is a spinning attack that lasts for 3 seconds and inflicts damage to all nearby foes.

Mountain Cleave

Mountain Cleave is a jumping attack where the Slayer spins counter-clockwise and smashes the ground, creating a storm of swords that inflicts damage and knocks down her enemies.

Guillotine

Guillotine is a skill where the Slayer grabs her greatsword with one hand and unleashes all of her strength, dealing damage and launching her enemies into the air.

Volcanic Eruption

Volcanic Eruption allows the Slayer to thrust her greatsword into the ground to deal damage. If she holds the skill for 1.5 seconds, she can attack six times to inflict additional damage. If she hits the Perfect Zone, she can deliver a finishing blow that launches her enemies into the air.

Brutal Impact

Finally, Brutal Impact lets the Slayer condense the energy of her rage into her greatsword and strike the ground with all her might. This attack deals damage and can be charged for even more damage.

Lost Ark Slayer Awakening Skills

Moving on to the Slayer’s awakening skills, Execute is a skill that enables the Lost Ark Slayer to channel their anger into a giant blade, which can then be used to perform an upward slash that deals damage to enemies. The Slayer can then jump and slash four times in mid-air, leaving Sword Wounds on the ground with each strike. When the final strike lands, all Sword Wounds will explode, dealing damage and launching foes into the air. In Burst Mode, outgoing damage is increased by 20%.

Ragna Break is another awakening skill that allows the Slayer to enter a state of extreme fury, which manifests as a Flame Demon. This furious energy can then be gathered into the Slayer’s greatsword and used to strike the earth, dealing damage and launching foes into the air.

Lost Ark Class
Lost Ark Class

Progression events

In terms of progression events, the Punika Powerpass and Hyper Express Plus (II) event will be available alongside the launch of the Slayer class on May 10 and will continue until August 9. While there will not be a new Story Express event, the existing event can still be used with the Lost Ark Slayer if players have not designated a character already, and will be active until June 14. The other events that were launched with the Artist class in March will continue until their planned end date of June 14.

Punika Powerpass Event

With the Punika Powerpass event, players will receive Item Level 1340 gear. Unlike previous Punika Powerpass events, players do not need to complete Berver’s Friend to receive the rewards. However, to prevent bots from reaching endgame areas, only players with Trusted status or with a Lost Ark account created before December 14, 2022 will be granted a Powerpass. New players can earn their trusted status in multiple ways, such as enabling the Steam Guard mobile authenticator and having a Steam profile that is no longer a ‘Limited User’ account, or by making any purchase in Lost Ark through either Steam or Amazon.

Hyper Express Event II

To complement the Punika Powerpass, players will now have the opportunity to designate one character in their roster between Item Level 1340 and 1460 to participate in the Hyper Express Plus II Event. This event will provide players with honing materials that allow them to level up quickly to Item Level 1460 and beyond. By designating a character, players will earn rewards every 15 Item Levels up to 1460. These rewards include Silver, honing materials, Gems, Engravings, and more!

Engraving Support System

A new feature that comes with the Hyper Express Plus event is the Engraving Support system. This system lets players choose four Engravings to be in effect at level 3 during the event. Here’s how to get started:

  • To use the Engraving Support system, players must first select a Hyper Express Plus character. After selecting the character, the Engraving Support button will become active.
  • Click the Engraving Support button to open the Engraving Support page and select four desired Engravings.
  • Once players have selected their desired Engravings, they can activate them by pressing the Activate Engraving Support button.
  • The effects of Engraving Support will also be visible in the player’s Character Profile.

With the Engraving Support system, players can strategically choose Engravings that align with their playstyle and make the most out of the Hyper Express Plus event.

For more Guides, Tips, and Tricks

Check out our Video Games Guide Section for more dedicated guide