Are you also finding it difficult to get the Lost Ark Roar Emote? Do not worry because it is easy once you know what to do.
When playing Lost Ark, it is important to note that some items, such as emotes, are not just for fun but can also be used in various quests to help players progress further in the game. One such emote is the ‘Roar’ emote, which is relatively common in terms of rarity and not too difficult to obtain.
However, the real challenge lies in earning enough currency to purchase it, rather than finding it in the game. Players should focus on farming other in-game currency to afford the Lost Ark Roar emote to help them progress through quests that require its use. This guide will give you all the details that will help you to get the emote.
Gameplay
How to get Lost Ark Roar Emote
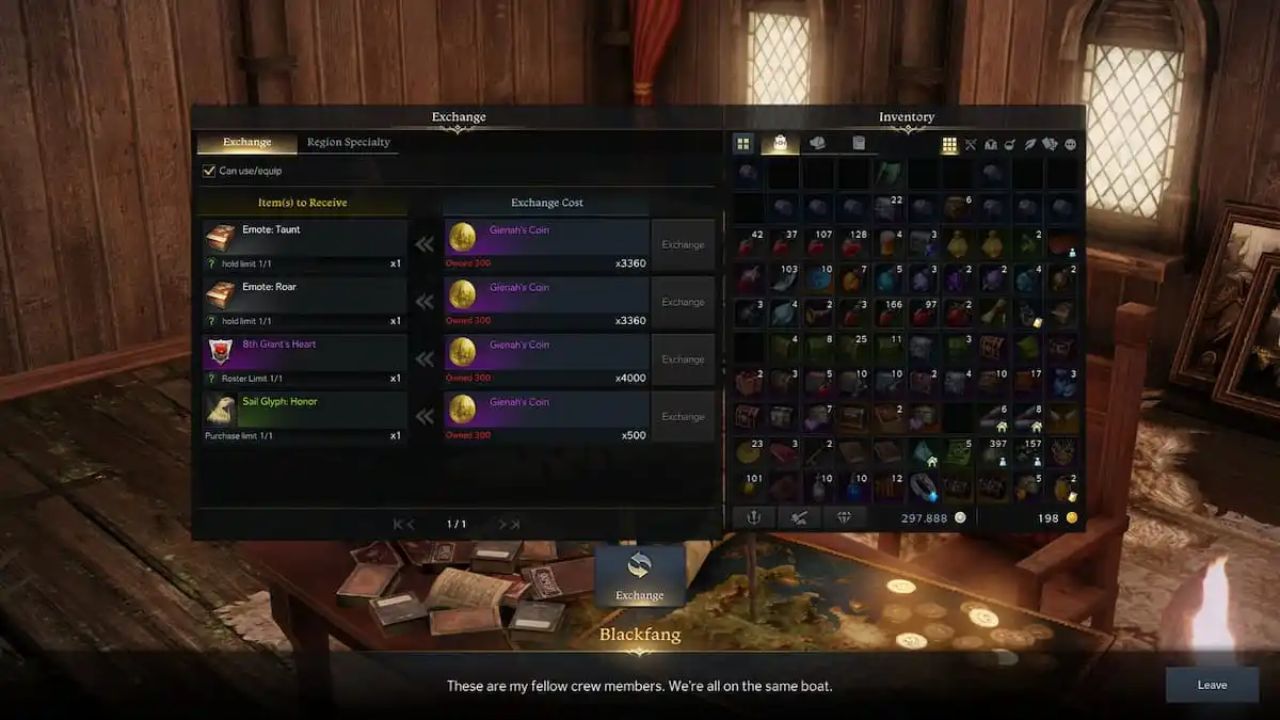
To get the Roar emote in Lost Ark, players will need to acquire 3,360 Gienah’s Coins, an epic type of coin used to buy certain items in the game. These coins are sometimes rewarded from quests and missions, so players can focus on doing co-op quests or island quests from NPCs to earn them. Completing island quests can also give players a chance to receive a High Seas Coin Chest, which can be traded in for 100 Gienah’s Coins.
While obtaining enough coins may take some time, the Lost Ark Roar emote itself is not too difficult to acquire once the coins are in hand. Gienah’s Coins can be used to purchase various items, such as blueprints and emotes. The Roar emote is of normal rarity, so players should be able to buy it from a vendor once they have enough coins.
Gienah’s Coins
A good way to earn them is by completing co-op quests or island quests for NPCs around the map. Players can also exchange a High Seas Coin Chest obtained from an island quest for 100 Gienah’s Coins.
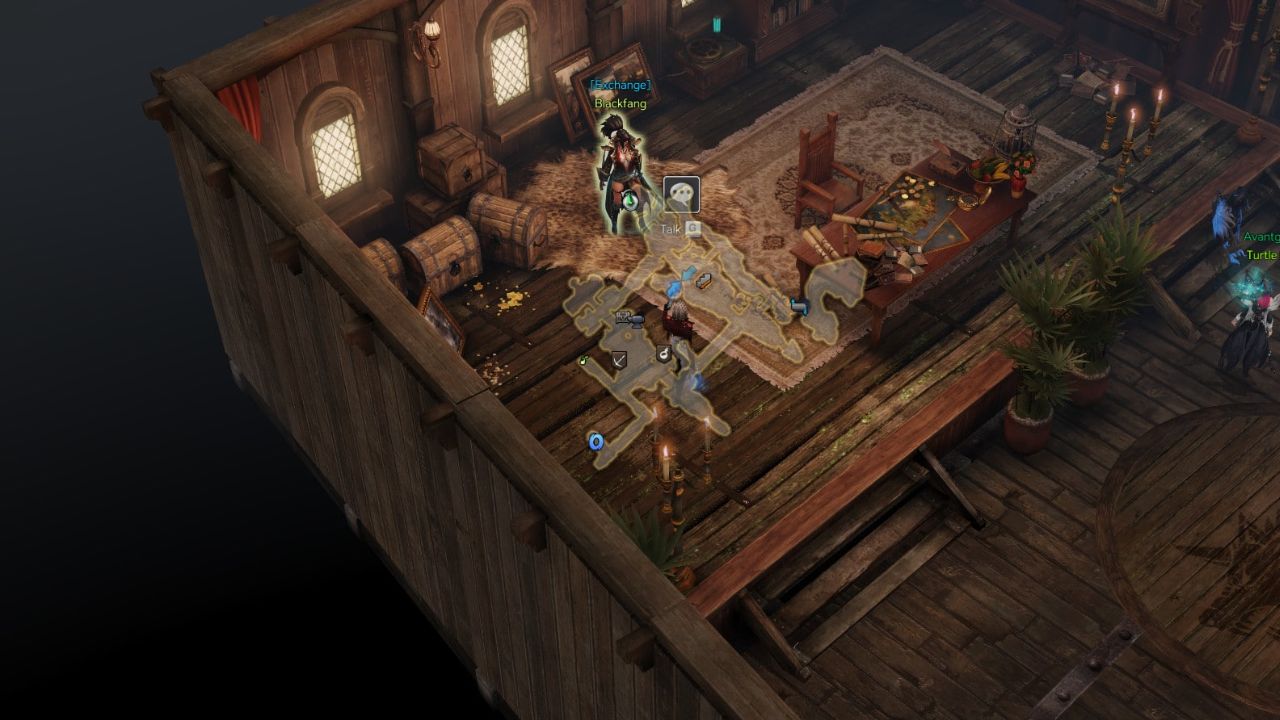
Once the required coins have been obtained, players can head to Freedom Isle to buy the emote. To find the merchant who sells the roar emote, players should check the map for a grey vendor icon. If Blackfang, the pirate who sells the emote, is on the island, the icon will be located where she is. Players should head to the east side of Freedom Isle to find the grey vendor icon inside a cabin.
How to find the Blackfang
To obtain the Lost Ark Roar emote, players must first find the merchant, Blackfang, on Freedom Isle. The easiest way to check if she is available is to look for a grey vendor icon on the map. Once found, players should approach her and initiate a conversation to access her shop menu.
One of the items sold by Blackfang is the book required to learn the roar emote. While emotes are usually learned through quests or by reading a book, the ‘Roar’ emote is purchasable from Blackfang’s shop. Once the book is purchased, the emote is automatically learned and can be used by selecting it in the inventory tab or typing ‘/roar’ into the chat.
It’s important to note that emotes can be a requirement for various quests and missions in Lost Ark, and the Roar emote is no exception. While it may take some time to save up the required coins, it’s well worth the effort to have this emote in one’s inventory.
Gameplay
Other methods to get the Lost Ark Roar Emote
If you’re looking to earn the necessary funds to purchase the Roar emote in Lost Ark, there are a couple of methods to do so, though it may take a few days to accumulate enough coins. One option is to participate in the Procyon’s Compass daily events, which include a Chaos Gate, Adventure Island, Lost Ark Ghost Ship, and Field Boss. You can track these events with the compass located under the mini-map. Completing these events can potentially reward you with a High Seas Coin Chest, which contains 100 epic coins, including Gienah’s Coin.
In addition to daily events, there are certain islands that offer guaranteed High Seas Coin Chests as rewards for completing quests. Here are the names of the islands and the number of chests you can earn on each:
Devil’s Isle: 3
Jagged Coast: 2
Whistling Island: 2
Alteisen – 3
Lullaby Island – 12
Opher, the Lonely Island – 2
Orvis Island – 3
Peyto – 5
Revelry Row – 5
Atropos – 10
Hope Island – 12
Island of Mist – 7
Isle of Yearning – 15
Kalthertz – 7
Lost City – 15
Blackfang’s Den – 10
Freedom Isle – 15
Gesbroy – 15
Golden Wave Island – 7
Runaways Island – 5
Tooki Corporation – 16
Turtle Island – 7
By completing quests on these islands, you can earn the required coins much faster.
Want to know the tip for Crowfall fast level up? The guide below has all the details that will help you to level up fast in the game.
Each RPG game’s leveling system is important since it has the power to make or ruin a player’s entire experience. The Crowfall fast level up system is made to be basic and uncomplicated in order to encourage players to play the game as regularly as possible to have the greatest outcomes. Because each character has a distinct set of skills, advantages, and disadvantages, the game is both difficult and thrilling.
The Crowfall fast level up encourages players to start with the basics to make the most out of the game’s features. Then they can reach Levels 25-30 as soon as possible. In Crowfall, normal gameplay is encouraged to level up quickly and gain access to more exciting features. This means that players should engage in the game’s quests and activities, fighting battles, and completing objectives. This way, they can gain experience points and level up. In this guide, we will tell you everything about the Crowfall fast level up strategies.
Gameplay
Crowfall fast level up strategies
Quests
In Crowfall, ignoring quests and grinding mobs can turn on your head. Unlike many other RPGs, completing quests is not important. However, it is necessary to progress quickly in the game. The beginning of the game is designed to get players to the ‘end-game’ content as quickly as possible by completing all quests and tasks given to the player through a tutorial.
To make questing as easy and straightforward as possible, Crowfall has a dedicated quest tab and marker. Players can use it to keep track of their progress. By following the quest markers and completing objectives, players can quickly earn experience points (XP) and level up their characters. This is especially important in the early stages of the game. There, leveling up quickly is essential to surviving in the game’s harsh and difficult environment.
While it may be tempting to spend time attacking enemies and exploring the game’s vast open world, focusing on quests is the most efficient way for Crowfall fast level up. By completing quests, players can earn substantial amounts of XP. This makes it easy to reach level 5 in the first section of the game. This is a significant advantage, as reaching this milestone allows players to access more powerful abilities and gear. This is crucial for survival in the later stages of the game.
Joining a Guild
Joining a guild in Crowfall is highly recommended, especially for new players who want to level up quickly and smoothly. By completing quests and fighting mobs with other players in a party, the net XP gained can increase significantly. This is because party members can help each other in completing tasks. This results in quicker progress and more XP. Additionally, guild members can provide helpful tips and tricks for whatever class the player is using. This can further increase the efficiency of leveling up.
Not only does joining a guild provide benefits for Crowfall fast level up, but it can also make the transition into PVP much smoother. PVP becomes available at level 25, and having a group of experienced players to fight alongside can make the process much more enjoyable and efficient. With the help of a guild, players can reach the max level of 35 much faster and more easily than if they were to go at it alone.
Abilities and Attributes
The Crowfall fast level up system is not solely dependent on a character’s class, but rather on their abilities and attributes. As players gain experience, they earn talent points. This increase the capabilities of their chosen class. In order to level up quickly, players should focus on talents that emphasize survivability and AOE abilities. This is because they prove more useful in the long run.
One of the most popular abilities is the ‘demoralizing shout’ within the Centaur Champion tree. It focuses on Strength and Constitution. This ability debuffs attack and support power of enemies nearby by 20% for 15 seconds, while also slowing them. Obtaining this ability requires talent points that are earned sparingly.
Attribute points are also a key aspect of Crowfall fast level up. They boost critical damage, critical chance, attack power, and vessel abilities. It is important to choose a vessel that is compatible with a player’s chosen class, as certain classes are restricted to specific vessel types. With the right combination of attributes and abilities, players can do high damage and inhibit multiple enemies at once, making the journey to level up much quicker.
Gameplay
Sacrificial altars
In Crowfall, XP is an essential aspect of the leveling system, and it is important to optimize its use in order to make the most of the game’s features. It is essential to note that XP does not carry over to the next level, making it necessary to be mindful of when to complete quests and turn in rewards.
In cases where the XP meter is close to being filled, it’s advisable to hold off on completing any quests that offer significant XP rewards until the meter is completely empty. Instead, players can make use of sacrificial altars, which allow the use of old equipment to earn the specific amount of XP required. This strategy will save a significant amount of time and ensure that XP is used effectively.
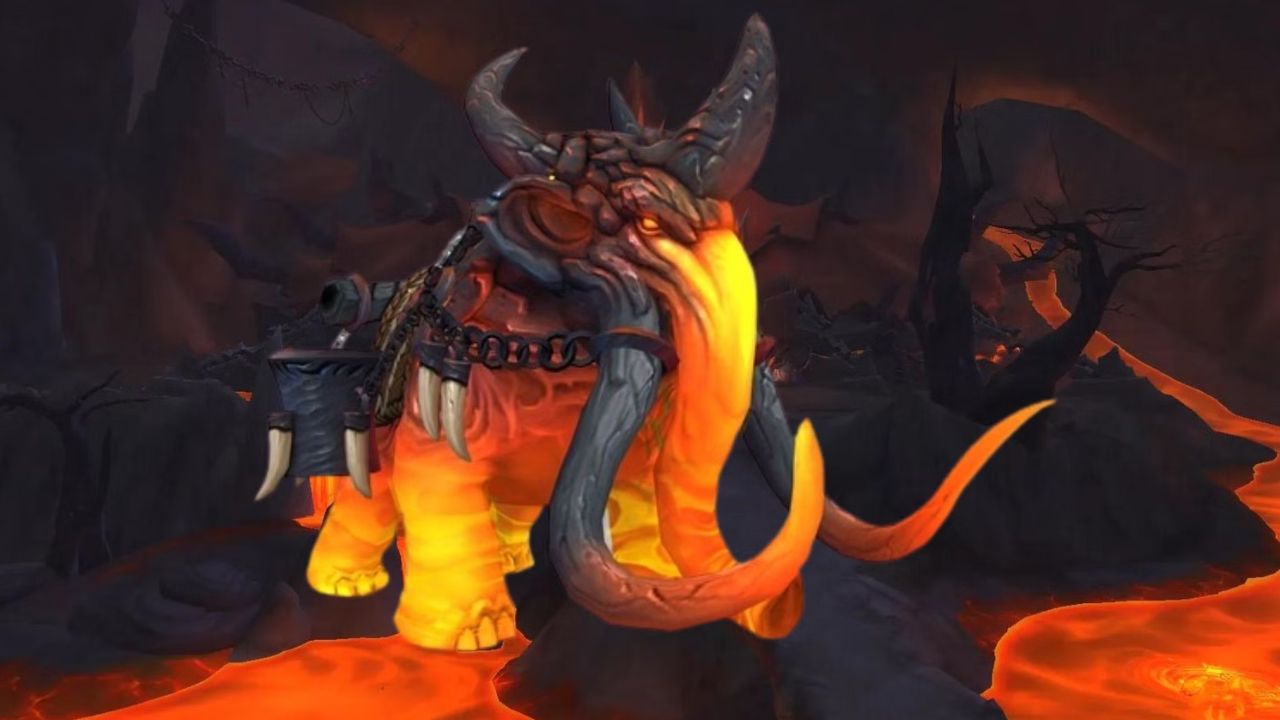
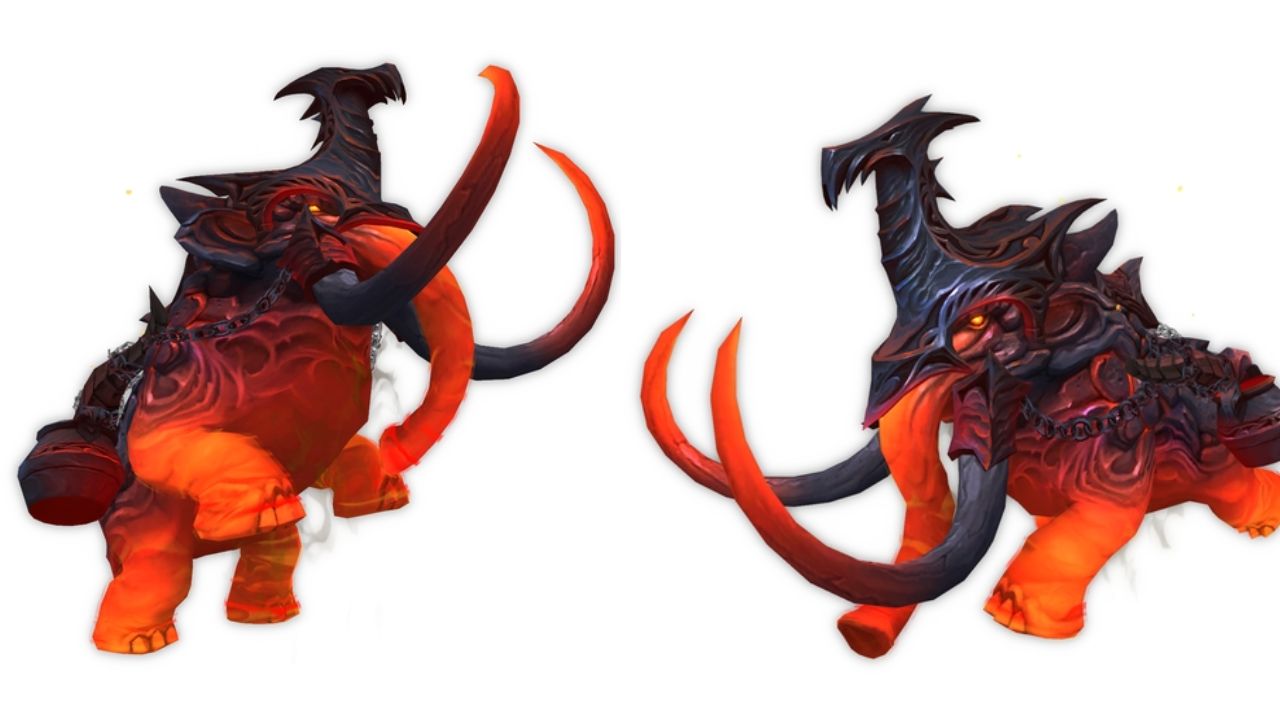
Are you also looking for a way to get the WoW Dragonflight Raging Magmammoth mount? Do not worry just follow the guide below.
The Raging Magmammoth is a Mount within the realm of World of Warcraft: Dragonflight. It has a colossal mammoth-style physique which is in searing molten magma. Its natural armor can endure temperatures that exceed thousands of degrees. This further enhances its nature. It is the ideal mode of transportation for adventurers traveling the perilous volcanic wastelands of the Dragon Isles in World of Warcraft: Dragonflight.
In order to acquire the WoW Dragonflight Raging Magmammoth Mount, players must successfully fulfill the “Glory of the Vault Raider” Dungeons & Raids Achievement. However, this is not a trivial task, as it requires the mastery of eight distinct Achievements within the initial Raid of the expansion, the Vault of the Incarnates.
Raging Magmammoth
Although, the majority of these Achievements are attainable on Normal Difficulty or higher. This allows players to obtain the Mount without having to engage in more demanding Heroic or Mythic dungeon-clearing. The guide below will help you to know how to get the WoW Dragonflight Raging Magmammoth.
How to unlock WoW Dragonflight Raging Magmammoth
Achieving the “Glory of the Vault Raider” in the Vault of the Incarnates may take up to two hours or more. As such, those seeking to get the WoW Dragonflight Raging Magmammoth mount are strongly advised to join a Raiding Guild. Players can also create a group of trusted friends and form a team in order to streamline the process of conquering the eight Dungeons & Raids Achievements.
Complete achievements
The following activities must be accomplished by users to successfully fulfill the “Glory of the Vault Raider” Achievement. Then only they can get their hands on the WoW Dragonflight Raging Magmammoth Mount.
What Frozen Things Do: Defeat Eranog by locating a Frozen Portal Stone and then vanquishing a Burning Behemoth.
The Lunker Below: Utilize fishing to lure the Lurking Lunker out of the lava, and then defeat the Primal Council.
Nothing But Air: Collect 8 Condensed Gales and defeat Dathea.
Incubation Extermination: Hatch and defeat lieutenants from each Primal element’s eggs within 10 seconds of each other to defeat Broodkeeper Diurna.
Little Friends: Strike the three Dormant Earth nodes in Terros’s chamber with Awakened Earth, and then defeat the resulting Energized Earth creatures to defeat Terros.
I Was Saving That For Later: Use Caustic Eruption to free 5 mysterious captives, and then defeat Sennarth.
The Power is MINE!: Destroy the Primal Avatar to defeat Kurog Grimtotem.
The Ol Raszle Daszle: Collect two Concentrated Storm Essences and defeat the Concentrated Storm so that you can defeat Raszageth the Storm-Eater.
Raging Magmammoth
Just follow this guide and you will learn how to get the WoW Dragonflight Raging Magmammoth mount.
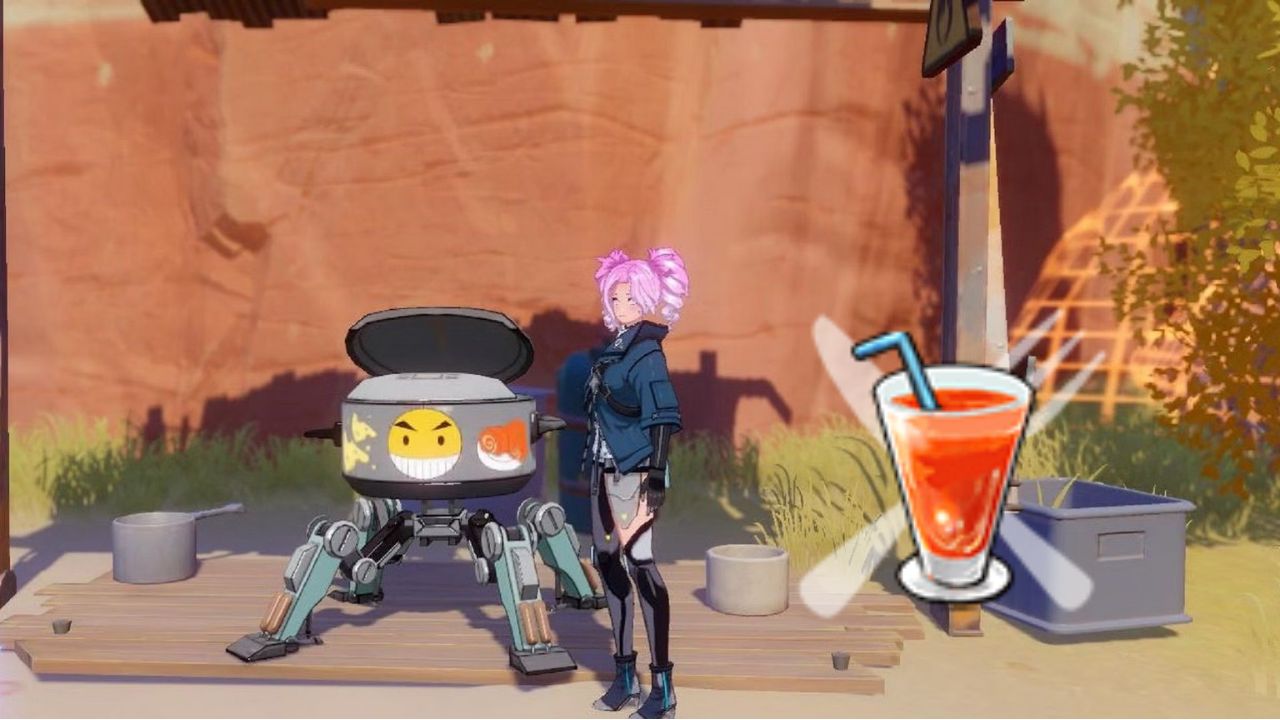
Want to know how to make the Tower of Fantasy Honeyed Fruit Juice? Follow the guide below to learn about the process and ingredients.
In Tower of Fantasy, Honeyed Fruit Juice is a highly valuable consumable that falls under the N-Rarity food category. It has the ability to restore 300 points of Stamina and 12% of a Wanderer’s max Health. It also includes an additional 3,300 HP, this recipe is a must-have item. Furthermore, it is great for any player seeking to explore or fight enemies in the expansive shared world of Aesperia.
This food item not only provides considerable HP restoration in case of a significant hit, but it also regenerates Stamina for sustained attacks. Furthermore, using their Jetpack, players can rely on Honeyed Fruit Juice to replenish their energy when climbing tall cliffs or gliding to distant locations. The guide below will help you to understand how to make the Tower of Fantasy Honeyed Fruit Juice.
Cooking
How to Make Tower of Fantasy Honeyed Fruit Juice
Tower of Fantasy Honeyed Fruit Juice is a valuable consumable that can restore a substantial amount of stamina and health to players. Crafting this item requires the use of specific ingredients and the knowledge of where to find them.
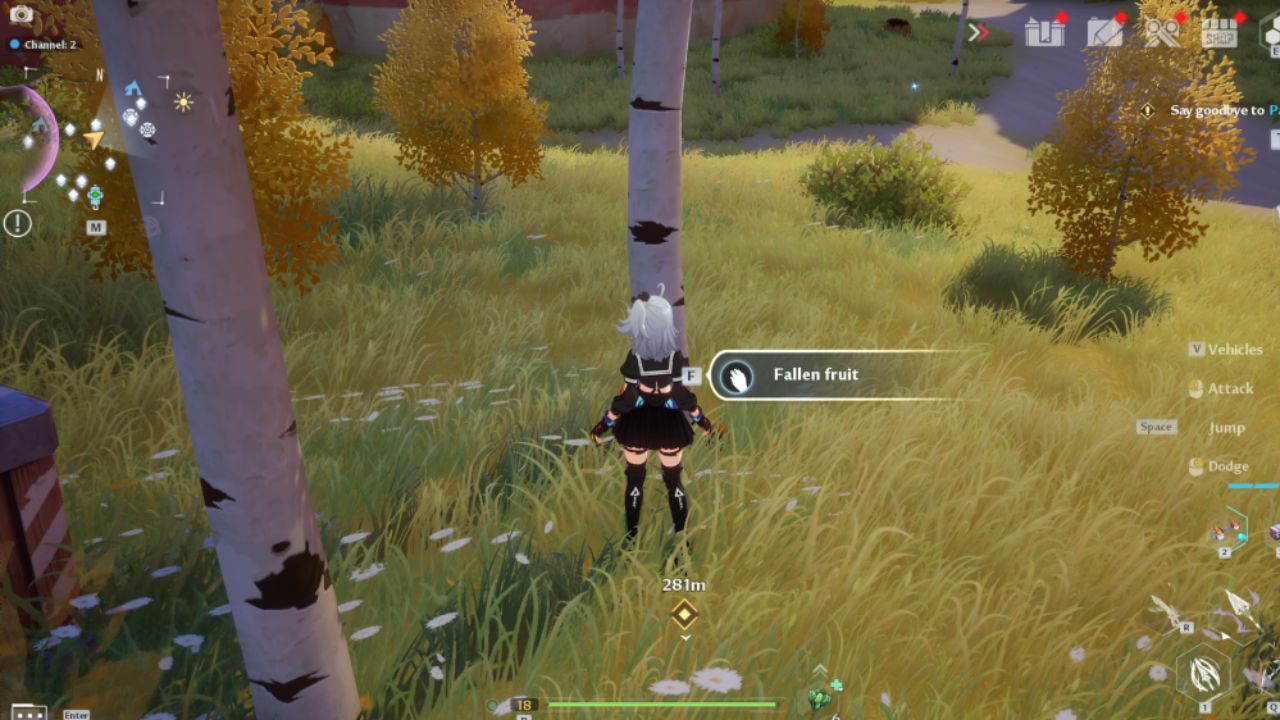
Obtaining Fallen Fruit
Fallen Fruit is a common resource in Tower of Fantasy that players can use to craft Honeyed Fruit Juice. Players can find the fruit in various locations throughout the Banges region and Astra. Still, the forests west of the Astra Omnium Tower and north of the Ring of Echoes are particularly fruitful.
Gameplay
Crafting Honeyed Fruit Juice
To craft Honeyed Fruit Juice, players will need to use a Cooking Pot and follow a simple recipe. Simply gather Fallen Fruit ×2, Honey ×1, and Carbonated Water ×1 and place them into the Cooking Pot.
Then, select the Creation option at the bottom-left corner of the screen to open the discovery menu. Add 14 or 15 stacks of Fallen Fruit and press the “Cooking” button to create the Honeyed Fruit Juice recipe.
More ingredients for Honeyed Fruit Juice Recipe
Honey is the second ingredient required to make Honeyed Fruit Juice in the game, and it is obtainable in Astra and Banges. Although not as common as Fallen Fruit, players can acquire Honey by destroying Beehives or the hostile bees that spawn from them in the game’s open world. These nodes are characterized by termite mound-shaped hives with purple goo flowing from their holes.
On the other hand, Carbonated Water is the third ingredient for Honeyed Fruit Juice that is not obtainable from exploration or farming in the open world. Instead, players must visit one of the three Food Vendors located in Astra, Banges, or Mirroria to purchase it. These vendors offer up to 99 stacks of Carbonated Water daily to players. Once you complete the crafting, you can use this item to restore your health and stamina while exploring or battling enemies in the vast world of Aesperia.
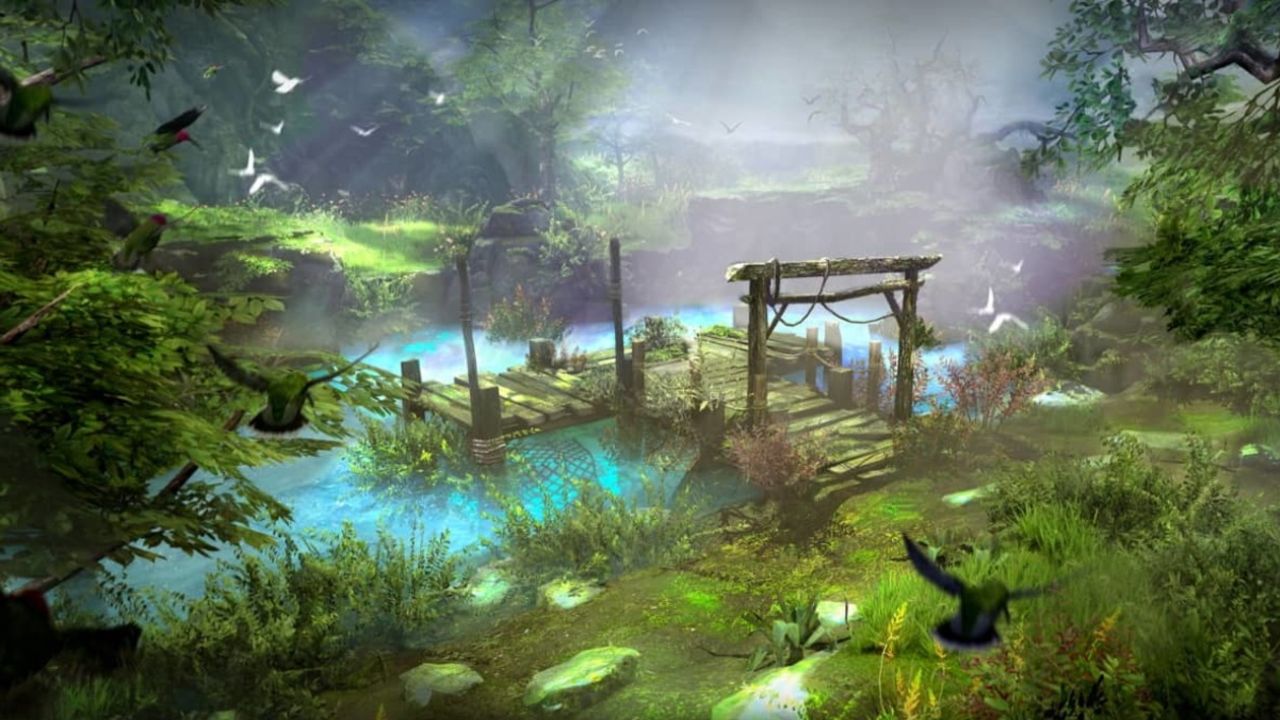
Want to know all about the Lost Ark Serenity Isle Island? The guide below has all the important information that you need before visiting there.
Exploring the vast world of the Lost Ark is a thrilling experience. This is more fun especially after acquiring your first ship. One of the first islands worth visiting is Serenity Isle. The recommendation for the gear level is 250. This should be attainable at this point in the game, players can explore the island and collect two Mokoko Seeds. There is also a valuable Island Soul.
It’s worth noting that to obtain the Island Soul, players need to complete a quest chain that requires a visit to the Tortoyk’s Heart dungeon on Tortoyk. It’s important to keep this in mind when planning your island-hopping adventure in Lost Ark. So what are you waiting for? Quickly take a look at the Lost Ark Serenity Isle Island guide below.
Gameplay
Lost Ark Serenity Isle Location
To reach Serenity Isle in Lost Ark, the most convenient method is to travel to Wavestrand Port located in East Luterra. From there, the island can be easily accessed with a short sail towards the east in the Platina Ocean. The journey is relatively safe, and even slower ships will arrive in just a few minutes without any perilous sea routes to navigate.
How to Obtain the Island Soul for Serenity Isle in Lost Ark
To obtain the Island Soul for Serenity Isle in Lost Ark, players need to complete a quest chain involving the Legendary Blacksmith. This quest chain is connected to the game’s main storyline, so players will be guided here regardless. The first two parts of the quest chain, “Who’s There?!” and “A Sad History,” simply require players to talk to the blacksmith on the island.
For part three, “The Stone of Power,” players need to revisit two dungeons to collect items. The first dungeon is Tortoyk’s Heart in the Forest of Giants, Tortoyk, and the second is Morai Ruins in Saland Hill, Yudia. Once players have taken the necessary items, they should return to the Legendary Blacksmith. The blacksmith will then ask them to defeat the Serenity Isle boss mob, Metomus.
Metomus has 70,000 health and is level 50, but he is relatively slow and shouldn’t prove too difficult for players to defeat. Once players have defeated him, they will be rewarded with the Island Soul.
Gameplay
Lost Ark Serenity Isle Mokoko Seed Locations
Lost Ark Serenity Isle is home to two Mokoko Seeds. Getting to them requires a bit of exploration. The first seed is in the first area on the island’s northernmost tip, just beyond a wooden bench in the water. There will be a left plant and the first mokoko is just to the left of the plant. However, players must be cautious while exploring this area since the island boss, Metomus is likely to attack them.
To get the second seed, players need to climb some vines that are slightly hidden. To find it, walk into the central area of the island, along the thin path, and turn left (north) at the end. There are several Slimes guarding this area, and the vines are among them. At the top of the vines, players will find the second seed.
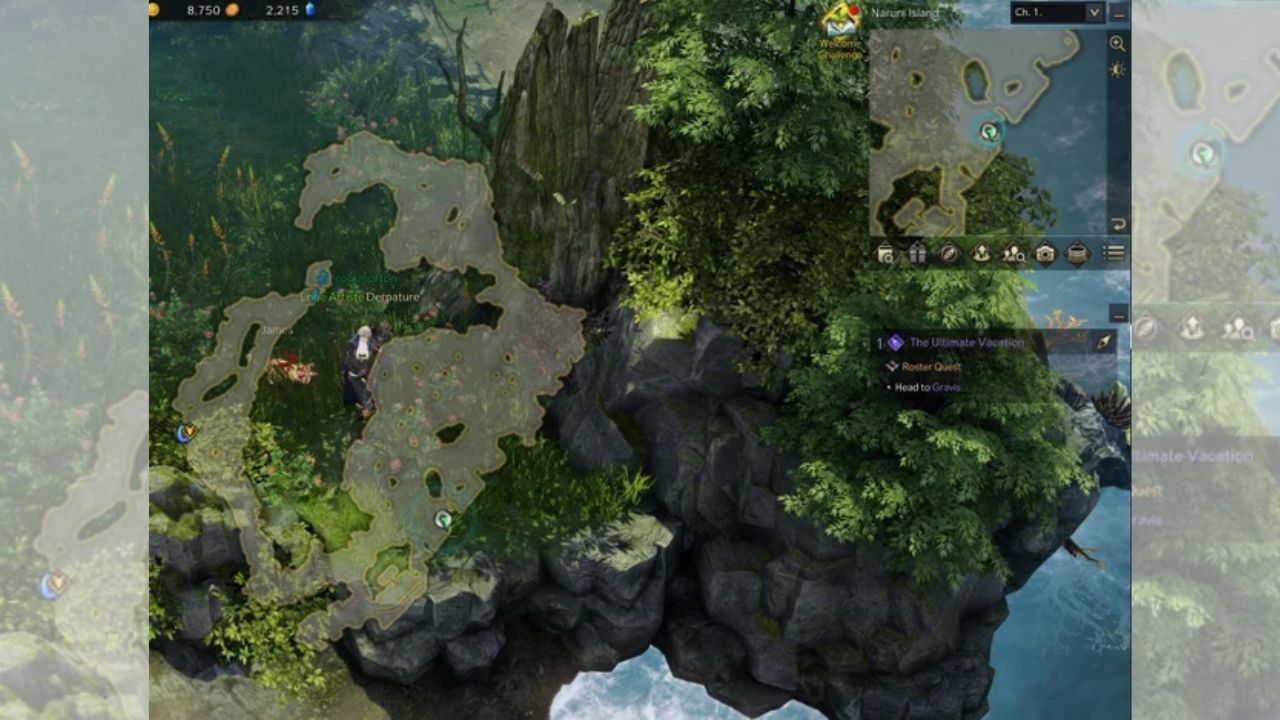
Are you thinking of traveling to the Lost Ark Naruni Island? Just take a look at the guide below so that you can be aware of everything.
Naruni Island is a small tropical paradise located off the coast of Lost Ark. It is an immense and mysterious world filled to the brim with an array of magical creatures, powerful artifacts, and hidden secrets. The island is home to the Naruni. It is a species of cute and cuddly dinosaur-like animals that are exclusive to this world.
Though the island may seem small and unimportant, it holds a great deal of significance. It is for those brave enough to venture there. You will find the Island Soul and five Mokoko Seeds on the Lost Ark Naruni island. The island also provides a unique opportunity to interact with the Naruni. It is a rare species that can only be found on the island. Below you will find the Lost Ark Naruni Island Guide that will give you more information.
Gameplay
Lost Ark Naruni Island Guide: Location
If you’re on the hunt for adventure, look no further than Naruni Island. Tucked away in the Sea of Procyon, this tropical paradise can be found just beyond the central Wall of Procyon. And get this, it’s only a stone’s throw away from South Vern’s port at the Bellion Ruins. So batten down the hatches and set sail for Naruni Island, where excitement and fun await!
Island Soul
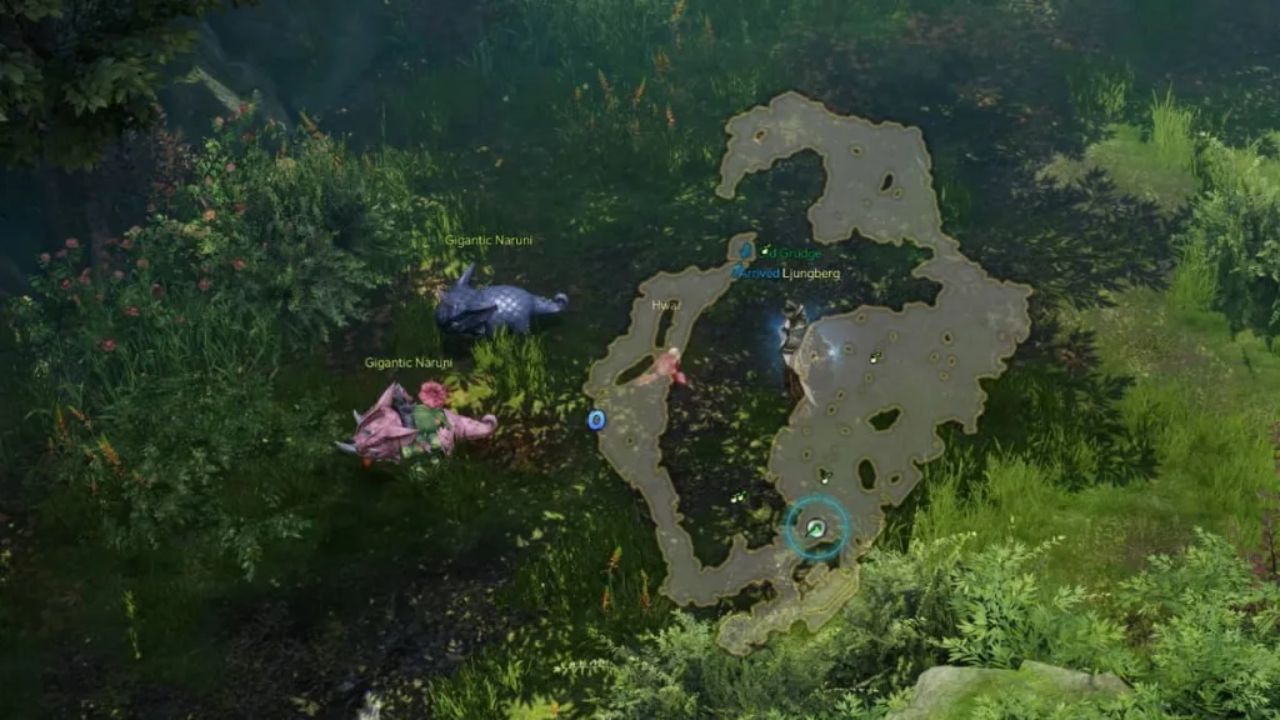
Although the acquisition of the Island Soul on Naruni Island is obtained through a single quest, do not let the apparent simplicity of the task lull you into a false sense of security. While this unique and highly sought-after token can be obtained without relying on random number generation, it still requires a significant investment of time and effort to acquire.
You will get the quest, known as “Naruni Go!”, from the Environmental Researcher who is near the island’s entrance. To complete this quest, you will need to interact with the Narunis on the island a total of 101 times. However, do not be fooled by the seemingly straightforward nature of this task. These playful creatures move around frequently, and each interaction takes several seconds to complete. Timing is key, as you must catch them at the right moment to prevent them from fleeing mid-interaction. Best of luck on your quest for the Island Soul!
Lost Ark Naruni Island Mokoko Seeds Location
Finding the first Mokoko Seed on Naruni Island is like searching for a needle in a haystack. It’s cunningly concealed and almost invisible to the naked eye, unless you zoom in as far as possible and stand right next to it.
But wait, there’s more! The fun doesn’t stop there. As you traverse the northern area of the island, you’ll stumble upon a hidden entrance that beckons you to explore further. And if you heed the call, the game will urge you to interact with the Mokoko Seed well before it comes into view. This will add an extra layer of excitement and mystery to your journey.
Brace yourself for a challenging quest to obtain the second and third Mokoko Seeds on Naruni Island. These elusive treasures are located off the map, hidden from plain sight and ready to test your mettle.
To begin your journey, venture to the middle of the southern strip of the island and position yourself next to a wall that may seem unremarkable at first glance. But hold on, there’s a twist – there’s no bouncing yellowish-gold arrow to indicate that you can climb it! With a sharp eye and steady hands, you must scale this wall, and once you’ve made it to the top, you’ll be met with yet another obstacle.
But don’t lose hope! Your perseverance will be rewarded when you finally reach the summit and discover the long-awaited Mokoko Seeds, perched high above the island and waiting to be claimed.
Last Two Mokoko Seeds
Gameplay
The fourth and fifth seeds are shrouded in mystery and hidden in the eastern section of the island. The fourth Mokoko Seed awaits you, nestled in the shade of a tree and tucked away in a small bush of reddish-purple flowers. It’s a real master of disguise, so be sure to look closely and take your time to uncover its hiding spot.
The fifth and final Mokoko Seed is just a short jaunt north of the fourth one. It is also camouflaged under the protective boughs of a nearby tree and obscured by the dense foliage. Your eagle eyes and sharp intuition will be put to the test once more, as you scour the area for this elusive treasure.
Conclusion
Once you’ve completed the quest to snag the coveted Island Soul and gathered all the Mokoko Seeds on Lost Ark Naruni Island, you might be thinking “What’s next?”. Well, there are no more Una’s Tasks to be found here but don’t pack your bags just yet. If you’re looking to kick back and relax with some friendly Narunis, then this island paradise is the perfect destination for you.
Are you also looking for the Tower of Fantasy Poultry Meat? Do not waste your sweat because our guide will help you.
In Tower of Fantasy, Poultry Meat is a versatile cooking ingredient that can be used to whip up some scrumptious meals. Specifically, it’s a key ingredient in two popular N-Rarity dishes: Fried Chicken and Crispy Chicken Burgers. Both of these dishes are restorative meals and have the same effect when consumed. They regenerate 7 Satiety and restore (12% + 3,300) HP.
While these meals may not be the ultimate solution for replenishing your health, they are still a great option for those on a budget. Plus, they are easy to make and require ingredients that can be easily found throughout the expansive sci-fi world of Aesperia. So if you’re in need of a quick and tasty snack, look no further than Tower of Fantasy Poultry Meat. If you dont know how to get poultry meat in Tower of Fantasy then do not worry. The guide below will help you out.
Poultry meat
Poultry Meat
The Tower of Fantasy Poultry meat dishes, which are Fried Chicken and Crispy Chicken Burgers can also appear as random recipes that you will have to cook. It will be one of the four dailies in Tower of Fantasy.
For those who are part of a guild-like crew in Tower of Fantasy, Poultry Meat can also show up as a Donation. As a result, it’s important to know where to find this essential cooking ingredient for such recurring activities.
How To Get Tower of Fantasy Poultry Meat
As the name suggests, Poultry Meat is acquired from unnamed birds that bear a striking resemblance to real-life cranes and peacocks, with their pink and white feathers. These feathery creatures can be found in specific locations throughout the wild regions of Aesperia, specifically in Astra and Banges. So, if you’re in search of this ingredient for your culinary needs, be sure to keep an eye out for these avian creatures.
Tower of Fantasy’s avian creatures, which provide Poultry Meat as a drop, behave similarly to those found in Genshin Impact, taking flight when approached by players. However, a notable difference is that in Tower of Fantasy, these creatures won’t flee when attacked with a ranged weapon. This makes it the best approach for hunting them down. Players can use weapons like Dual EM Stars or Nightingale’s Feather to shoot the birds from a safe distance, acquiring their valuable Poultry Meat.
Cooking recipe
How to Farm Poultry Meat
In Tower of Fantasy, the locations of the birds that drop Poultry Meat are fixed and consistent. This allows players to locate them in the same areas after they have respawned. However, if another player has already defeated them, they will take some time to regenerate.
If you’re looking for a reliable source of Tower of Fantasy Poultry Meat, you’ll want to know where to find the birds that drop it. Fortunately, it has specific spawn points that you can learn and remember for future hunting expeditions. Here are seven locations to check:
Riverside northwest of Ruin A-01 in Astra
Mountainous ridges east of Ruin A-01
Opposite beach to the east of the arena island, starting from Barrenstown
Ridge above the waterfall northwest of the Football Field in Astra
Northeastern shores near two birds, west of Anchorville in Banges (fast travel point)
Road beneath the ruined highway southwest of Banges Farm
Mountain overlooking the Loen Dock from the southeast, near a large enemy campsite
Remember that these birds won’t stick around if you get too close, so it’s best to use ranged weapons like Dual EM Stars or Nightingale’s Feather to take them out. Also, keep in mind that if someone else has recently killed them, you may have to wait a few minutes for them to respawn.
Want to know how to get the Destiny 2 Fire and Forget Rifle? This is a linear Fusion rifle and we will tell you how to get it.
Destiny 2 is known for its variety of weapons, each with its unique perks and abilities. Among them, the Fire and Forget Linear Fusion Rifle stands out as a powerful heavy weapon that can deal devastating damage to bosses and other tough enemies. This Legendary weapon came in Season of the Seraph and has become a popular choice among Guardians looking to tackle end-game content. In this article, we will guide you on how to obtain the Destiny 2 Fire and Forget Rifle.
Weapon stats
Destiny 2 Fire and Forget Rifle
Fire and Forget is a Linear Fusion Rifle of Legendary rarity that came to Destiny 2 during Season of the Seraph. This Stasis weapon is exceptionally effective in both PvP and PvE activities and can be equipped in the Heavy slot. With a range of possible Perks, the gun has become a go-to option for Guardians looking to tackle high-level content, as Linear Fusion Rifles have consistently been among the most potent DPS weapons in recent seasons.
Destiny 2’s Duality Dungeon introduced the first Aggressive Frame Linear Fusion Rifle, making the Stormchaser the most popular weapon for boss DPS. Aggressive Frame Linear Fusion Rifles fire a three-round burst while only costing one ammo. While the Stormchaser is still a powerhouse weapon, the Fire and Forget is an excellent alternative. This Linear Fusion Rifle is also Aggressive Frame and can be acquired through much easier methods and crafted in the Enclave.
How to get the Destiny 2 Fire and Forget Rifle
We already told you that Fire and Forget is a powerful Linear Fusion Rifle in Destiny 2. You can get this weapon only by completing Season of the Seraph activities. Guardians have a chance of getting a Deepsight version of the weapon by completing and opening the final chest of a Heist Battleground.
Keep in mind that the odds of getting it might be low. Players can increase their chances by acquiring the “Heisted Deepsight” upgrade or by using the “Focusing Deepsight” method. This way they can progress toward a Pattern by focusing one Legendary Engram each week. In addition, Seasonal vendors now offer Deepsight weapons daily instead of weekly until the Lightfall expansion.
Gameplay
Fire and Forget Linear Fusion Rifle Attachments
For Fire and Forget in Destiny 2, Polygonal Rifling is the recommended Barrel choice. It reduces recoil and improves stability. The Enhanced Battery increases the magazine size, which synergizes with the Veist Stinger Origin Trait. This provides a chance to fully reload the weapon upon dealing damage. This Trait is unique to Fire and Forget as it can activate on any of the three shots fired in a single burst.
Field Prep improves ammo reserves and speeds up stow, ready, and reload times when crouching. Focused Fury increases damage by 20% if half of the magazine causes precision damage. These Perks make Destiny 2 Fire and Forget a competitive Linear Fusion Rifle compared to other weapons like Stormchaser. Additionally, guardians can apply enhanced Perks to crafted weapons and take advantage of the guaranteed daily Deepsight focusing to acquire Fire and Forget.
In this article, we will be discussing the best solo MMORPG games that you should play. Read the list till the end.
Are you a solo player looking for the best MMORPG games to play? This article will provide you with the best solo MMORPG games that are ideal for solo players. We’ll take a look at the features and benefits of each game. We’ll also discuss the gameplay of the game for your solo gaming experience. So get ready to adventure into the world of online MMORPGs and find the perfect game for your solo gaming needs.
MMORPG gameplay
Elder Scrolls Online
The massively multiplayer online role-playing game Elder Scrolls Online is based in the Tamriel universe. Ten different races, including humans, elvish races, and bestial races, are available. Players can choose when creating and customizing a character. Additionally, they have a choice of six classes, including Necromancer, Dragonknight, Nightblade, Templar, and Sorcerer.
A non-linear gaming experience is provided by the game, combining objectives, random interactions, and open-world exploring. Players can also practice crafting skills. These include alchemy, blacksmithing, clothing, magic, woodworking, provisioning, and jewelry making. The makers have stated that there will be plenty of material for individuals. Especially for those who want to play alone online even if the game does not include a single-player offline option. This is one of the best solo MMORPG games you can play.
Runescape
Players begin in a special area called Tutorial Island. There they are taught the basics of RuneScape. After completing the tutorial, they have access to tutors and advisors located in the cities they explore. Players can set their own goals and objectives as they play the game. There are training in-game skills, engaging in combat with monsters or other players, and completing quests. Players can also interact with each other by trading, chatting, or participating in mini-games.
RuneScape has 28 skills. Players gain experience points in a skill whenever they use it. RuneScape’s combat system is semi-real-time and is an important part of the game. This is because it allows players to defeat monsters to obtain dropped items or complete quests. A player’s combat level is determined by a formula based on their combat skills. Combat is initiated by clicking on the enemy.
It continues until the player kills their opponent, dies, or retreats from the fight. Weapons in the game are different in nature and have different strengths and weaknesses. Players can summon familiars to assist with combat. They can also use special attacks called “abilities” to deal more damage and use potions and the Prayer skill to increase their combat. Players looking for the best solo MMORPG games can try out Runescape.
MapleStory
MapleStory is a two-dimensional, side-scrolling massively multiplayer online role-playing game. Gameplay in MapleStory primarily revolves around venturing into dungeons and fighting monsters in real time. Players can gain experience points, in-game currency known as “Mesos”, and various items by completing quests and defeating monsters. Players can also choose from a variety of in-game professions, such as crafting equipment, accessories, and potions.
Furthermore, players can interact with other players in a variety of ways, such as forming parties to defeat monsters, getting married, joining guilds, creating families, and raising or lowering the in-game popularity of other players. Additionally, players can compete with each other in minigames, such as Gomoku and Concentration, and engage in trading activities for Mesos or other in-game items.
Rift
Rifts are a type of portal that opens up in the land of Telara and brings in monsters from the Elemental Planes. These monsters march toward important locations on the map. It’s the players’ job to defeat them and close the rifts. If left unchecked, the monsters will take over large parts of the map, causing destruction and hampering operations in that area.
If a player enters the area around a rift, they will be prompted to join a public group instead of having to create one manually. After the rift is closed, players are rewarded based on their contribution to the fight. These are dealing damage, healing, or buffing other players.
Non-player characters hostile to the player may also engage rift invaders. With the addition of Storm Legion, Hunt Rifts can be summoned by players, creating a “survival” style of combat, where players must defend conduits from waves of invaders culminating in a boss battle. The difficulty of the Hunt Rifts affects the rewards that players receive.
Temtem
Temtem is a video game that draws inspiration from the Pokémon series. Players explore the game’s environment while capturing and commanding Temtem creatures to battle other Temtem creatures controlled by NPCs or other players.
Battles in Temtem take place in a 2×2 environment, similar to the double battles seen in the Pokémon series. Players take on the role of a novice Temtem tamer, who must travel around the six floating islands of the Airborne Archipelago to battle and defeat Clan Belsoto, a sinister organization that wants to take control of the islands by force.
Black Desert Online
Black Desert Online is an action-based MMORPG that requires players to use manual aiming and free movement to progress in the game. It offers a variety of activities, such as housing, fishing, farming, trading, large player versus player siege events, and castle battles. The game’s character customization is advanced and in-depth, and its combat system requires precise manual aiming, dodging, and using combos.
Players can even acquire mounts through taming or breeding and care for them. Additionally, the game includes an immersive dynamic worldwide weather system that influences gameplay and has localized weather events, such as temporary fog. It also features a dynamic day/night cycle with gradual lighting effects, with different game content available depending on whether it is night or day. Finally, players are able to customize their own housing by purchasing furniture from NPCs or crafting it themselves. BDO is one of the best solo MMORPG games.
Final Fantasy 14
Final Fantasy XIV is a Massively Multiplayer Online Role-Playing Game (MMORPG) in which players create and customize characters to use in the game. They can choose various features for their character, such as name, race, gender, and facial features. To start the game, players must select a game server and choose a starting class from the two available options: Disciple of War or Magic. Other classes can be unlocked later.
New World
Players in the game can form groups of up to five people, split into three factions, collect resources from resource spots, craft items, take control of settlements, complete quests, explore the world, or fight other players or monsters. The game requires the player to aim manually, rather than relying on auto-targeting, and enemies become more difficult to defeat as the player levels up, with more complex sequences of attacking behavior that require the player to use their mana, stamina, and health, along with timed attacks, dodges, weapon blocks, retreats, and crawling, to defend themselves.
Players can choose from a variety of weapons, including bows, hammers, hatchets, great axes, fire staffs, life staffs, muskets, blunderbusses, spears, swords/shields, ice gauntlets, void gauntlets, and great swords. As players level up, they can increase their personal attribute skills and weapon and trade skills. Trade skills are divided into crafting, refining, and gathering, as well as camping (wilderness survival).
There are three quick travel methods and, while there are no fast mounts, there are skills to give the player intermittent speed boosts. Players can dodge or climb most environment objects or use the fire staff to cross large areas.
Guild Wars 2
In Guild Wars 2, players can create a character from a combination of five races and nine professions. The races are humans, charr, asura, norn, and sylvari. The professions are divided into armor classes: “scholars” with light armor, “adventurers” with medium armor, and “soldiers” with heavy armor.
The race and profession of the player determine the skills they can access. Guild Wars 2 uses a skill-based combat system, which requires players to select 10 skills from a larger pool. The first five of these slots are determined by the player’s weapon and profession, the sixth is for healing, the seventh through ninth are for skills with no defined roles that are unlocked as the game progresses, and the tenth slot is for an “elite” skill, which is initially locked. There is no dedicated healing class, as the developers felt this would be too restrictive.
World of Warcraft
In World of Warcraft, players control a character avatar in a game world, exploring the landscape, fighting monsters, completing quests, and interacting with other players and non-player characters. Players need to pay a subscription fee to play, although they can use a trial account that lets them reach level 20 with limited features.
Different realms are available for players to choose from, each with its own rules and focus, such as Normal, which focuses on monster and quest completion, or Roleplay, which focuses on character development and interaction. Players can make new characters in all realms within the region. It is also possible to move characters between realms for a fee. World of Warcraft is without a doubt one of the best solo MMORPG games.
Want to know how to make the Tower of Fantasy Truffle Fried Rice? The guide below will help you with the recipe and other things.
Tower of Fantasy is a game with various recipes that can give players an advantage in the game. One of these recipes is Truffle Fried Rice. This can increase the attack power of the player who consumes it. In order to unlock this recipe, you must first find the ingredients for it. This can be acquired from various sources.
Once you have obtained the necessary ingredients, you can then craft the dish. You will have to use the recipe to gain the attack-boosting benefits. This guide will provide step-by-step instructions on how to unlock the Tower of Fantasy Truffle Fried Rice recipe. The guide will also help you to find the ingredients needed to craft it.
Cooking in Tower of Fantasy
Unlock the recipe for Tower of Fantasy Truffle Fried Rice
In order to unlock the recipe for Truffle Fried Rice, players need to acquire three ingredients: one onion, one black truffle, and thirteen units of rice. The black truffle is in the Warren Snowfield region of the game, usually in large holes. Enemies in this area can make collecting the truffle more difficult.
However, the truffle itself restores 4 satiety and 15,000 hit points, as well as an additional 7% of health. Players need to acquire one onion and one black truffle, along with thirteen units of rice, in order to guarantee success in learning the recipe.
Rice can be purchased from food vendors in Astra, Banges, and Mirroria, and must be combined with other ingredients in order to be consumed. Onions can also be acquired from food vendors in Astra, Banges, and Mirroria, and are not very effective when eaten alone, as they only restore a single point of satiety. Players must mix one onion, one black truffle, and thirteen units of rice in a cooking pot to unlock the recipe for Truffle Fried Rice. This will ensure that you understand the recipe properly.
How to Make Tower of Fantasy Truffle Fried Rice
Recipie
Once players unlock the recipe for Tower of Fantasy Truffle Fried Rice, they can make it far more cheaply and easily than before. All they need is one black truffle, one onion, and two servings of rice. With all these, they can easily create the attack-boosting, hunger-satiating fried rice. This makes producing Truffle Fried Rice much more efficient, as players can make it quickly and without having to spend too much money.