Our Animal Crossing New Horizons Terraforming Guide is here for you. In it, you can further customize how your island looks and how it is laid out.
One of the reasons Animal Crossing New Horizons is on our list of the greatest Nintendo Switch games is the ability to customize your island with terraforming. It’s also one of the most exciting ways to personalize your tropical paradise. Make rivers, ponds, cliffs, and more, as well as bespoke routes. Naturally, you cannot terraform straight away; you must first acquire it.
Although the function appears to be useful, it requires a significant amount of effort to activate. You won’t acquire it for at least a week or two after purchasing the game, and if you do, you’ll only have a few selections until you use Nook Miles to purchase the rest. Don’t be concerned, though. We’ve got all you need to know about terraforming in New Horizons. It also includes how to unlock it and then use it in our New Horizons Terraforming Guide.
Before going further, we recommend you to read other guides of this game: Animal Crossing New Horizons Snowboy Guide, Animal Crossing New Horizons Guide – Top things to do in the 2.0 Update, Animal Crossing Art Guide — Are Redd’s Paintings Real or Fake.
New Horizons Terraforming Guide: How to unlock?
The Island Designer software is a gift from Tom Nook. After K.K. Slider does his first show on the island, he’ll give it to you. You must complete the game’s plot in order to get him to the island. It entails constructing the museum, assisting Timmy and Tommy in the establishment of Nook’s Cranny, attracting additional people to your island, and finally upgrading the island to three-star status. After you’ve completed all of this, K.K. will appear and perform the game’s theme song, after which Nook will hand over the app.
You’ll only have two terrain selections at first: grass and dirt. You’ll have to buy them individually for 2,000 Nook Miles apiece from the Nook Stop at Resident Services to unlock further pathing options. For 2,000 Nook Miles, a customized pathing option is available, allowing you to employ a bespoke pattern as a path. To change cliffs or waters, you’ll also need permits, which cost 6,000 Nook Miles each.
New Horizons Terraforming Guide: Waterscaping and Cliffscaping
It’s not difficult to unlock water and cliffscaping, fortunately. Permits are available for both waterscaping and cliffscaping at Resident Services’ Nook Stop terminal. They are a tad costly at 6,000 Nook Miles apiece.
You will, however, have unlocked both Nook Miles+ and the daily bonus assignment to earn 5x the miles at this time. It may take many in-game days to obtain both, depending on how often you play, but if you haven’t finished Project K yet, you may save the Miles ahead of time. You may now add more bridges and inclines to your waterscaping and cliffscaping as part of the 2.0 release. The number of bridges and inclines on an island is now limited to 10.
New Horizons Terraforming Guide: Path options
If you want to lay more kinds of paths, you’ll need more Nook Miles, just like waterscaping and cliffscaping. Each of the additional paths costs 2,000 Nook Miles (the Custom Design path costs 2,300) and comes in these options:
- Dark dirt
- Dirt
- Grass
- Sand
- Arched tile
- Brick
- Stone
- Custom design
- Terra-cotta
- Wooden
Purchasing Nook Miles is a one-time fee. It’s not necessary to craft or purchase additional items once you own the path.
Terraforming is a form of art
Getting started with terraforming is as easy as gathering the right tools. You can begin by opening Island Designer on your Nook Phone and selecting “Start Construction!” As you play, you’ll receive a shovel and hardhat, and on the top right of your screen, you’ll find a new option to choose what kind of construction you want to do. When your island’s gate is open, or you have guests over, you cannot terraform.
You will see the different paths you’ve unlocked. You will also see the icon for waterscapes and terraforming if you have unlocked them. Decide which one you wish to work with.
Path
By pressing A once you have selected a path, your character will paint one tile of space before them with that path. You can continue to do this until you get the shape you want. If you place a path tile by accident, you can erase it by pressing A again (or you can swap it back to grass to restore it to its original form).
When you press A on a corner a second time, the path will not be erased, but instead will be rounded to appear smoother. It will disappear if you press A again. However, rounding corners gives your paths a more natural appearance. Remember that you can’t terraform over anything that’s already on the ground, including furniture, dropped items, trees, flowers, houses, etc. Before you can lay paths, you will need to move those things.
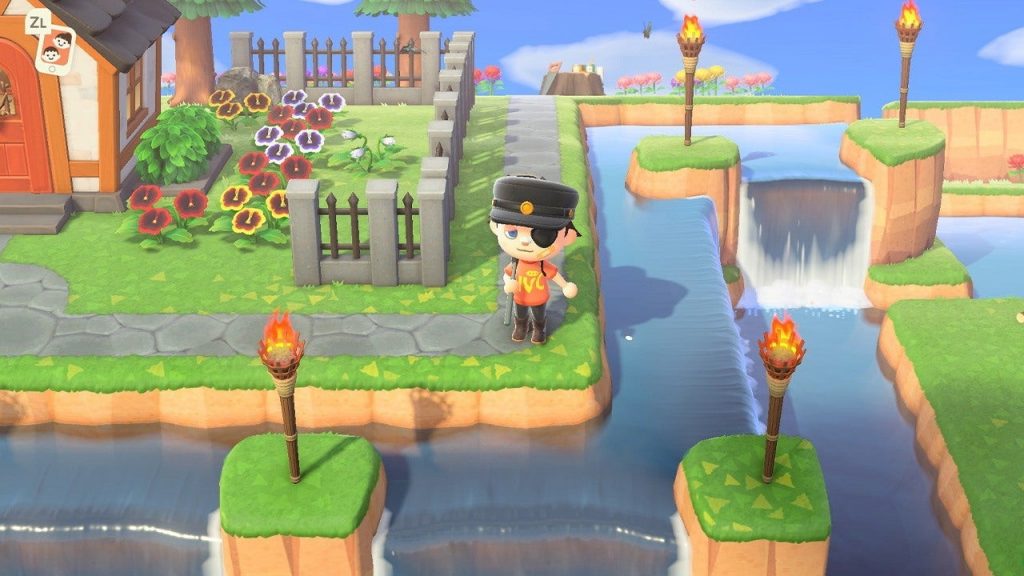
Waterscaping
Paths and waterscapes have a lot in common. By pressing A, you may either dig a hole and fill it with water, or you can fill an existing body of water with one tile of soil. If you like fishing, you’ll undoubtedly want to know the distinctions between rivers and ponds. It might be difficult to tell where one ends and the other begins.
A river is characterized as such if it runs for a certain amount of time, flows into the ocean, or flows into a waterfall. Ponds are enclosed bodies of water that are larger than lakes. Cast a fishing pole into the water to distinguish between the two. You have a river if the bobber slowly goes downstream. You’ve created a pond if it remains put. Keep in mind that certain fish are only found in rivers or ponds, and others are only found in one body of water at the top of a cliff.
Waterscaping on the margins of cliffs may be used to generate waterfalls; you don’t have to waterscape to the bottom unless you want to. Keep in mind that only straight cliff edges can be waterscaped over. You may also “round” the curves of rivers by pressing A on a tile a second time after putting it, similar to how you can “round” the curves of routes. On the beach, you can’t do waterscapes.
Cliffscaping
In comparison to the other two, cliffscaping is a bit more challenging. The ‘A’ key creates or destroys a tile of a cliff in front of you, just like before. You will create a second level of cliffs if you’re already on top of the first. A third layer would be even taller, but you would not be able to climb on top of it. There’s nothing to it.
To build a cliff, you must start at the base. As a result, you’ll always be building up. Standing on top of a cliff can’t destroy it. It is not possible to build cliffs over furniture, trees, flowers, or other obstructions on the ground like with waterscapes. The first step is to move them.
As with waterscaping, you can also round the corners of cliffs by pressing ‘A’ another time. If you do this a third time, the tile will be destroyed. Cliffs can’t be built on beaches.
For more Guides, Tips, and Tricks
- Mortus Horn in Warframe – A Complete Guide
- Remnant From the Ashes Guide – Everything you need to know
- Best way to get Ducats in Warframe – Guide
Check out our Video Games Guide Section for more dedicated guides.