We have brought you a guide on how to beat Mirro Shaz Shrine. Follow the steps correctly and you can easily complete this shrine.
The Legend of Zelda: Breath of the Wild is an action-adventure game for the Nintendo Switch and Wii U platforms, developed and published by Nintendo. The Legend of Zelda saga comes to a close with Breath of the Wild, the series’ twentieth installment. Link emerges from a century-long hibernation in Hyrule Warriors to vanquish Calamity Ganon and recapture Hyrule.
Aside from exploration, players can complete tasks or challenges to earn rewards. Towers and shrines that are activated will add waypoints to the map that the player can travel to at any time. Tower activation also adds territories to the map, albeit location names aren’t added until the player explores the region. Shrines may be found all around Hyrule, with tasks ranging from riddles to confrontations against artificial opponents.
Spirit Orbs are earned through clearing shrines. These orbs may be traded for more life or stamina points after acquiring four of them. Link can retrieve Master Sword in the Korok Forest after he has at least 13 hearts. Master Sword is the game’s only indestructible weapon, however, it does run out of energy after prolonged usage and requires a 10-minute recharge. Below we have provided a guide on how to beat Mirro Shaz Shrine.
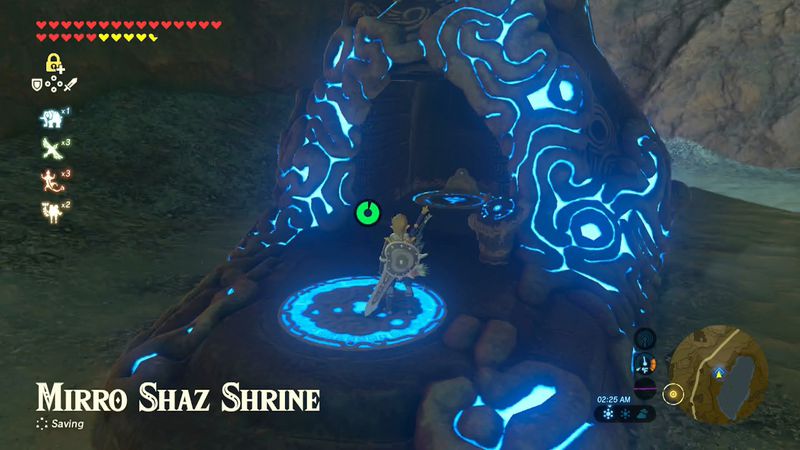
Mirro Shaz Shrine
This is undoubtedly one of the more enjoyable, but sometimes frustrating, shrines in the game. Especially if you’re after the second treasure chest. Run to the right and down to the ground level using the moving platform. Get a sledgehammer from the treasure box.
You’re essentially playing golf here. You must use your Stasis ability on the ball discovered here. Then strike it several times with the Sledgehammer or any other weapon. You must set it such that the ball moves straight ahead. If you strike the ball five times in a row with most two-handed weapons, it will fall on the platform well in front of the hole, but it will roll its way in.
This is not simple, and it will take some practice to acquire the knack for targeting the ball. You may also use a one-handed weapon, such as a spear, but you’ll have to strike it a lot more times.
You might also like Shae Loya Shrine Guide – Zelda: Breath of the Wild
How to beat Mirro Shaz Shrine: Location
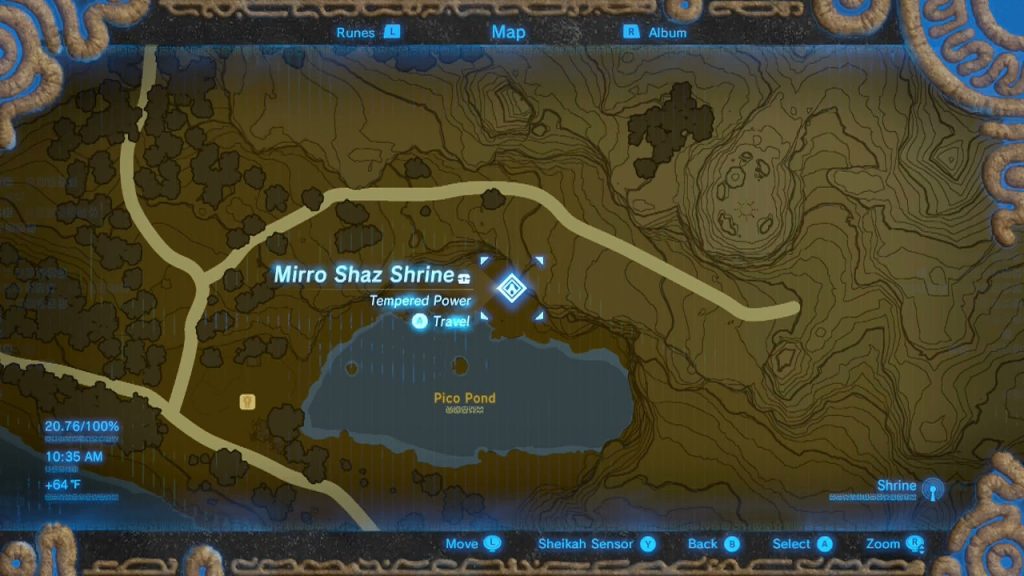
The Mirro Shaz shrine is in the Woodland Tower area of northern Hyrule. If you’ve discovered the Woodland Stable, take a look across Pico Pond to view the shrine. If you haven’t spotted the stable yet, go to Woodland Tower and search south. Glide south from the tower to reach the stable, then go left to reach the shrine. You can do it in a single glide if you have enough stamina.
How to beat Miro Shaz Shrine: First challenge
The first task of the Mirro Shaz shrine entails striking a ball a certain distance in order to place it on an island in front of you. When you step in, there’s a chest with an Iron Sledgehammer with enhanced durability, which will come in useful. Equip the sledgehammer and position yourself to point directly towards the faraway island.
Apply statis to the ball and then hit it five times. If you’ve lined yourself up correctly, the ball will glide over and land in its pit, clearing the way to the next section. If you miss, press the switch on the right to summon another ball.
How to beat Miro Shaz Shrine: Push the block
You’ll next come upon a block that has to be pushed up in order to lower this sloping bridge. You can use stasis again and whack it five times… or you can simply push the block, which may be more fun because you have to walk up an exceedingly thin beam. In any case, this is a simple section. Climb the ladder and go to the bridge.
You’ve arrived at the shrine monk and may now wrap things up if you wish, but why would you when there’s another room? Follow the hallway to the left before you meet the monk, and you’ll find this elevator leading down into completely other space.
How to beat Miro Shaz Shrine: Hit the ball straight
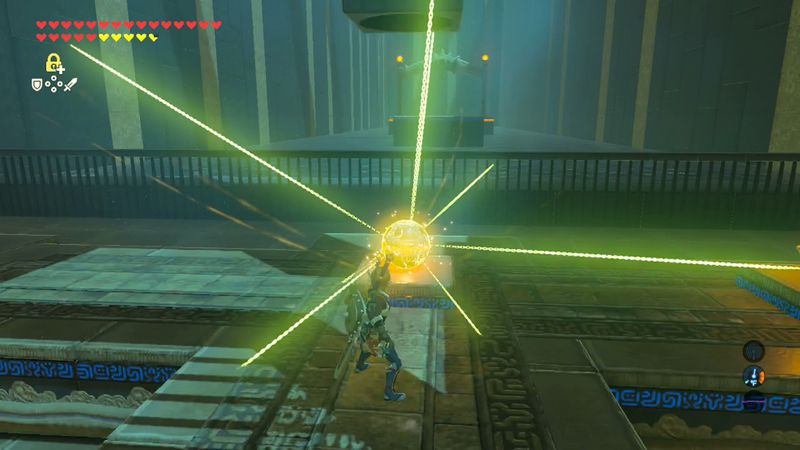
You definitely need to smash the ball straight for this one (look at all those obstacles!) The tough component of this issue is that the Iron Sledgehammer cannot conjure the correct balance of power on its own. There is an additional Sledgehammer in the chamber, which should alert you to its significance, but five hits are too many and six are too few.
So, using statis, pound the ball five times with a sledgehammer, then swiftly swap to a one-handed weapon, such as a sword or boomerang, and strike it again. Consider it as though you needed to hit the ball 5.5 times.
It’s difficult (and much easier if you’ve increased your stasis ability at the Hateno Ancient Tech Lab), but get it perfect and the ball will glide in. What is your reward? A Massive Ancient Core. These are incredibly uncommon items that may be used to purchase weapons at the Akkala Ancient Tech Lab or, more crucially, to upgrade some of the game’s greatest armor at the Fairy Fountains. Return to the monk to claim your Spirit Orb, and you’re finished!
For more Guides, Tips, and Tricks
- Mortus Horn in Warframe – A Complete Guide
- Neon Abyss Beginner’s Guide – Tips and Tricks you should know
- 10 Tips for Shadow of the Tomb Raider – Guide
Check out our Video Games Guide Section for more dedicated guides.