We have brought a Destiny 2 Gjallarhorn Guide to help you to get the Gjallarhorn and the Gjallarhorn catalyst.
The Gjallarhorn has arrived in Destiny 2, and it’s proving to be a worthy rendition of the legendary rocket launcher thanks to its Exotic catalyst. Because this Exotic weapon is related to the new Grasp of Avarice dungeon, you’ll need to buy the Bungie 30th Anniversary bundle to receive it. Here’s how to obtain Gjallarhorn in Destiny 2 because it’s one of the greatest components of the package. Below is a Destiny 2 Gjallarhorn Guide that will answer all your questions.
Destiny 2 Gjallarhorn Guide: How to start the Gjallarhorn quest in Destiny 2?
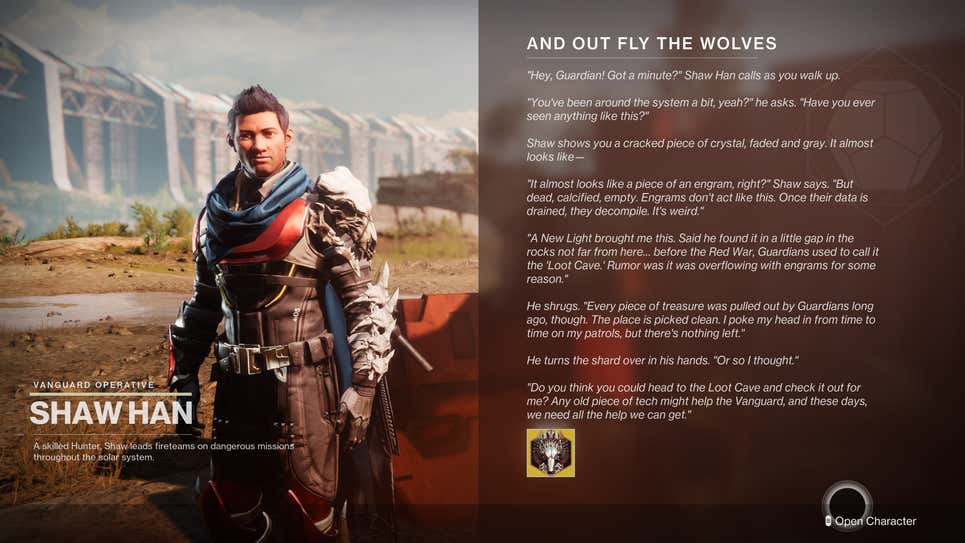
To obtain the quest “And Out Fly the Wolves,” visit Xur in his new Treasure Hoard social place. Continue the quest by speaking with Shaw Han in the Cosmodrome. Clearing the new Grasp of Avarice dungeon is the only requirement for the quest’s next stage (normal difficulty is fine). It takes some effort to master the Grasp of Avarice, but it isn’t difficult.
Destiny 2 Gjallarhorn Guide: And Out Fly the Wolves
You must first finish a round of Dares of Eternity, a new six-player activity that will be available following the Bungie 30th Anniversary update. This shouldn’t take long, so relax and enjoy yourself. When you’re finished, you’ll find yourself in Xur’s exclusive location, the Treasure Hoard.
Once you’ve arrived, finish your conversation with Xur until you’re back at the standard vendor screen. Switch to the second tab on the bottom grid of objects to discover the And Out Fly the Wolves quest. You don’t require any major preceding steps while ‘hidden,’ which is a comfort. The mission will then take you to Shaw Han to speak with him. After you’ve obtained And Out Fly the Wolves from Xur at the Treasure Hoard, go to the Cosmodrome and talk with Shawn Han.
How to get the Gjallarhorn Catalyst in Destiny 2
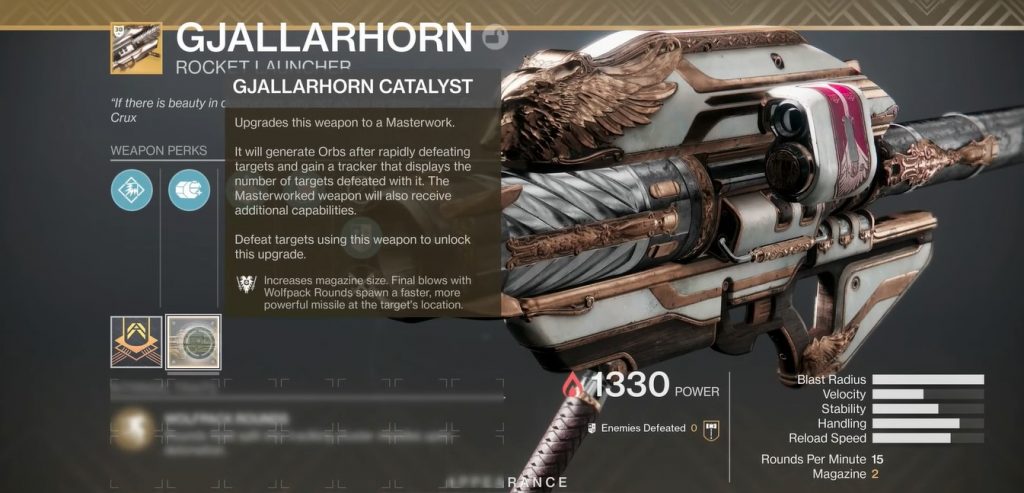
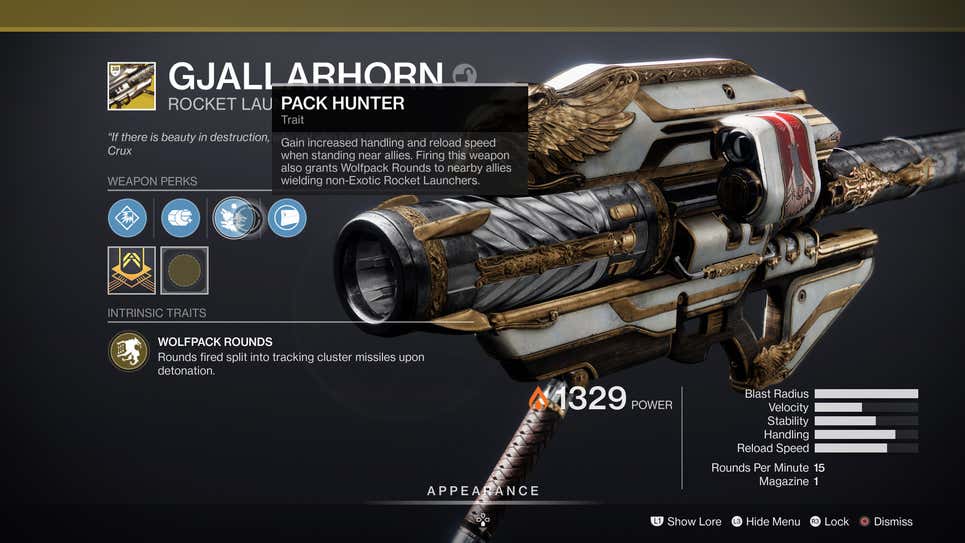
Gjallarhorn, like many other Exotics in Destiny 2, has its Exotic Catalyst, which grants it a new perk and allows it to manufacture Orbs of Power. Gjallarhorn’s new perk is extremely effective, boosting the number of rockets in the magazine while also increasing group damage. Obtaining the Gjallarhorn Catalyst necessitates some puzzle-solving.
Destiny 2 Gjallarhorn Guide: The Grasp of Avarice Dungeon Puzzle
Grab some friends and enter the Grasp of Avarice dungeon on the tougher master difficulty or the regular difficulty if you’re looking for the Gjallarhorn Catalyst. Outside of confrontations, there are three unique boxes buried inside the Grasp of Avarice dungeon. You’ll need the Burdened by Riches debuff, which you get through collecting Engrams from foes, to unlock them. A Reaver Vandal is guarding each treasure, a super-healthy foe who drops Engrams as you damage them.
These chests and their related Vandals don’t spawn until you’ve previously gathered Gjallarhorn, which is why you didn’t notice them the first time around. The purpose of each problem is to locate the chest, locate the neighboring Vandal, obtain an Engram, and return to the chest before expiring.
The notification center will display the message “you retrieved looted fragments” if the first member in your group opens the chest. While the other two players will not receive that message, they must still open the chest to obtain the Catalyst. This is a solo mission, and only one person can complete it.
Chest 1
After entering the dungeon from the treasure cave outside, the first chest appears nearly immediately. In the cave, walk through the crystals until you notice a metal grate above you. You can see a chest hanging from the side.
The Vandal is within spitting distance in this scenario. Look across the chasm to your right. A large Fallen will be positioned in a hollowed-out section of the cave, most likely firing at you. It’s simple to detect because it has a huge yellow health bar. Run over to the Vandal and attack it until it drops an Engram. Hoof it back to the chest with your Burdened by Riches debuff. Because this is a short run, you shouldn’t have too much problem keeping track of the time.
Chest 2
Continue in the dungeon until you reach the room with the vent, which you must enter (just after the rolling barrel trap). You won’t be able to miss the Vandal since they are blocking your path. This time, the chest is further ahead, so take an Engram from the Vandal and leap into the vent once you’ve received your debuff.
Just before going outdoors to confront the first boss, boogie your way through the space and into the flooded inside section. Turn right and follow the concrete wall instead of jumping to the platform in front of you. Here’s where you’ll see an indent. You’ll locate the chest if you jump into the indent. To open it, trade your debuff.
Chest 3
The third chest is the most difficult to open and the most often overlooked. Make your way to the lagoon to finish the cannon battle. However, do not rush into the boss’s office. After you complete the gun encounter, all the cannons will lock in place, allowing you to only go to the center platform. Since the treasure sits atop the insignificant fortification on the central island, this is a great find. The Vandal, on the other hand, is on a different platform.
Make your way to the center and up to the cannon. You can only relocate this post-encounter cannon. Position yourself to the right and fling yourself up to the waterfall platform. After the battle, the Reaver Vandals will spawn here and should be walking around. Grab an Engram from the Vandal and transport it to a nearby cannon.
If you like Indie games, then we have a list of Top 10 Indie Games of 2021.
This race is a lot simpler if you have a friend to help you fire the cannon, but it’s still feasible if you’re on your own. Return to the center island with your body and begin leaping toward the stronghold. Before your 25 seconds are up, climb up to the chest and apply the debuff. If you’re having problems, map out a path for yourself and make sure you know where the treasure is.
You’ll automatically get the Gjallarhorn Catalyst if you open the third chest in a single run. It’s fine to go now; you don’t have to finish the dungeon to keep the Catalyst.
In the Cosmodrome, where might you discover strong Fallen?
Return to Shaw Han after clearing Grasp of Avarice and looting the last treasure to unlock the next level. It requires you to battle strong Fallen opponents in the Cosmodrome. This may be done at the Exodus Garden 2A Lost Sector, which is located just south of the landing zone near Shaw Han. One pass of this Lost Sector should be enough as long as you destroy everything inside.
After that, speak with Shaw Han once more before heading to Banshee-44, the Tower’s gunsmith. It’s back to the Cosmodrome when Banshee asks you to clean the Exodus Garden 2A Lost Sector one more time. For this stage, be sure to slay the Lost Sector monster and plunder the treasure.
Return to Shaw Han with all of your weapon pieces and utilize the tool bench in the adjoining garage to create an almost complete Gjallarhorn. To fulfill the objective, speak with Shaw one more time to put the final touches on your new rocket launcher.
For more Guides, Tips, and Tricks
- Prison Architect Beginner’s Guide – Tips and Tricks to get started
- Halo Infinite Campaign Guide – Top 10 Tips and Tricks
- Godfall Challenger Edition Beginner’s Guide – Everything you should know
Check out our Video Games Guide Section for more dedicated guides.