FIFA 22 TOTY revealed – Everything you should know

The FIFA 22 TOTY (Team of the Year) has been announced after all the votes have been counted by EA Sports.

Including Lionel Messi but missing Mohamed Salah and Cristiano Ronaldo, EA Sports has released the FIFA 22 Team of the Year Final XI. In response to a fan vote, EA Sports FIFA announced its FIFA 22 TOTY Final XI on Thursday, January 20. From 80 nominees for TOTY, FUT players had the chance to vote for a Final XI. 

Lionel Messi of Paris Saint-Germain and Robert Lewandowski of Bayern Munich lead the FIFA 22 TOTY Final XI, with both players receiving 98-rated FUT TOTY player items. The FUT TOTY player items with three 97s are joined by three 96s, one 95, one 94, and one 93. Kylian Mbappe, Messi’s club teammate, was also named to the FIFA 22 TOTY Final XI. 

It is a surprise to many that he was chosen over Liverpool forward Mohamed Salah, after the Egyptian’s stellar 2021 campaign. In FUT TOTY Final XI, the Frenchman earned a 97 out of 100 ratings. There are five PSG players included in the FIFA 22 TOTY Final XI, three Manchester City players, and two Champions League winners Chelsea players.

FIFA 22 TOTY 

The FIFA Ultimate Team TOTY promotion is one of the most popular FUT promotions of the year, rewarding the best-performing players from the previous calendar year with massively increased FIFA Ultimate Team player goods. However, EA Sports has just published the FIFA 22 TOTY Final XI without comprehensive stats, which will be disclosed in the coming days.

FIFA 22 TOTY revealed

FIFA 22 TOTY revealed 
TOTY (Image credit: EA Sports FIFA)
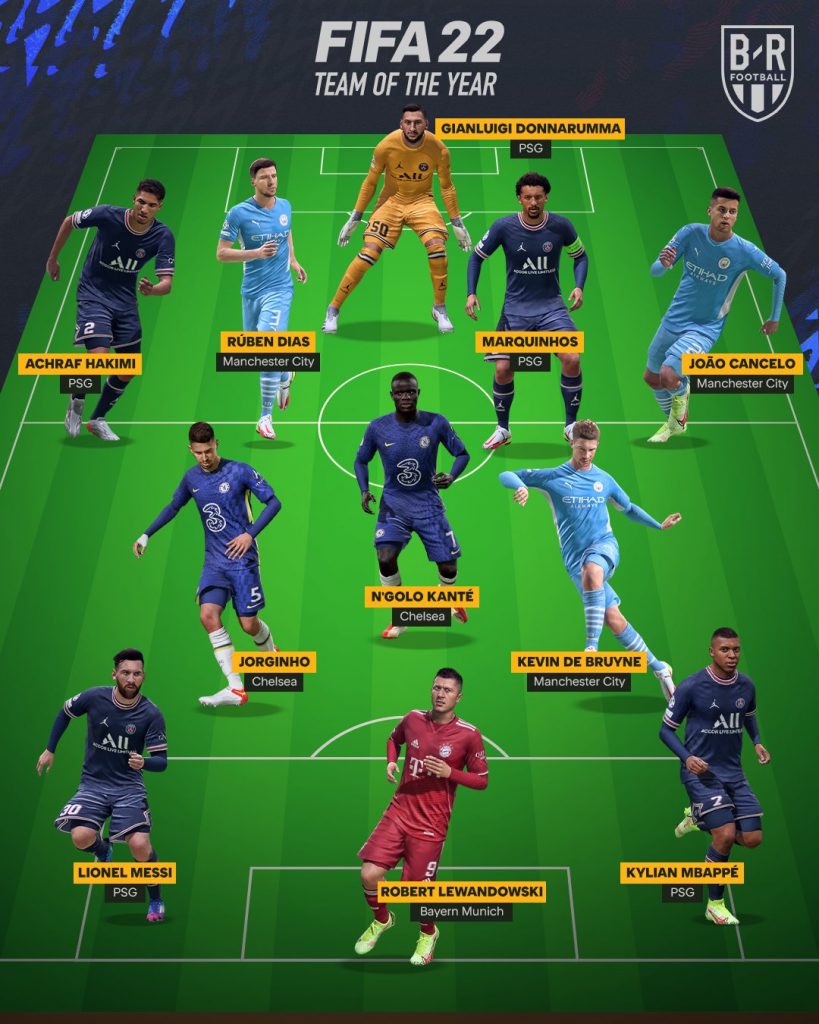
  • GK: Gianluigi Donnarumma (Paris Saint-Germain, Italy)
  • RB: Achraf Hakimi (Paris Saint-Germain, Morocco)
  • CB: Marquinhos (Paris Saint-Germain, Brazil)
  • CB: Ruben Dias (Manchester City, Portugal)
  • LB: Joao Cancelo (Manchester City, Portugal)
  • CM: N’Golo Kante (Chelsea, France)
  • CM: Jorginho (Chelsea, Italy)
  • CAM: Kevin De Bruyne (Manchester City, Belgium)
  • ST: Kylian Mbappe (Paris Saint-Germain, France)
  • ST: Robert Lewandowski (FC Bayern Munich, Poland)
  • RW: Lionel Messi (Paris Saint-Germain, Argentina)

On Tuesday, January 18, 2022, EA Sports FIFA 22 TOTY fan vote ended. The vote began on Monday, January 10. Over 80 players were nominated for TOTYs, including Lionel Messi, Mohamed Salah, and Robert Lewandowski.

FIFA 22 TOTY revealed: Absentees

There were a lot of prominent names who were left off the list. 

FIFA 22 TOTY revealed
FIFA 22 TOTY (Image credit: EA Sports FIFA)

Forwards

  • Cristiano Ronaldo of Manchester United
  • Mohamed Salah of Liverpool
  • Neymar of Paris Saint-Germain 
  • Karim Benzema of Real Madrid
  • Erling Haaland of Borussia Dortmund

Read Best Strikers in FIFA 22 for Career Mode

Midfielders

Despite winning their domestic league titles in 2020 and the latter also winning the European Championship, 

  • Joshua Kimmich of Bayern Munich 
  • Luka Modric of Real Madrid
  • Marco Verratti of Paris Saint-Germain 

These are all missing from the Team of the Year’s midfield.

Read The Best Midfielders in FIFA 22

Defenders

As a result of the majority of his season being disrupted by injury, Virgil van Dijk is not among the defensive ranks, but his Liverpool teammate Trent Alexander-Arnold’s absence is much more concerning. 

Despite forming the cornerstone of the Azzurri’s Euro 2020 winning team, Juventus’ Giorgio Chiellini and Italy’s Leonardo Bonucci are also absent.

GK

Only one goalkeeper spot is available, so Alisson, Ederson, and Oblak, all among the world’s best shot-stoppers, find themselves eliminated.

Other XI

Several parallels can be drawn between the FIFA 22 TOTY and the FIFA FIFPro World XI that was announced at The Best FIFA Awards earlier this week.

Both selections included Donnarumma, Dias, De Bruyne, Jorginho, Kante, Lewandowski, and Messi. It is notable that the two teams are fielding different defenses, with David Alaba and Bonucci representing Real Madrid and Italy, respectively, along with Ronaldo and Haaland rounding out a rather top-heavy 3-3-4 formation. In terms of the Ballon d’Or, Messi received his eighth prize at the France Football gala in early December, although the winner was decided by a vote of 29 other players.

Also read How to complete Showdown Luis Muriel SBC in FIFA 22

FIFA 22 TOTY: What was actually expected

  • GK: Gianluigi Donnarumma (Paris Saint-Germain/Italy)
  • CB: Achraf Hakimi (Paris Saint-Germain, Morocco)
  • CB: Georgio Chiellini (Juventus/Italy)
  • CB: Ruben Dias (Manchester City, Portugal)
  • CM: N’Golo Kante (Chelsea/France)
  • CAM: Kevin De Bruyne (Manchester City, Belgium)
  • RW: Mohamed Salah (Liverpool/Egypt)
  • LW: Cristiano Ronaldo (Manchester United/Portugal)
  • LF: Karim Benzema (Real Madrid/France)
  • CF: Robert Lewandowski (Bayern Munich/Poland)
  • RF: Lionel Messi (Paris Saint-Germain/Argentina)

For more Guides, Tips, and Tricks

You can also check our dedicated Video Games Guides section.

Divine Beast Vah Medoh Guide – Zelda: Breath of the Wild

Here is a Divine Beast Vah Medoh Guide that will help you solve the dungeon. Follow the steps carefully and finish it with ease.

Vah Medoh, the Divine Beast, has been teasing you from the beginning of Breath of the Wild. We’ll teach you how to get there, how to solve the challenges, and how to beat the boss in this tutorial. You must prepare before embarking on your trek to the Divine Beast Vah Medoh. 

Having a boatload of arrows and the correct armor are the two most important aspects of preparing. Below we have a Divine Beast Vah Medoh Guide that will help you to solve this and move on further in the game.

Zelda: Breath of the Wild (Image credit: Youtube)

More Zelda: Breath of the Wild guides:

Divine Beast Vah Medoh Guide

To upgrade your new snowquill armor, warp to Ta’loh Neg shrine near Kakariko village and speak with the Great Fairy. Wearing all three pieces of snowquill armor will not only boost your armor’s power but will also boost your cold resistance. You’ll meet Teba at the Flight Range. Upon completing his quest, you will be given the falcon bow and 20 bomb arrows. The area around a cooking pot also features a swallow bow. 

To begin the Vah Medoh dungeon, go to Rito Village and look for Teba in the Flight Range. You’ll be swept into the sky after the brief trial, and you’ll have to knock down the Beast’s defenses before boarding. 

Divine Beast Vah Medoh Guide
Zelda: Breath of the Wild (Image credit: Youtube)

The Beast is surrounded by four cannons, which you must shoot. Glide over to each one and point a Bomb Arrow at them when you’re near enough. Because of the distance, you may need to move up close or shoot a little higher, putting you in great range for laser assaults. Wait a few minutes after you’ve been locked on, then cease gliding. This causes you to descend suddenly, guaranteeing that the laser will miss you by a significant margin, before returning to the same height and continuing.

The cannons can be destroyed by two hits each, and you can fire them quickly one after the other. When the four canons are down, you will have easy access to the Vah Medoh dungeon if you do not fire or get close to the red forcefield.

Divine Beast Vah Medoh Guide: Location

Divine Beast Vah Medoh Guide
Zelda: Breath of the Wild (Image credit: Youtube)

You’ll arrive on Divine Beast Vah Medoh after destroying the canons, and you’ll instantly interact with the first terminal here to discover how to go to the map terminal. Your objective is to interact with all of the terminals before fighting the monster. Turn around before entering and shoot the eyeball in the ooze to get access to a treasure box containing a sapphire.

To clear the route ahead of you, enter the Divine Beast’s guts and shoot the eyeball in goo. Drop to the bottom level and eliminate the eyeball in goo that is obstructing your exit. This opens the door to the chamber and reveals a treasure chest containing an old shaft.

Take a tour around the circumference of Divine Beast Vah Medoh. Destroy one eyeball to reveal a fan that is blowing up, then circle around to destroy another eyeball to reveal the second entrance to the area you were in previously. Return to the chamber and use your paraglider to ride the upward draught to the level where the Divine Beast Vah Medoh is located.

Divine Beast Vah Medoh Guide: Chests and Map

Divine Beast Vah Medoh Guide
Zelda: Breath of the Wild (Image credit: Youtube)

Rather than falling, this time take the ascending path at the entrance and turn left. On the left-hand side of the chamber are two treasure boxes. Climb up to locate a treasure box containing an old core by grasping the climbable section illustrated in the upper image. Paraglide left to the other treasure box, which contains five bomb arrows, by jumping off the far side.

Retrace your steps back to the entrance. Jump over the platforms using magnesis by pulling a metal block toward you. The guardian is on the other side of the gap, so you must fight him and steal his spear. The map of Vah Medoh can be obtained by interacting with the terminal down the hallway.

Located along Vah Medoh’s wing axis, the five terminals are marked on the map. Divine beasts can also be controlled with it. A level (center) posture, a curled up posture, and a curled down posture are the three points of movement.

First Terminal

First Terminal
Zelda: Breath of the Wild (Image credit: Youtube)

It’s now time to obtain the first Terminal. To get access to the right-wing, tilt the Beast all the way down and slide the stone platforms to the right side. It’s impossible to hop from one stone platform to the next. As a result, you’ll have to alternate the metal platforms one by one before gliding across to the next side region, which is the right-wing, where our terminal sits.

To begin, there are a couple more optional chests. Shoot the Eye on the ceiling with Ice Arrows to drop one, then tilt the Beast all the way up and push the switch to open the windows and let a blast of air through. Standing on the window, while gaining some height, glide back down the way you came, then climb up the ledge to the left, where you’ll find a Knight’s Bow in a chest on the ledge.

This area now needs to be solved. As the wind blows, you’ll see fans opposite spinning, opening two gates. As you tilt the Beast, you realize a fan will also move out of the way, stopping you from opening a gate. You want the stopper to move along the rail to the far end, hitting the switch.

Make sure that this loose fan is aligned with the right gate using Magnesis, so that the gate remains open and the stopper moves along. Hold the Beast in place as you tilt it down so the stopper reaches the end of the wing. It gains speed as it goes along the far end, passing the opening gates, then hitting a switch with some force to open the door with the Terminal inside.

Second Terminal

Second Terminal
Zelda: Breath of the Wild (Image credit: Youtube)

The left-wing is the next stop. Jump from the slanted windows of this right-wing by tilting the Beast up. Through the window across, glide over the stone and metal platform in the center room and into the hole in the wall. By tilting the stone platform and using Statis to stop it, you can climb up and hop over the climbing wall, just as you did with the Ancient Core chest.

Whichever path you go, you’ll encounter an alcove coated in Calamity muck and a Terminal behind an alcove covered in Calamity gunk. To clean the debris, run up the ramp in the far corner and shoot the eye. By tipping the Beast all the way down, glide through the alcove to activate the Terminal.

Third Terminal

You will find a switch and a chute below the ramp you just jumped from if you drop down to the lower level. Roll a bomb down the chute as you tilt the Beast. To clear a path, detonate it near the rocks. 

As a second bomb is rolled, swing at the switch to activate a current of wind that blows the bomb to the far corner. Upon reaching the rock wall at the corner, detonate it to reveal a metal ball. As soon as the Beast rolls towards you, move to the other side of the room so you’re across from the metal ball.

Use Magnesis to go through the wall and back to the chute. Place it down, then tilt the Beast up so it rolls with some force to the other switch, which opens the gate and allows you to enter the chamber. The Terminal is waiting to be triggered on a ramp to the left.

Third Terminal
Zelda: Breath of the Wild (Image credit: Youtube)

For more Guides, Tips, and Tricks

You can also check our dedicated Video Games Guides section.

How to beat Great Shinobi Owl in Sekiro – Guide

We have brought you a guide on how to beat great shinobi owl in Sekiro. Follow our guide carefully and defeat this boss.

The next battle in Sekiro is Great Shinobi Owl, which can be located in the Ashina Castle section after Guardian Ape in our tour of the game’s bosses and mini-bosses. On top of Ashina Castle, where you previously faced Genichiro Ashina, you’ll discover Great Shinobi Owl waiting for you.

In this guide, we’ve covered how to beat the Great Shinobi Owl in Sekiro, as well as any particularly powerful or weak ways or vulnerabilities they may have, as well as any useful tips to keep in mind.

Read Sekiro Shadows Die Twice – How to Beat Juzou the Drunkard.

How to start?

If you wish to confront the Great Shinobi Owl atop Ashina Castle, there are a few details to keep in mind, since they are related to the outcome you choose.

  • You must first acquire all of Lord Kuro’s important plot objects, which include those obtained by defeating the Folding Screen Monkeys, Corrupted Monk, and Guardian Ape.
  • Except for the Abandoned Dungeon Entrance, all of Ashina Castle’s Sculptor’s Idols will be kept away from quick travel. When you’re ready for a battle, go there and work your way back up to the top of Ashina Castle, just as you did for Genichiro Ashina.
  • At the summit, you’ll have to choose a decision. One path leads to Emma and Isshin Ashina, as well as the ‘bad’ conclusion. “Break the Iron Code,” the other, leads to this battle with Great Shinobi Owl.
  • So, after the mid-game bosses, return to the castle, climb to the top, select to Break the Iron Code, and you’ll face this boss fight.

How to beat Great Shinobi Owl

How to beat Great Shinobi Owl
Great Shinobi Owl (Image credit: Playstation)

Owl is a huge mass of muscle that stands at least eight feet tall. The key to winning this war is not to be intimidated by his size and to go toe-to-toe with him whenever possible. Dodging and slicing Owl’s health with single hits will be the order of the day in this battle.

  • When Owl flips in the air at you, it’s the best strike to counter. Avoid the onslaught and land some simple blows.
  • Sidestep around Owl when he dumps the health bomb and gets in one swift hit.
  • If you can recognize when Owl is about to kick you and immediately step back, he will miss his assault and you will be able to get in a few rapid blows.
  • Owl is vulnerable to the firecracker, although he may counter with a firecracker strike of his own.

He will only appear if you choose specific speech options in Sekiro: Shadows Die Twice. Owl will emerge at the end of the game, at the top of Ashina Castle, asking Wolf to remember the Iron Code and abandon Kuro. What you say here is really important. If you choose Owl, you’ll fight two bosses (one of them is Isshin Ashina), resulting in the game’s ‘poor’ ending. Reject Owl and stick with Kuro until the game’s prolonged finish portion, which includes many bosses and additional places. But first, you’ll have to go through Owl.

How to beat Great Shinobi Owl: First phase

How to beat Great Shinobi Owl
Sekiro (Image credit: Playstation)

In the first phase, Owl has a restricted amount of attacks. The assault you’re aiming to provoke is the one in which he throws two shurikens at you in quick succession before leaping into the air and crashing into the ground where you were standing. Move out of the path while he’s in the air and stab him with a couple of fast attacks when he lands.

Another attack you may use is when Owl kicks your sword. Owl will kick thin air if you take a step back at precisely the right moment, allowing you to land a single attack before retreating to safety.

Owl is going to throw a special bomb at you if he pauses and reaches into his pocket. While this explosion isn’t harmful, it will prevent you from using healing items like the Healing Gourd and Pellets for a short while. You can obtain two hits on Owl by just sidestepping this strike to the right before he gets a chance to change animations.

Owl, like Wolf, is a Shinobi, thus he has some tricks up his sleeve. He holds an enhanced version of the Firecracker, which creates an exploding wall in front of him. When you notice black dust in the air ahead of you, instantly leap or step backward. The goal of this fight is to master Owl’s attack patterns so that your deflections are flawless. There are some assaults when it’s best to stay your ground, such as when Owl comes forward with a sweeping attack to his left.

How to beat Great Shinobi Owl: Second phase

How to beat Great Shinobi Owl
Sekiro (Image credit: Playstation)

Owl has received some improvement in the fight’s second phase. He’ll now unleash blotches of poison, which cover sections of the arena for about 10 seconds, instead of rebounding off you into the air and throwing shurikens a t you. Either stay away from them or pack antidote powder.

During this point of the fight, it could be a good idea to use the Firecracker Prosthetic. The Firecracker is excellent at stopping Owl in his tracks, allowing you to heal or lay into him with a few quick hits.

We’d also suggest learning the Whirlwind Slash Combat Art. This is particularly useful when avoiding Owl’s anti-healing bomb since it allows you to land many strikes as well as Posture damage in a short amount of time. Once you’ve finished fighting Owl, the Great Shinobi, you’ll be well into the last stretch of Sekiro. For your accomplishments, you’ll receive the Memory: Great Shinobi, which boosts your attack strength.

Note: He’ll go down pretty quickly if you’re patient and don’t get too excited about landing more strikes than you feel you can safely land. You’ll be alright if you gain a solid sense of the range you want to be in when dashing around the arena to securely bate his gap-closers and reply accordingly.

For more Guides, Tips, and Tricks

You can also check our dedicated Video Games Guides section.

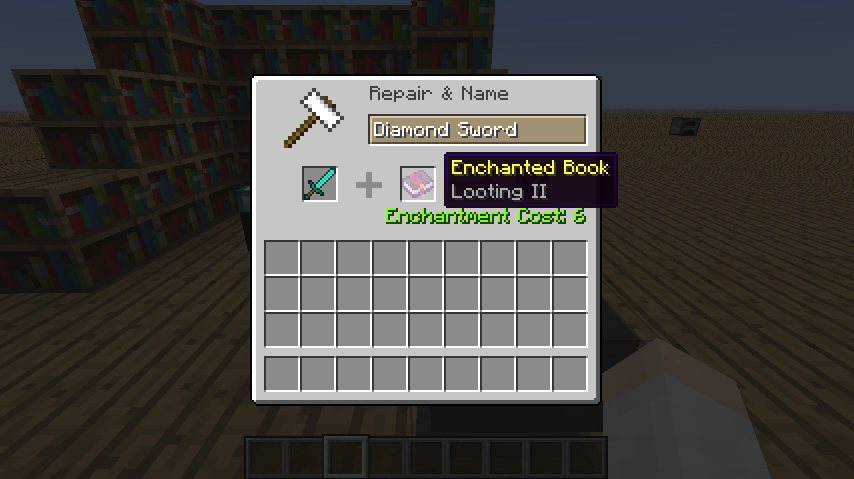
Minecraft Enchanted Books – Where to find them and how to use them

Here is a guide to Minecraft Enchanted Books. We have mentioned where to find them and how to use them. Read it carefully to know everything about it.

An enchanted book is an artifact that allows players to use an anvil to add enchantments to specific goods. As part of the “treasure” category, enchanted books can be gained as “treasure” items by fishing with a fishing rod. The book has the same level of enchantment as a level 30 enchantment from an enchantment table, but treasure enchantments are available, and the possibility of multiple enchantments is not lowered.

Enchanting a book on an enchantment table allows players to create an enchanted book. Books have a lower “enchant ability level” than most other goods and have a lower possibility of receiving multiple enchantments (particularly, if multiple enchantments are added, one is removed at random). Mending, for example, is a treasure enchantment that cannot be obtained via an enchantment table.

Read Minecraft SMP Guide – Tips and Tricks.

Minecraft Enchanted Books: How to find

You will undoubtedly come across several enchanted books while exploring Minecraft without even seeking them. In bastion ruins, desert temples, dungeons, mineshafts, pillager outposts, underwater ruins, and forest mansions, enchanted books can be found within chests.

Another wonderful technique to get your hands on charming books without getting into too much trouble is to go fishing. It’s usually better to have a fishing rod with the Luck of the Sea enchantment if you want to boost your chances of discovering additional lucrative treasures like this one. The chances of catching an enchanted book with an ordinary fishing rod are extremely tiny, at only 0.8 percent.

With Luck of the Sea I, the figure rises to 1.2 percent, then 1.5 percent with Luck of the Sea II, and finally 1.9 percent with Luck of the Sea III, a huge difference. However, you might want to try setting up an AFK fishing farm.

Minecraft Enchanted Books: How to trade

Minecraft Enchanted Books
Minecraft Enchanted Book (Image credit: Minecraft fandom0

Librarian villagers in Bedrock Edition have a 50% chance of selling enchanted books as part of their trades at novice, apprentice, and journeyman levels, and a 13% chance of selling enchanted books as part of their crafts at the expert level, meaning each librarian villager can sell up to four volumes. They cost 1 book and 5-64 emeralds, depending on the enchantment level (for example, Infinity and Protection I both cost 5-19 emeralds), with treasure enchantments (such as Mending) costing twice as much.

Librarian villagers in Java Edition have a 2/3 chance of selling enchanted books as part of their crafts at the novice, apprentice, and journeyman levels, and a 50% chance at the expert level, allowing each librarian to sell up to four volumes. They cost 1 book and 5-64 emeralds depending on the enchantment’s level (for example, Infinity and Protection I both cost 5–19 emeralds), but treasure enchantments (such as Mending) cost twice as much.

How to use Enchanted Books

Minecraft Enchanted Books
Minecraft (Image credit: Minecraft fandom0

Enchanted books, such as Unbreaking on shields, are the only way to get certain enchantments on certain equipment in Survival. The sprite of enchanted books has a gleam. To utilize an enchanted book, the player must first place an item in the anvil’s first slot, then a book in the second. The player must have the needed amount of experience in order to finish the enchantment. 

It’s worth noting that employing an enchanted book at the anvil results in huge savings. Similar to combining tools or weapons, enchanted books can be combined to form a single book with more or different enchantments. When two things are combined, the matching enchantments from the second slot’s book are transferred to the first slot’s item, preserving the highest level of any kind. 

When two enchantments of the same level and a higher level are available, they merge to become the next level. If a book is used on an object that can’t use all of the spells in it, the spells that can be used are transferred, while the spells that can’t are lost. Enchanted books are one-time usage only. 

The magic of enchanted books is not visible. When used as a weapon, a book with Sharpness IV as an enchantment causes no more damage than an unenchanted book or any non-weapon item. The Fire Aspect book, which can start campfires and ignite TNT, is an exception, as is the Mending book if the block mined can be smashed with a fist. ‌

For more Guides, Tips, and Tricks

You can also check our dedicated Video Games Guides section.

Ubisoft’s latest mobile game, Clash of Beasts: Tower Defense

Ubisoft’s latest game, Clash of Beasts, has already reached more than 100k downloads on the play store so far. Read our detailed Clash of Beasts review.

Despite being a mobile strategy game, Clash of Beasts is unlike other mobile strategy games you may be familiar with. This game puts you in control of huge beasts rather than armies or warriors. The game also combines traditional strategy game elements with tower defense, as well as multiplayer elements. Unlike Clash of Clans, you cannot drag your army of different categories into battle. For the fights, you will only have a few dragons that you have unlocked in Clash of Beasts. You can battle anyone with those few dragons.

The 3D visuals of Clash of Beasts thoroughly immerse you in each combat. After you’ve chosen your monsters, all you have to do now is pick an opponent and prepare for a thrilling PvP encounter. When you come across enemy fortifications, touch on them to demolish them with the combined force of your monsters.

It is imperative that you give everything you’ve got when you get to your opponent’s base. If you succeed, you’ll receive a slew of goodies to help you strengthen your monsters and unlock new ones. In a cooperative mode, you may team up with your pals and combat your adversaries.

If you love the game already, read our Clash of Beasts Guide – Top 10 Tips and Tricks.

Clash of Beasts Review: A lot of Beasts to control

You may command a staggering 65 beasts, allowing you to rule both the land and the air while wreaking havoc on your enemies. You may acquire, train, and experiment with a broad range of animals, tweaking their individual classes to best fit your fighting strategy. On your quest to become the Ultimate Beastmaster, you’ll encounter various spirit combinations and legendary beasts.

Beasts must be summoned with soulstones, and some can be fused to create new monsters. Shadescale and Talvara, for example, can give birth to Brightwing, Shalegrasp, and Iridoz. Monsters have distinct affinities as well; for example, you should avoid assaulting islands with beasts that share that island’s affinity. Otherwise, your beast’s attack power and mana recharge will be reduced.

To get the items, read the Clash of Beasts Items Guide – How to Get Soulstones, Prismatic Shards, and Soul Shard.

Clash of Beasts Review: Battles

Clash of Beasts review
Clash of Beasts (Image credit: Ubisof)

A smartphone strategy game like Clash of Beasts has surprisingly dynamic battles. Slide your finger across the screen to control your beast’s weapon as it advances through the fortress.

The goal is to keep your finger on the towers of your opponent to demolish them before they can destroy you. You have talents to use in addition to your primary weapon, which has a range of offensive and defensive benefits. The war is over after you’ve destroyed 70% of your opponent’s base. If your beast dies in combat, you can summon another to carry on the attack.

Speaking of beasts, you have different options to attack with different beasts

Clash of Beasts review
Clash of Beasts (Image credit: Ubisoft)

Swipe: Some beasts attack if you swipe on the screen. This method is quite nice as it makes it easier and more fun to destroy the towers.

Hold: You attack the enemy by holding on to the screen. This method is slightly boring as you just have to hold on while the beast does its job. But remember, the battles are not always easy.

Tap: You can attack the enemy by continuously tapping on the targets. This method is a bit difficult as you are not very quick with it. But with strong beasts, you can easily win the battles with the tap beasts too.

You can directly attack anyone in the global chat

Clash of Beasts review
Clash of Beasts: Tower Defense (Image credit: Ubisoft)

The best thing is that if you’re in a global chat with someone, you can just click on them, access their profile, and attack them. This is enjoyable since it allows you to meet new people online, have a chat, and just prove to each other who has the finest beasts in the game. Surprisingly, if you have strong beasts, you might actually get a lot of loot by defeating the players from the chat. For this, read How to get in-game Currency – Gems, Gold, and Essence

Joining a guild and conquering territory with your allies is another way to make online friends. Using your guild to coordinate attacks may help you storm enemy strongholds and lay siege to their territory all around the world. Every new season will provide new material, as well as weekly events with big prizes, so there’ll always be something to look forward to in terms of rare animals, limited skins, and other goodies.

For more Guides, Tips, and Tricks

You can also check our dedicated Video Games Guides section.

Yu-Gi-Oh! Master Duel Guide – Tips and Tricks

We have brought you the latest Yu-Gi-Oh! Master Duel Guide with all the tips that will help you start the game positively.

Yu-Gi-Oh! Master Duel will be based on the TCG/OCG. With native 4K resolution on supported systems, this game will be the first in the series. It will also be compatible with Yu-Gi-Oh! Neuron, which allows downloads from wherever you are. 

In the Yu-Gi-Oh! VRAINS anime, a Master Duel is a word used to describe the normal Duel format utilized in earlier Yu-Gi-Oh! series. Instead of using speed dueling rules, it employs conventional Dueling rules. Below is a Yu-Gi-Oh! Master Duel Guide.

You might like Assassin’s Creed Valhalla – Tips for How to Beat Odin.

Yu-Gi-Oh! Master Duel Guide: How to get free packs?

Master Duel is yet to be released. However, you may still obtain the Free Packs and claim them once Yu-Gi-Oh Master Duel is released. Being a PlayStation+ member is the only way to acquire the Free Packs. If you have PlayStation Plus, you will receive Packs at a 100% discount. 

This will be quite beneficial to you, as Gem prices are fairly high, and you will want to obtain all 10,000 Cards. So, if you’re a PlayStation Plus member, go get your free Yu-Gi-Oh Master Duel packs. You will receive the rewards once you link your Konami account to your PlayStation account.

Yu-Gi-Oh! Master Duel Guide: Solo mode

Yu-Gi-Oh! Master Duel Guide
Yu-Gi-Oh! Master Duel (Image credit: Konami)

To begin, players will be offered a series of tutorials designed to assist new and returning players get back into the Yu-Gi-Oh! spirit. The details of Solo Mode are still a little hazy, but we do know that once the primary tutorial is done, the game will introduce players to numerous deck types that focus on distinct styles of play.

Players will learn how to play with a specific deck in each of these scenarios, as well as uncover mythology and backstories for cards, archetypes, and how they tie into the broader Yu-Gi-Oh! universe. Fans are ecstatic about the latter revelation since it means a return to tales such as Hidden Arsenal and Duel Terminal.

Yu-Gi-Oh! Master Duel Guide: Card Crafting

Depending on the card’s rarity, you’ll be able to disassemble it into CP. Pot of Desires (SR), for example, may be destroyed for 10 SR CP while Twin Twisters (SR) can be acquired for 30 SR CP. You can obtain 1 of your choice for every 3 SRs you trade in.

Each card rarity has its own CP: UR, SR, R, and N. However, we don’t know how quickly other rare items convert. Cards made using CP will have the default foiling, however, there appears to be a slight possibility of getting a different foiling.

Yu-Gi-Oh! Master Duel Guide: Secret Card Packs

Yu-Gi-Oh! Master Duel Guide
Yu-Gi-Oh! Master Duel (Image credit: Konami)

When the player obtains the SR and UR cards from their pack, they are awarded two “Key Cards.” New card packs can be unlocked based on the cards you pick, according to the on-screen prompt using the same Key Card image.

On the right side of the cards, there is a section labeled “Secret Packs.” The top pack, “Waste Recurrence,” has Scrap Wyvern, and a Frightfur/Fluffal themed bundle, “Ruthless Toys.” Packs for Prank-Kids and Destiny Heroes are also available.

The waste recurrence is written beneath each of the cards on the screen, except for Beast-Eyes Pendulum Dragon. On the same UR item, the Waste Recurrence is also written underneath “Scrap Atomic Dragon” as well. The Master Pack might unlock Secret Packs if certain UR/SR cards are obtained through it.

Yu-Gi-Oh! Master Duel Guide: PVP Modes

Yu-Gi-Oh! Master Duel Guide
Yu-Gi-Oh! Master Duel (Image credit: Konami)

Both ranked and free duels will be available to you. The “standard” regulations appear to be used in ranked duels. Room IDs appear to be supported in Free Duels, comparable to Duel Rooms in Yu-Gi-Oh! LINKS IN DUEL. Various rules will apply to different events and tournaments. Certain cards would be unlocked through these events, according to previous announcements.

For more Guides, Tips, and Tricks

You can also check our dedicated Video Games Guides section.

Valorant Skye Guide – Best Tips and Tricks to Win

We have brought you the Valorant Skye Guide with all the best tips and tricks that will help you win the games.

The selection of agents lies at the heart of Valorant. Knowing the finest Valorant weaponry and how to manipulate the economy is important, but the agents are the game’s heart. To truly flourish in the game, you’ll need to be well-versed in each of them, as well as their ins and outs. Valorant introduces additional agents on a regular basis.

Skye is an especially intriguing new character in the game. Since the game’s introduction, Skye has been the first initiator to be introduced. This comes at a perfect moment, given how the meta has shifted to the defensive. Skye’s powers and equipment are fascinating. They’re among the most effective yet, but they also feature some of the most serious flaws and drawbacks. Our Valorant Skye guide explains everything you need to know about the agent. 

Skills & Abilities

TRAILBLAZER (Q) — Skye wears a Tasmanian tiger trinket. To activate the tiger, click the fire button. It will scout the area. Upon direct contact, it will concuss the enemy.

GUIDING LIGHT (E) — Equipping the hawk trinket allows her to use it as a flash and a recon device. Hawks can be steered to a specific spot, and flash can be used to discover more about the area around that spot.

REGROWTH (C) — Heals allies within a certain radius. Although Skye cannot heal herself, she can heal all her teammates.

SEEKERS (X) — Skye uses the Seeker trinket to find enemies. They cause the enemies to go nearsighted for a short period of time when they are struck by them.

More Valorant Guides

Valorant Skye Guide: The Trailblazer becomes a deadly setup

Valorant
Skye (Image credit: Valorant)

Skye equips a Tasmanian tiger trinket with Trailblazer (Q), which transforms into a controlled beast (100 HP) when fired. The tiger shape will rush forward and burst as a result of another fire within it. On a hit, enemies take 30 damage and are stunned for 2.5 to 4 seconds, depending on how far away the explosion is.

The mild stun from Trailblazer might theoretically be a good setup for Skye and her squad. When the pressure is on, Trailblazer might appear from around the corner and stun adversaries, allowing Skye and the others to close in for the kill. In terms of defense, Trailblazer can catch a pushing team off guard and stop them in their tracks.

Valorant Skye Guide: Seekers

Valorant Skye Guide
Valorant Skye (Image credit: Valorant)

Skye transforms into the ultimate disruptor thanks to Seekers (X). Skye equips a Seeker trinket when she is used. Firing with such an item will have three Seekers track the three closest foes to Skye. They suffer three seconds of Nearsight when they make touch. Seekers have 150 HP as deployable devices. 

Despite their appealing appearance, gamers must keep in mind that Seekers not only Nearsight opponents but also travel slowly. As a result, Seekers should not be utilized in open regions where opponents may easily reposition themselves if they are spotted. Rather, when utilized in high-intensity firefights, Seekers have a greater impact since foes will have less time to cope with them.

Through Trailblazer, Scouts can be secure

Valorant Skye Guide
Valorant Skye (Image credit: Valorant)

Trailblazer, despite its appealing damage option, is a better reconnaissance tool than a combat weapon due to its lower HP. Furthermore, the Trailblazer is not a suitable offensive weapon since it makes too much noise, has limited vision, and does not inflict enough damage.

As a result, Trailblazer is more capable of recognizing adversaries and moving them away from dangerous angles. Skye should try to scout potential push zones, chokepoints, and possibly the flank as soon as she takes possession of the tiger. As a result, the squad will be able to spot where the adversaries are planning an ambush right away. Trailblazer can also be beneficial in forcing foes to change their rotation when utilized in this way.

Valorant Skye Guide: How to play

Valorant Skye Guide
Valorant Skye (Image credit: Valorant)

Skye is the ideal team agent for casual gamers since she can stay out of gunfights, heal allies, and blind foes as they rush in on a spike location. However, it is only the most basic way to use Skye, and it is rather predictable. Skye’s power as an Initiator comes from her self-sufficiency. Experts claim that she is a true Duelist trapped in the position of Initiator.

Skye’s most powerful ability is her flashes, which may temporarily blind foes. Skye now only gets two flashes after the patch 3.0 update, with one renewing every 40 seconds. If she hides around spike locations, this provides her with complete map control.

Skye’s best weapon would be determined by the player’s gameplay. If the player, for example, employs Skye as a Duelist to press locations in search of an entry, the Phantom is your finest weapon! On the other side, if the player prefers to take long-distance engagements and aim for heads, then go with the Vandal. The ideal weapon for an Agent in Valorant is always determined by the player’s gaming style.

Valorant Skye Guide: Weakness

Weakness
Valorant Skye (Image credit: Valorant)

In Valorant, every agent has a flaw. Skye’s worst flaw is her inability to heal. This encourages teams to have both Sage and Skye in their lineup. Skye’s healing should be utilized on as many teammates are possible at once, rather than one at a time. The ability is wasted if it is used on a single teammate. Meanwhile, Sage’s ability may be utilized on a single teammate who is in critical condition, or her Ultimate can be used to revive a teammate who has died.

The opponents can shoot down all of Skye’s powers to save Regrowth. Skye’s flashes are fast, but opponents with good accuracy may take them out before she pops the flash. Her Trailblazer and Seeker skills can be used in the same way.

Skye is susceptible to all angles when using Trailblazer because her eyesight is needed to manage the trinket. If adversaries know where to hide and attack when the trinket fails to identify them, this may be quite severe. As a result, while this Agent appears to be extremely powerful on paper, her powers may be exploited by astute opponents.

For more Guides, Tips, and Tricks

You can also check our dedicated Video Games Guides section.

Top 10 Tips for Rainbow Siege Six Extraction – Guide

Have difficulties with Rainbow Siege? You’ll need some tips. Do not worry, as we have brought a Rainbow Siege Six Extraction guide.

Among the greatest competitive shooters, Rainbow Six Siege stands out. Those facts aren’t likely to change any time soon with the release of a new Rainbow Six game. At first, the claustrophobic maps and complicated mechanics might seem daunting, but the Siege community has built and honed a delicate meta over time. 

Rainbow Seige Six Extraction is a three-player cooperative multiplayer game. The operatives in Extraction must penetrate an alien-infested area and perform missions including collecting samples, extracting items from computers, and acquiring data. Each “incursion” is made up of three interconnected sub-maps, with players being allocated one of the twelve objectives in each sub-map at random.

After completing a goal, the player has the choice to either retreat or explore the next submap. The new region will be tougher than the previous one, but players that successfully complete it will earn more prizes. By withdrawing early, all operators’ safety is assured. Players cannot play as an operator who was killed by hostile forces before being rescued during an extraction mission. Below are the top 10 tips for you.

You might like Halo Infinite Campaign Guide – Top 10 Tips and Tricks.

Rainbow Siege Six Extraction Guide: Setup

If you want to enter Rainbow Six Siege, the first thing you should realize is that the majority of operators demand teamwork. As a result, you must be able to interact with your team. There are methods to accomplish this in-game, but you should be able to communicate audibly to guarantee the adversary isn’t alerted to anything you know and you’re not pausing to write. Rainbow Six Siege gamers should be required to use a headset with a microphone.

Rainbow Siege Six Extraction Guide
Rainbow Siege Six Extraction (Image credit: Ubisoft)

If you don’t have one readily available, attempt to reach out by SMS. To do so, hit the Y key on your keyboard to launch Team Chat. Memorize certain significant places; room names are ideal at higher levels. But alternative shoutouts, such as “Stairs left/west” if you’re near that portion of the map, can be just as effective. If you’re a player like Lesion, whose gadget includes symbols that only display that player if a trap has been sprung, make sure you’re pointing out where the adversary is to your teammates.

Rainbow Siege Six Extraction Guide: Pre-fire

When firing from cover, a frequent strategy is to look down sights before popping out, then strafe out of cover, fire a burst, and then strafe back into cover. This cuts down on the amount of time you’re exposed to radiation. 

Pre-fire your weapon to increase your chances of success. This entails firing before leaving cover, so you’re already firing when you’re exposed. This not only gets the shots out faster but also eliminates any network latency advantage the opponent may have. This one tactic may appear easy, but it may significantly improve your odds in a gunfight.

Read How to get the Destiny 2 Gjallarhorn and the Gjallarhorn catalyst – Guide.

Rainbow Siege Six Extraction Guide: Drones

Drones are far more significant than you give them credit for. Drones should be employed in every round – as an attacker, sneak your drone inside the building through vents and then conceal it somewhere that opponents won’t notice, such as in plants or beneath a tiny table. When you need to discover adversaries in the middle of a game, you may utilize your drone to ping them for your team.

Rainbow Siege Six Extraction Guide: Firing Range

Rainbow Siege Six Extraction Guide
Rainbow Siege Six Extraction (Image credit: Ubisoft)

As an attacker, you must move cautiously towards the bomb locations while avoiding any traps set by the defensive squad. If at all feasible, you will need to pick off foes from a distance, therefore scoped guns with extended range are ideal. For defenders, the converse is true: the attackers must approach you, which allows you to draw them into range for a fast shotgun blast or SMG burst.

Rainbow Siege Six Extraction Guide: Communicate

You must communicate with your team in every way you can. Pings are useful, but you should utilize voice chat if you can. If that fails, typing is an option, although it is rarely possible to do so in a stressful situation. Effective communication with your team is essential if you want to play at a high level. Even if you can’t party with your buddies, prepare to talk to strangers on the mic.

Hug the wall

Rainbow Siege Six Extraction Guide
Rainbow Siege Six Extraction (Image credit: Ubisoft)

This is a strategy used by the military and law enforcement to clear an area fast and safely. Essentially, it entails hugging the wall adjacent to the door or window, aiming for the farthest corner, and making your way across the room in a semi-circle. This method provides you with cover while you inspect the room.

Organizing your loadout

Before starting a game, go into the operator selection menu and experiment with the attachments. You do receive some time before each encounter, but not enough to completely build up an operator beyond swapping items like gadgets and perhaps one or two sights. It will spare you some unnecessary tension before things become really tight. If you grab the starting set right away, you unlock all the attachments as well as a set of operators, so it’s worth testing to find what works best.

Make the best use of your attachments

Make the best use of your attachments
Rainbow Siege Six Extraction (Image credit: Ubisoft)

Depending on the weapon, attachments are quite useful. Some higher-powered guns might benefit from a reduction in attack force in exchange for the use of a silencer, and the muzzle brake is extremely effective for recoil management. The laser sight, on the other hand, is an addition you should avoid. 

This does help with shooting from the hip, but it’s just situational at best, and because you’re primarily aiming down sights, it’s not really beneficial for more advanced play. Laser sights also have the drawback of calling attention to themselves, much like a pet with a laser pointer, so only use them if you know exactly how to operate them.

Understand the Maps

When you reach Rank 5 in the game’s progression system, the first thing you should do is create a new multiplayer game and explore the maps. This will allow you to get a sense of the environment you’ll be exploring, as well as which walls are destructible and where the goals may be. 

It may even avoid some situations when opponents surprise you, such as firing through the floor from above. Our map guides in the first part go over a handful of the maps in-depth, but there are so many older maps to check over for cameras, objective placements, and other vantage positions.

Utilize cameras while defending

Utilize cameras while defending
Rainbow Siege Six Extraction (Image credit: Ubisoft)

When the game starts, you may check the cameras to see where they’ll be coming from, then work with your teammates to deal with the scenario as it happens. There are cameras positioned around the perimeter and within the facility, but they are all exposed to enemy shooting. 

Some defensive operators have their own cameras. However, they should only be utilized if the player in question is no longer alive. If you die, you can still utilize the cameras, but you should attempt to verbally indicate where the opponent is rather than using the command to locate them, as this notifies the enemy of the camera, which they may then shoot at.

For more Guides, Tips, and Tricks

You can also check our dedicated Video Games Guides section.

Best Destruction and Scoring Cookies list in Cookie Run OvenBreak

Want some smashing cookies who can help you win and score more? Do not worry, we have a list of the best destruction and scoring cookies.

Cookie Run: OvenBreak (commonly abbreviated as CROB) is a Devsisters game that was launched on September 26, 2016. Cookie Run retains many aspects of its original design, such as the side-scrolling arcade action and many of the aesthetics, although its scoring system and leaderboard have been altered significantly, and the game features new Cookies, Pets, and Treasures. It contains new mechanics like Champions League, Guilds, and a Breakout Mode that were not previously available in LINE Cookie Run and Kakao Cookie Run.

Trophy Race, a real-time competitive PVP mode, is the most popular of the game variants. Guild Runs, which are team-based, have been added to the game. The camera may zoom in or out farther, allowing portions with more vertical movement and stages with multiple pathways to be added.

Skills and combo bonuses of several Cookies and Pets have been altered. Magic Candy may drastically alter a Cookie’s capabilities. Many of the Cookies and Pets are new, including the Hello Kitty, Mimmy, and Cookiedroid crossover characters, while some from prior games have been left out. So for you, we have a list of the best destruction and scoring cookies of the game.

More Cookie Run guides

Best Destruction and Scoring Cookies: Difference

Scoring Cookies frequently outperform destruction cookies on long, dense, and hazardous maps. Destruction Cookies outperform Scoring Cookies on maps that are either devoid of jellies or have levels that are too short for Destruction Cookies to make the most of their strength. 

The Destruction Cookies perform poorly in Story Mode and perform much better as main or relay cookies in Trophy Run. Scoring Cookies perform much better in Story Mode and occasionally make poor main cookies in Trophy Run. Slower-moving scorers also play well on event-based maps, particularly those that require you to dodge some jellies while grabbing others. A Destruction Cookie with a speed-increasing blast talent is more likely to miss whatever vital event goal you’re attempting to capture!

Best Destruction and Scoring Cookies: Destruction cookies

Knight Cookie

Knight Cookie
Knight Cookie (Image credit: Cookierun fandom)

The Knight Cookie is the quickest cookie in the game, to the point that their extremely insane Blast speed creates for hilarious meme films. While they’re rarely used in Trophy Race (because they’re so focused on going fast that they suffer in maps with few Blast pickups), they’re a staple on most of the top Leaderboard teams in Breakout Special Episode 1, with a heavily fed, costumed Knight Cookie on most of the top teams simply for their ability to make the most of certain Blast-heavy spots.

Wind Archer Cookie

Wind Archer Cookie
Wind Archer Cookie (Image credit: Cookierun fandom)

Only available once you’ve reached the Champions League, and for good cause. Their ability entails the appearance of demonic spirits as you flee. You may fire them while sliding, which, by the way, destroys any obstructions your arrow flies through!

They get a Wind Dash after killing enough Evil Spirits, which allows them to run fast while shooting. When it ends, they fire a huge arrow that kills any remaining Evil Spirits while doing useful amounts of collateral damage to any obstacles, bystanders, or other things you may have run into and lost Energy over. They frequently appear in Champion’s League Combi Rankings, and you should be wary of them if you encounter them as an opponent.

Dark Enchantress Cookie

Dark Enchantress Cookie
Dark Enchantress Cookie (Image credit: Cookierun fandom)

This is probably the only character who eats jelly throughout the entire game. Because their self-healing is outstripped by their low energy count, Dark Enchantresses are usually incredibly weak the first time you obtain them. Once her talent activates, which entails wicked grabby hands appearing from another realm and consuming jelly while demolishing barriers, their self-healing begins.

She starts staying long enough for her self-healing to matter a lot and heaps on the points along with the body count until she achieves her lengthy, difficult-to-acquire upgrades. Dark Enchantress’ pet, the Eternal Eye of Darkness, slows her Energy depletion, thereby counteracting her major flaw. They also shoot death rays for additional Destruction and Beam of Darkness points.

Scorpion Cookie

Best Destruction and Scoring Cookies
Scorpion Cookie (Image credit: Cookierun fandom)

So you play Ninja Cookie for fun since, despite being rare, he has seven hops instead of the usual two. Your relatively low score, on the other hand, has been getting on your nerves recently. Then Scorpion Cookie appears in your gacha. Hurray! Scorpion Cookie is an improvement to Ninja Cookie since it is an epic with 5 hops and considerably superior destruction and scoring abilities. Both have charged manually-controlled attacks, thereby converting the game into a side-scrolling shooter. 

With Scorpion Cookie, though, you barely need to aim because their bullets fan out! They have 5 wide-spray shots that reload when you double leap and push Slide. Scorpion may go on a mini-dash that smashes through barriers if the green bar is charged and Scorpion is out of bullets. A stinger shot from a scorpion carried magic candy sprayed needles over a larger area, and a dash along with a scorpion stinger attack followed the dash.

Best Destruction and Scoring Cookies: Scoring Cookies

Butter Pretzel Cookie

Best Destruction and Scoring Cookies
Butter Pretzel Cookie (Image credit: Cookierun fandom)

Thankfully, this fussy painter is one of the simpler minigame sweets to master. Colored paint tubes occasionally get in the way of making butter pretzel cookies. The Butter Pretzel will inform you which color they want, and you must get it by twice leaping for the one on top, jumping once for the one in the middle, or sliding for the one below.

You receive 4 tubes, after which a canvas appears for Butter Pretzel to paint on, and you must use the Jump and Slide controls to make her paint as quickly as possible. This awards you a large number of points while also obliterating any impediments in the vicinity of the painting.

Chocolate Bonbon Cookie

Best Destruction and Scoring Cookies
Chocolate Bonbon Cookie (Image credit: Cookierun fandom)

The Choco Bonbon Cookie is tough to utilize at first, but with practice, one may become used to it and reap the benefits. They’re similar to cookies like Walnut Cookie in that they come with a minigame in which you must match a pair of garments to a list given to you.

Newcomers may get alert by the fact that the minigame comes almost immediately after the run begins. But unlike Sour Belt, you don’t need perfect timing, just a keen eye. You’ll become accustomed to them, and winning the minigame will reward you with a large number of points.

Shining Glitter Cookie

Best Destruction and Scoring Cookies
Shining Glitter Cookie (Image credit: Cookierun fandom)

The Shining Glitter is a nice pick if you’re not sure what to anticipate. She’s a scoring cookie with some destructive ability after acquiring her Magic Candy. They have a minigame where you have to time your taps to strike sound waves flowing toward her while she sings. This is forgiving, yet it can be difficult for people using extremely large tablets or playing on emulators with their massive computer screens: 

Because soundwaves come in from all sides, a smaller screen means you’ll be less likely to move your eyes left and right. As a result of their Magic Candy, they can drive around the road, running over pedestrians, obstacles, and traffic laws.

Ginseng Cookie

Best Destruction and Scoring Cookies
Ginseng Cookie (Image credit: Cookierun fandom)

Sometimes, Ginseng Cookie smashes the ground with his staff to dig Ginseng plants out of the earth, which is as easy as cookies can get. These are worth a lot of points, but they aren’t what distinguishes him. His Magic Candy is one of the most dependable resurrection items in the game, and it’s a little easier to enhance than Treasures. Furthermore, their ginseng spamming skills grow more potent after a revive.

This makes them an excellent Trophy Run Relay Cookie behind a Destruction Cookie since they’re a unique combination of high scoring and longevity without requiring you to bring their pet, as an Angel Cookie requires. Just make sure you don’t collide with anything since they don’t have much in the way of terrain avoidance! It’s technically true that the ginseng summoning staff bump destroys all obstacles it lands on, but it’s not exactly catastrophic destruction.

For more Guides, Tips, and Tricks

You can also check our dedicated Video Games Guides section.

Assassin’s Creed Valhalla – Tips for How to Beat Odin

Another day, another boss fight. This time, we have brought you a guide on how to beat Odin in Assassin’s Creed Valhalla.

Assassin’s Creed Valhalla delves into a story that revolves around various characters from Norse Mythology, blending them into the game’s plot is intriguing ways. Gamers will not only be able to explore a Viking world in England, but they will also be able to include Asgard in their gameplay sessions. Mythical characters like Thor, Freya, and Tyr arrive and become inextricably linked to the general narrative thrust of Valhalla.

Odin is one of the most recognizable characters in Norse mythology. Odin is a famous figure in Norse mythology, known for his might and wisdom. He has been turned into several adaptations in films, video games, and other kinds of media. Odin’s involvement is strongly interwoven into the story that Eivor encounters in Assassin’s Creed Valhalla.

How to beat Odin
Assassin’s Creed Valhalla (Image credit: YouTube)

How to beat Odin

Taking on Odin is more of a mental struggle than a physical one. Odin cannot be defeated in the usual sense, necessitating the use of more than a sharp sword. Players will face Odin in a dreamscape at the conclusion of the game. Odin wields a spear and taunts players while attacking them. Players will be armed with an axe instead of their regular equipment.

In Assassin’s Creed Valhalla, players will be forced to battle indefinitely; if they die, the presence of Sigurd and Randvi will resurrect Eivor. Odin will draw Eivor back to the fight if he tries to flee towards Sigurd and Randvi. Following a few fatalities, the game will warn players that Odin has taken possession of their axe, stopping Eivor from reaching Sigurd.

How to beat Odin: Unequip the Axe

How to beat Odin
Assassin’s Creed Valhalla (Image credit: YouTube)

It’s not difficult to defeat Odin. The only thing Valhalla gamers need to do is drop their axe, which they may do by going to the inventory menu and unequipping it. Odin will become agitated, urging gamers to take up their axes and battle like genuine warriors, but they should ignore him. Odin has no influence over Eivor because he doesn’t have the axe. To terminate the combat and trigger a cutscene, Valhalla players merely need to run near Sigurd.

More Assassin’s Creed Valhalla Guides

Additional combat tips

Players frequently concentrate their attention on a single style of combat, such as melee, ranged, or stealth. You must pick one of these playstyles until you reach a level when you can branch out and add another. Some playstyles are tougher than others due to different conflicts, yet any strategy may be used to beat an adversary.

How to beat Odin
Assassin’s Creed Valhalla (Image credit: YouTube)

Melee is your major playstyle if you want to charge into battle and confront your opponents head-on. Those who prefer a bow and arrow to an axe should concentrate on ranged combat. Finally, if you want to slip through the bushes and assassinate your opponents, stealth is the playstyle for you. However, this style does need you to have a backup concentration on one of the other playstyles.

Using your skill points carefully as you place them on different portions of the constellation tree is the greatest way to focus your efforts on a primary playstyle. Early on in the game, you should aim to keep to one branch of the tree and then spread into the other sectors once you’ve established a strong branch.

Armor

The armor you pick is equally as vital as your weapon, and this guide will show you the greatest armor in the game. However, you should pick an armor that matches your playstyle, since some are designed to absorb a lot of melee damage while others have greater ranged attack advantages. Wearing a full set provides additional benefits, and upgrades can be given to specific armor sets within the skill tree.

For more Guides, Tips, and Tricks

You can also check our dedicated Video Games Guides section.