A Complete Smileton Dungeon Guide – FFXIV

We have brought you a complete FFXIV Smileton Dungeon Guide. This guide will help you to defeat the boss easily.

In Final Fantasy XIV: Endwalker, this dungeon is one of the few that can unlock the Expert Duty Roulette. Smileton continues the narrative of the Loporrits constructing a colony on the moon.

Smileton was to be a utopia for the people of Etheirys, a haven where every need is satisfied and its residents are comfortable and joyful for the rest of their lives. But what exactly is happiness? In search of a solution, the Loporrits built the Big Cheese, which was meant to make manifest everything they could need and more in order to meet the wants of their future passengers. 

They were eager to please, perhaps too eager, and their ideas became increasingly erratic, with each new concept a betrayal of the previous one. The Big Cheese is now burrowing toward the moon’s core, leaving a maze of contradiction in its wake. If left uncontrolled, its irrational quest for happiness might herald the end of the moon.

Before you go further, you might need FFXIV Reaper Guide – How to play Reaper in Final Fantasy XIV, Final Fantasy XIV different classes and playstyle

FFXIV Smileton Dungeon Guide: How to unlock?

At Level 90, the Panic-stricken Loporrit in Old Sharlayan gives you the side quest “Cutting the Cheese,” which unlocks Smileton (x12, y11). It is located in Mare Lamentorum and is one of three capstone dungeons found in Endwalker. To participate, you must have a minimum item level of 540.

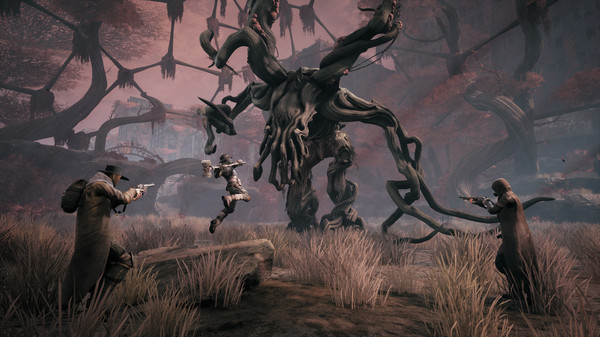
FFXIV Smileton Dungeon Guide: Face

FFXIV Smileton Dungeon Guide
Final Fantasy XIV (Image credit: Final Fantasy)

Smileton’s first boss, Face, is suitably titled. Several red or blue faces may be found on either side of the arena, which the boss will employ for various assaults. Face’s attacks and mechanics are listed below.

Lines of Fire

On one side of the arena, the Face will be tethered to the other faces. These will throw a thin line AoE over the arena, dividing the playable area into four halves. You’ll get a debuff depending on whatever portion you’re standing in. Standing in a section with a Red Face will cause Frowny Face, whereas standing in a segment with a Blue Face will cause Smiley Face.

You will incur massive damage, be thrown back, and be debuffed with Down for the Count if you are hit with the same debuff a second time. You will be killed instantly if you get a third stack of the debuff.

For the duration of the battle, you should switch between Frowny Face and Smiley Face. When the monster tethers to the side faces, make sure you’re positioned in the right portion, and keep an eye on your current debuff.

Off My Lawn

After a brief moment, Face will start charging a knockback from one side of the arena. The Face uses Temper, Temper at the same time when using this attack for the first time. Lines of Fire can also cause you to slip into one of the side face lanes when you are Off My Lawn. Don’t forget to push yourself into the correct lane.

Temper, Temper

Each player will have an AoE marking placed on them by the Face. During Off My Lawn, this attack happens, so spread out to prevent being driven into other players.

Temper’s Flare

All members of the party take damage. As needed, use AoE heals and shields.

Upside Down

The face will flip the debuffs inflicted by the side faces upside-down. During Lines of Fire, pay close attention after this assault to ensure you get the right debuff.

Heart On Fire IV

The Tank takes a lot of damage. Use defensive cooldowns as needed, and heal as needed.

FFXIV Smileton Dungeon Guide: Frameworker

FFXIV Smileton Dungeon Guide
Final Fantasy XIV (Image credit: Final Fantasy)

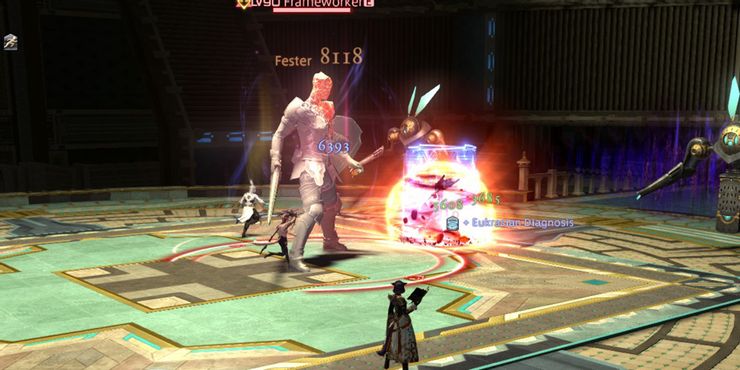
Frameworker is Smileton’s second boss. This fight is quite basic, but it will summon clones of itself across the arena, which you must avoid. Each of the Frameworker’s attacks is listed below.

Leap Forward

Frameworker will choose an arrow-pointed direction and jump thereafter a little pause, generating a big circular AoE where he lands. To evade this strike, keep an eye on the arrow and move behind the monster.

Print Workers

Frameworker will produce clones of itself by tethering to the arena’s untargetable robots. These clones will employ Leap Forward to replicate Frameworker’s assault. Keep an eye on the direction of the arrow, much like the boss did when he used it. The robots may travel about the arena after the second use of this assault, generating a clone of the boss in their new location. As you evade these assaults, keep an eye on their position.

Omnidimensional Onslaught

Around the arena, two sets of four cone-shaped AoEs are created. While the first set explodes, walk into the second set, then back into the safe zone you’ve constructed.

Steel Beam and Circular Saw

All members of the party take damage with the circular saw. In Steel Beam, the Tank takes a lot of damage from this. If necessary, heal and utilize defensive buffs.

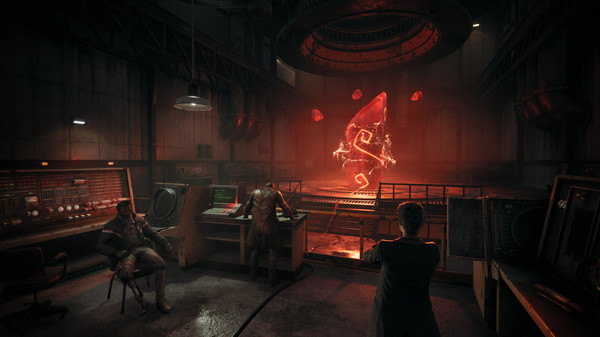
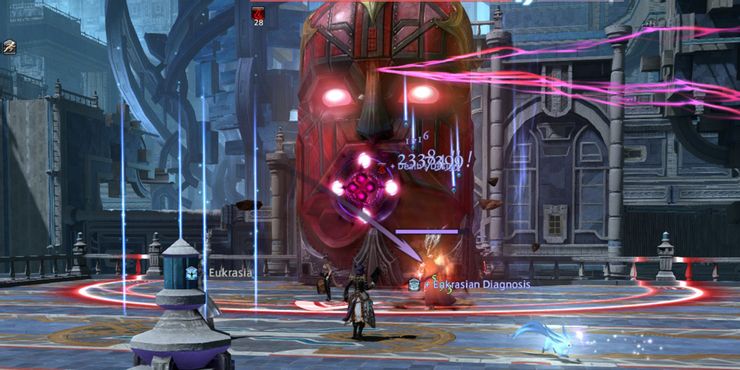
FFXIV Smileton Dungeon Guide: The Big Cheese

Final Fantasy
Final Fantasy XIV (Image credit: Final Fantasy)

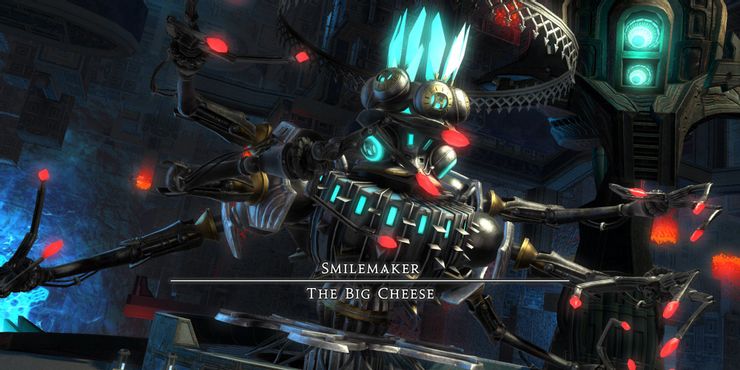
The Big Cheese is Smileton’s last boss. This boss will utilize a variety of explosives while forcing you to move around the arena. Each of The Big Cheese’s attacks and mechanics is listed here.

Explosives Distribution

On either side of the arena, the Big Cheese will drop two bombs. The arrows on these bombs will point to the bottom of the arena, suggesting that they will be moving in that direction soon. The number of arrows next to each bomb represents how far it will go. The bomb will do damage in a broad circular AoE when it moves.

The bomb will go a short distance before halting towards the top of the arena, as shown by one arrow. This will establish safe zones in the arena’s center and bottom.

The bomb will travel a great distance before stopping in the middle of the arena, as indicated by three arrows. On the top and bottom of the arena, this will establish safe zones.

Piercing and Levelling Missile

Each player receives an AoE marking from the leveling missile. To avoid overlapping these AoEs, spread away from other players. The Tank takes a lot of damage from Piercing. To reduce the damage from this attack, use protective cooldowns. 

Dispense Explosives

Mines the area around the arena. Entering the mine’s area of effect will knock you back and cause a lot of damage to everyone else in the region. During the distribution of explosives, they might sometimes obscure safe regions. During this attack, keep an eye on the mine locations to prevent taking too much damage.

Mines from Dispense Explosives are detonated by Explosive Power. If you are near the mines, move away from them.

Left/Right Disassembler

Deals damage to either the right or left side of the arena, depending on which direction it faces. When you’re facing a boss, this attack will work in the opposite direction from the boss’ left and right. You should move accordingly to avoid this attack.

Electric Arc

A stack marker is placed on a random participant. To spread out the damage of this strike, form a group at the impacted player’s position.

Violent Discharge

All members of the party take damage. To recover, use AoE heals.

These attacks will be repeated by the Big Cheese for the rest of the fight. You’ll be able to survive this battle if you watch Explosives Distribution’s positions.

For more Guides, Tips, and Tricks

Check out our Video Games Guide Section for more dedicated guides.

Loop Hero Beginner’s Guide – Tips and Tricks you need to know

You will find tips about placing cards, gathering resources, and many more in this Loop Hero Beginner’s Guide.

Various aspects of other games are shuffled into Loop Hero to make a totally new game. Individually, it is straightforward to understand but quickly becomes overwhelming. As a simple, but a deep game with plenty of secrets, Loop Hero has made quite a splash. 

Loop Hero is an odd game because you have no control over walking or fighting – the titular character handles everything on his or her own. There are three jobs you can hold in the game: outfitter, world-builder, and city planner. If you’re having trouble understanding how certain cards work or just want to build an unstoppable Rogue with his own forcefield, here’s a Loop Hero Beginner’s Guide.

What are the three roles?

Outfitter

During a loop, the hero walks about on his own, fighting foes that drop items, cards, and resources. As the outfitter, you control the gear they discover by comparing stats and fitting the one with the higher number.

World Builder

You design the universe while the hero battles – think of it as playing as the board on which a board game is played (or being a dungeon master in Dungeons & Dragons).

Swords and shields, as well as cards, are dropped by dead adversaries. You scatter these cards over the map, adding to the loop’s complexity. Some cards add elements like meadows and boulders to the landscape (the black space surrounding the loop) for health bonuses. Others alter the loop itself (the direction the hero takes), spawning additional foes in cemeteries and vampire palaces — and more adversaries equals more drops.

City Planner

You’ll also get to plan and build out your hero’s camp, including a farm, smithy, and herbalist’s hut.

During the hands-off part, the hero fights and collects things, and your job is to make said hero more deadly. The more you kill, the more cards you get and the better equipment you have. Through the placement of cards, the hero can acquire more valuable, rarer, and better resources. In turn, that stuff unlocks new cards and classes, which unlock new camp buildings.

Loop Hero Beginner’s Guide: Treasury

Every time you place a tile on one of the eight spaces surrounding it, treasures grant you resources. If you fill all eight spaces, the treasury will empty, granting you a plethora of resources and new gear. However, this is a double-edged sword since it will also allow Gargoyles to spawn on the loop. The gear you obtain from the treasury will likewise scale with the number of loops you have completed. To optimize the quality of gear dropped, it may be a good idea to keep an empty place surrounding it until a subsequent cycle.

You might like Neon Abyss. We have also provided a guide for the game.

Loop Hero Beginner’s Guide: Retreat

Loop Hero Beginner's Guide
Loop Hero (Image credit: Four Quarters)

It’s tempting as a newbie in Loop Hero to try how far you can push yourself on early runs. Unfortunately, without at least a few camp improvements, you’ll have little chance of defeating the initial monster. Dying compels you to discard 70% of your acquired gear. Reversing mid-loop only results in a 40% loss. If you can return to the campground, retiring there will allow you to save everything.

Naturally, it’s desirable to retreat to the camp, but it’s far better to retreat before an unwinnable or perilous conflict than it is to fight on. You may enable auto-retreat by holding down the retreat button in the bottom right, which will provide you with the choice when you approach a campsite or just before you confront the boss. 

We’d recommend holding off on the Lich boss until you’ve built a few critical structures like the Herbalist’s Hut. The most important Loop Hero beginning advice is this: resources, not bosses, are how you advance in this game. So keep an eye on the monster progress meter in the upper left and stop putting tiles, so you can safely leave before it fills.

Loop Hero Beginner’s Guide: Make Battlefields as early as possible

The amount of completed loops determines the quality of the objects you acquire. Place Battle Fields near the beginning of loops to guarantee you acquire the best gear for that loop as soon as feasible. However, overlapping them will result in a unique Blood Path environment with a formidable adversary known as a Blood Clot. You’ll get used to them eventually, although they might be difficult at first.

Loop Hero Beginner’s Guide: Day Meter

Loop Hero Beginner's Guide
Loop Hero (Image credit: Four Quarters)

Loop Hero’s time mechanic is a day, which is symbolized by the green gauge in the upper left corner of the screen. It’s a graphical depiction of the mathematics that governs everything from daily health boosts to opponent spawning. When you’re in adventure mode, the day meter builds up and stops when you’re in planning mode. When the gauge reaches zero, it’s time to call it a day. The following day will begin when you hear an 8-bit rooster. When the meter resets, Loop Hero’s daily math occurs.

It’s similar to an egg timer in a board game, dictating when you gain healing from meadows and how frequently a wasteland tile spits forth slime. Other tiles, such as the described mountain peak, create opponents regularly. When the gauge refreshes in the morning, those enemies arrive.

There won’t be many battles on your first loop or two, so you’ll be back to the starting position (the comfy camp tile) before too long. For example, a spider cocoon that shoots out one spider each morning will only have enough time to deposit a couple of spiders in your hero’s path.

With each new card placed and the enemy appearing, your hero will spend more time fighting them. During each loop, more days pass, and the spider cocoon chugging along at one per day has a chance to produce six or eight spiders instead of one or two. You don’t have to spend too much time getting to a tile to make it deadly. It’s painful to die because you lose 70% of your resources.

Loop Hero Beginner’s Guide: What to build first?

After a few trips back to camp, you’ll be able to access the construction menu. This transforms the materials you’ve gathered into new constructions that help to develop the camp. First, construct the herbalist’s cabin. This equips your hero with a healing potion. When the hero’s health drops below a specific level, healing potions immediately heal them.

Every time your hero passes by the comfortable camp, it will recharge in two doses. You will also be healed each time you pass the cozy camp tile. Build the field kitchen to get even more health each time you pass. This will increase the healing rate of the comfortable camp by 10%. Upgrade both structures to gain even more health and healing potion dosages.

Loop Hero Beginner’s Guide: Practicing Combos

When you start to discover combinations between distinct tiles, you’re on your way to mastering Loop Hero. When you unlock a new card, examine it carefully and ponder how it will interact with the others in your collection. 

For example, the Vampire Mansion may be a real nuisance for newcomers, but position it adjacent to the Swamp once you’ve unlocked it, and you’ll be able to use the Vampire’s own healing against it. Likewise, Chrono Crystals will double the healing impact of any neighboring Meadows, enabling you to put fewer to obtain the same benefits.

For more Guides, Tips, and Tricks

Check out our Video Games Guide Section for more dedicated guides.

Who is Samara Redway? — Net worth, Age, Height, and more

Find out everything you need to know about Samara Redway, including her net worth, height, and career.

Samara Redway is a 26-year-old star who was born on March 10, 1995, in Vancouver, British Columbia, Canada. She is a video blogger and social media celebrity best known for her self-titled YouTube channel, which features fashion purchases, outfit ideas, DIY, make-up and hair tutorials, Q&As, and gaming videos.

She stands 5 feet 6 inches (1.68 meters) tall and weighs 57 kg (126 lbs). Furthermore, she also has dark brown hair that she frequently dyes in a variety of colorful hues such as blonde, grey, honey blonde, black, and others. She has dark brown eyes as well. Similarly, her physical measurements are 34-26-36 inches.

The net worth of Samara Redway

Her career began in 2013, and she has worked in the entertainment sector ever since, mostly as a social media personality and YouTube celebrity. So, if you’ve ever wondered how wealthy Samara Redway is, credible sources estimate that her entire net worth is over $70,000, which she has amassed via her successful profession, which includes many advertisements on her YouTube channel. Without a question, if she continues to advance in her job, her net worth will skyrocket in the future years.

Read What is the ‘Cracker’ Issue on Twitch? — Pokimane, HasanAbi, Nmplol, and more

Samara Redway’s Childhood and Education

Samara Redway spent her first several years of life in Vancouver, where she also raised her two younger brothers. Her father abandoned the family when she was a youngster, leaving her with a single mother and grandparents. Samara went to both a public and a private high school during her education. She then applied to other universities before being accepted to Burda University.

Samara Redway Facts

Full NameSamara Redway
Birth PlaceVancouver, Canada
Father’s NameNA
Mother’s NameNA
Zodiac SignPisces
Net Worth$70,000
Age26 years old.
Date of BirthMarch 10th, 1995
Height5 feet 6 inches (1.68 meters)
Weight57 kg (126 lbs)
NationalityCanadian
AchievementsNA
Boyfriend/HusbandAndre Rebelo
ChildrenNone

Personal Life

Samara Redway
Samara (Image credit: Samara’s official Twitter)

Samara spent a lot of time with her grandparents after her mother’s second marriage and the births of her step-siblings. Her connection with her stepfather was tense. Samara’s mother eventually received a second divorce, and things started to look up to her. However, she had become emotionally damaged and weak as a result of her seclusion and anxiety disorders. Samara, on the other hand, excelled in the classroom. Her academic performance aided her entrance to the University of Alberta. Samara began filming funny videos of herself in her leisure time while at Alberta.

Currently, Samara is not married. She is currently dating Andre Rebelo, a.k.a. TypicalGamer, who is a fellow YouTuber. In addition, once she met her partner, her channel took off. Andre is said to be the one who encouraged her to start making Youtube videos. It’s unclear how they met. They have a lovely and joyful life together, nevertheless.

Professional life and Career

Samara and her Boyfriend Andre Rebelo
Samara and her Boyfriend Andre Rebelo (Image credit: Samara’s official Twitter)

Samara Redway Games was her first YouTube channel, launched on 7 October 2013, and she started it as part of her career as a YouTuber. The first video she uploaded to her YouTube channel was uploaded on January 13, 2016. Her YouTube channel also contains makeup reviews, hair, daily vlogs, Q&As, games, and challenges. Furthermore, she was socially inept. In her childhood, she was socially isolated and couldn’t fit in with any group.

Having moved to Australia, her life changed from being lost and unhappy to happy and cheerful. Thanks to her entertaining and fun videos, she has gained thousands of subscribers and followers. As well as sharing vlogs, she frequently creates makeup tutorials and shares vlogs about her everyday life.

She is known for videos like “DRIVING HIS LAMBORGHINI! !”, which has over 1.2 million views, “PLAYING GTA 5 WITH MY BOYFRIEND! !”, with over 1.1 million hits, and “NEVER HAVE I EVER W/ MY BOYFRIEND #2!!”, among many others, where her boyfriend is featured.

Aside from that, she is a social media star. She is active on Twitter and Instagram, where she has amassed a sizable fan base.

Social media platforms

Samara is also active across other most major social media platforms. She utilizes it not only to promote her projects but also to share different other content with her followers. To speak more about her role in the entertainment sector as a social media celebrity. As a result, she manages both her official Instagram account, which has over 274K followers, and her official Twitter account, which has about 199.9K followers. She uses the Snapchat platform as well.

Samara Redway FAQs

What is Samara Redway’s real job?

Samara Redway is a YouTuber who makes a living from it. Samara Redway and Samara Games are her two YouTube channels.

Is Samara Redway vegan?

Samara Redway is a vegan

Is Samara Redway on Instagram?

Yes, she is on Instagram, but she does not have a verified account yet.

What is Samara Redway’s Parent’s name?

There is no information regarding her parents’ names.

For more stories

Check out the Entertainment section for more stories.

Animal Crossing New Horizons Terraforming Guide

Our Animal Crossing New Horizons Terraforming Guide is here for you. In it, you can further customize how your island looks and how it is laid out.

One of the reasons Animal Crossing New Horizons is on our list of the greatest Nintendo Switch games is the ability to customize your island with terraforming. It’s also one of the most exciting ways to personalize your tropical paradise. Make rivers, ponds, cliffs, and more, as well as bespoke routes. Naturally, you cannot terraform straight away; you must first acquire it.

Although the function appears to be useful, it requires a significant amount of effort to activate. You won’t acquire it for at least a week or two after purchasing the game, and if you do, you’ll only have a few selections until you use Nook Miles to purchase the rest. Don’t be concerned, though. We’ve got all you need to know about terraforming in New Horizons. It also includes how to unlock it and then use it in our New Horizons Terraforming Guide.

Before going further, we recommend you to read other guides of this game: Animal Crossing New Horizons Snowboy Guide, Animal Crossing New Horizons Guide – Top things to do in the 2.0 Update, Animal Crossing Art Guide — Are Redd’s Paintings Real or Fake.

New Horizons Terraforming Guide: How to unlock?

The Island Designer software is a gift from Tom Nook. After K.K. Slider does his first show on the island, he’ll give it to you. You must complete the game’s plot in order to get him to the island. It entails constructing the museum, assisting Timmy and Tommy in the establishment of Nook’s Cranny, attracting additional people to your island, and finally upgrading the island to three-star status. After you’ve completed all of this, K.K. will appear and perform the game’s theme song, after which Nook will hand over the app.

You’ll only have two terrain selections at first: grass and dirt. You’ll have to buy them individually for 2,000 Nook Miles apiece from the Nook Stop at Resident Services to unlock further pathing options. For 2,000 Nook Miles, a customized pathing option is available, allowing you to employ a bespoke pattern as a path. To change cliffs or waters, you’ll also need permits, which cost 6,000 Nook Miles each.

New Horizons Terraforming Guide: Waterscaping and Cliffscaping

New Horizons Terraforming Guide
Animal Crossing New Horizons (Image credit: IGN)

It’s not difficult to unlock water and cliffscaping, fortunately. Permits are available for both waterscaping and cliffscaping at Resident Services’ Nook Stop terminal. They are a tad costly at 6,000 Nook Miles apiece.

You will, however, have unlocked both Nook Miles+ and the daily bonus assignment to earn 5x the miles at this time. It may take many in-game days to obtain both, depending on how often you play, but if you haven’t finished Project K yet, you may save the Miles ahead of time. You may now add more bridges and inclines to your waterscaping and cliffscaping as part of the 2.0 release. The number of bridges and inclines on an island is now limited to 10.

New Horizons Terraforming Guide: Path options

If you want to lay more kinds of paths, you’ll need more Nook Miles, just like waterscaping and cliffscaping. Each of the additional paths costs 2,000 Nook Miles (the Custom Design path costs 2,300) and comes in these options:

  • Dark dirt
  • Dirt
  • Grass
  • Sand
  • Arched tile
  • Brick
  • Stone
  • Custom design
  • Terra-cotta
  • Wooden

Purchasing Nook Miles is a one-time fee. It’s not necessary to craft or purchase additional items once you own the path.

Terraforming is a form of art

New Horizons Terraforming Guide
Animal Crossing New Horizons

Getting started with terraforming is as easy as gathering the right tools. You can begin by opening Island Designer on your Nook Phone and selecting “Start Construction!” As you play, you’ll receive a shovel and hardhat, and on the top right of your screen, you’ll find a new option to choose what kind of construction you want to do. When your island’s gate is open, or you have guests over, you cannot terraform.

You will see the different paths you’ve unlocked. You will also see the icon for waterscapes and terraforming if you have unlocked them. Decide which one you wish to work with.

Path

By pressing A once you have selected a path, your character will paint one tile of space before them with that path. You can continue to do this until you get the shape you want. If you place a path tile by accident, you can erase it by pressing A again (or you can swap it back to grass to restore it to its original form).

When you press A on a corner a second time, the path will not be erased, but instead will be rounded to appear smoother. It will disappear if you press A again. However, rounding corners gives your paths a more natural appearance. Remember that you can’t terraform over anything that’s already on the ground, including furniture, dropped items, trees, flowers, houses, etc. Before you can lay paths, you will need to move those things.

Waterscaping

Paths and waterscapes have a lot in common. By pressing A, you may either dig a hole and fill it with water, or you can fill an existing body of water with one tile of soil. If you like fishing, you’ll undoubtedly want to know the distinctions between rivers and ponds. It might be difficult to tell where one ends and the other begins. 

A river is characterized as such if it runs for a certain amount of time, flows into the ocean, or flows into a waterfall. Ponds are enclosed bodies of water that are larger than lakes. Cast a fishing pole into the water to distinguish between the two. You have a river if the bobber slowly goes downstream. You’ve created a pond if it remains put. Keep in mind that certain fish are only found in rivers or ponds, and others are only found in one body of water at the top of a cliff.

Waterscaping on the margins of cliffs may be used to generate waterfalls; you don’t have to waterscape to the bottom unless you want to. Keep in mind that only straight cliff edges can be waterscaped over. You may also “round” the curves of rivers by pressing A on a tile a second time after putting it, similar to how you can “round” the curves of routes. On the beach, you can’t do waterscapes.

Cliffscaping

In comparison to the other two, cliffscaping is a bit more challenging. The ‘A’ key creates or destroys a tile of a cliff in front of you, just like before. You will create a second level of cliffs if you’re already on top of the first. A third layer would be even taller, but you would not be able to climb on top of it. There’s nothing to it.

To build a cliff, you must start at the base. As a result, you’ll always be building up. Standing on top of a cliff can’t destroy it. It is not possible to build cliffs over furniture, trees, flowers, or other obstructions on the ground like with waterscapes. The first step is to move them.

As with waterscaping, you can also round the corners of cliffs by pressing ‘A’ another time. If you do this a third time, the tile will be destroyed. Cliffs can’t be built on beaches.

For more Guides, Tips, and Tricks

Check out our Video Games Guide Section for more dedicated guides.

The Vanishing of Ethan Carter Guide – Tips, Tricks, and Strategies

The Vanishing of Ethan Carter Guide will help you with all its tips and strategies on important parts of the game. So do not miss it.

A first-person perspective is used to experience the action in this game, taking place in the small, open world of Red Creek Valley. Since the game does not take you step-by-step through every part of the world, this guide will be of assistance if you encounter any difficulties. 

Despite the short length of the game, the puzzles associated with the brutal murders, and the hints hidden in the thick jungle, may cause some difficulties. Our guide will help you get through all the puzzles that the developers have prepared for you briefly. There are some general hints that you should learn before diving into The Astronauts’ game world. We are providing you with a guide on difficult situations in the game so that you can complete it with ease.

The Vanishing of Ethan Carter Guide: Murder in the mine

Go to the Carters’ residence, which is next to the dam, then follow the shoreline to the chiseled-in-the-rock tunnel. Continue on the right branch until you reach a hill with a closed door. Inside, the road is linear at first, so you won’t lose your bearings, and the side tunnels are brief. You must locate the elevator that will transport you to a lower floor. You’ll arrive in a cave with railway tracks after exiting the elevator, where you’ll have to solve another crime.

Tunnel
The Vanishing of Ethan Carter (Image credit: IGN)

A pickaxe stand may be found in the cave on the right; check it. Start the vision mode when you’ve successfully oriented the camera and organized the dispersed words – you’ll see where the missing pickaxe is (as of now, it is dark). There is an elevator shaft just next to the stand. The elevator must be started. A control panel is located on the left; select up. 

The elevator will emerge from the sea, and within you will find a woman’s body, which you should examine. Outside the chamber, follow the tracks. A mining steam engine may be found behind a mass of rubble at the fork. Start the engine by entering it.

Stop the engine, grab the tool, and return to the elevator’s nearby stand. Place the pickaxe in the appropriate location. Now approach the body and touch it; light beams will appear, which you must approach to begin putting the events in chronological order. They’re all inside the loop of the tracks, so locating them won’t be an issue.

The Vanishing of Ethan Carter Guide: The forest of traps

Ethan Carter sends messages to Paul Prospero as a last resort when he has no one else to turn to. Prospero said that the boy’s messages appeared to be ordinary fan mail until Ethan starts describing things that ordinary people shouldn’t see. Paul then sets out to track down Ethan and solve his puzzle.

You emerge from a tunnel after hearing this narrative, strolling through a misty woodland on railroad tracks. To obtain the Steam accomplishment, immediately return to the tunnel and pass to the other side. You’ll wind up in the same position, no matter which end of the tunnel you escape from – this region is packed with traps. You’ll be able to utilize your sensing ability for the first time after triggering them. When you detect all five traps, a scene appears that provides further information about the region.

Forest
The Vanishing of Ethan Carter (Image credit: Steam)

Left side traps

After exiting the tunnel, turn left and proceed to the back of the clearing. A swath of grass slides away to expose a hole surrounded by wood and metal spikes. From the hole, a bloodied branch protrudes. The second trap is located just north of the pit. As you approach the bear trap, it will snap.

Right side traps

After exiting the tunnel, turn right to find the first trap. When you approach the location, a clumsily constructed bundle of logs and spikes falls from the treetops. The second trap is towards the end of the tracks and resembles a catapult, only instead of throwing something, it smacks someone with its numerous lethal spikes. 

The final trap necessitates some walking. Stick to the rails until you reach the damaged bridge, but don’t cross it yet. Before the woods cease, turn right. It will bring you down a trail that will take you to a clearing with a view of a valley. The trap is located near the back of the area, close to where you came out of the tunnel. It’s another odd catapult-style trap.

The Vanishing of Ethan Carter Guide: House of portals

Now you must enter the right-hand home, the one closest to the dam. There is a route leading up to the home that is not overgrown with grass – enter the structure as soon as you reach the top. There’s a letter on the table that you should read. When you close the door, a blue gateway will open in its place. 

You’ll trigger identical ones everywhere throughout the home when you pass it. Your mission is to use the portals to reconstruct the Carter House’s interior. The activities are shown by blue bursts of light if they are successfully done. You only get one chance to make a mistake (the screen flashes red), after which you must restart the puzzle!

The Vanishing of Ethan Carter Guide: Spaceman

The Vanishing of Ethan Carter Guide
The Vanishing of Ethan Carter (Image credit: IGN)

Turn left as you approach the railcars. You should start looking for a fir cone in this woodland. The cone will change into a grenade when you hit Inspect, and you will take it. After that, look for a four-screen post. Every time you glance at a screen, a hand will appear. To reveal a guy in a spacesuit, click the third, first, second, and fourth screens.

You’ll have to re-do the screen problem if you lose sight of him. The spaceman will guide you to a spacecraft if you keep up with him. Enter the realm of light. You’ll be going across space after the spaceship takes off. Look around the capsule, and then look in the seat for a note.

The Vanishing of Ethan Carter Guide: Witch’s House

The Vanishing of Ethan Carter Guide
The Vanishing of Ethan Carter (Image credit: Steam)

If you travel into the forest behind the larger home on the hill, you’ll hear a woman say she can see into the future and that people flock to her for that. She does remark, though, that she is interested in the past, and that you must answer her question if you wish to discover her home. As you approach a light, you are taken to a drab and brown woodland, where a voice asks you many questions. You’ll be transported into the wilderness until you reach a tent. 

The Vanishing of Ethan Carter Guide: Murder at the Dam

You will reach a dead-end if you follow the tracks all the way down. Turn left, and you will come across a walkway with bubbling green water. You can leave the mines by walking through them. As soon as you exit, begin heading in the direction of the building on your right. Make a point of returning to the cliff-side elevator before entering. It’s tucked away behind the mine’s entrance. A pair of scissors may be found here. Bring them along. 

You’ll discover a case for an emergency axe and a damaged door as soon as you enter the building. Dale’s body may be found in the room. You’ll locate the axe alongside the body, and you’ll be able to replace the scissors. Return downstairs after getting the axe and placing it in its case. You now have all you need to return to Dale’s body and sense his body.

 Vanishing of Ethan Carter
The Vanishing of Ethan Carter (Image credit: IGN)

Sequence of events

  • By the mine entrance, Dale is prepared to assault Travis with the axe.
  • Travis wields the axe, as Dale defends himself by raising his hands.
  • Travis approaches Dale with the axe, who is on the ground.
  • Dale closes the door to the room where he will be assassinated.
  • Travis approaches Dale with the axe, and Dale defends himself with scissors.

There is a survival game called Icarus. You must try it out. These guides will help you in the game: Icarus Beginner’s Guide – 10 Tips to help you Survive, Best Technology in Icarus – A Complete Guide.

The Vanishing of Ethan Carter Guide: The Vandergriff House

 Vanishing of Ethan Carter house
The Vanishing of Ethan Carter (Image credit: IGN)

Shut off the last turbine in the dam control building if you haven’t already. As a result, the river’s water flow will be slowed, exposing a spot where you can cross the stream. Return to the building where Dale was assassinated. The location where you can cross the lake is to the left of the entrance.

Follow the route until you reach the lake, and then the burned remnants of the old Vandergriff house. Enter the house and walk to the right side. You’ll come upon a location where you can sense things. In the revolving stones, write the name Corvus. Begin with the C on the stone that is connected to the center by a line. Descend inside the chamber.

Ed, Ethan’s grandfather, is curled up and died here. When you initially perceive his body, you notice that he appears to be calm. Four memory pieces are released when you touch his body.

  • While Ethan watches, Ed enters the room.
  • Ethan is rearranging the table.
  • Ed and Ethan are attempting to unlock the door.
  • Ed is curled up in a fetal posture.

For more Guides, Tips, and Tricks

Check out our Video Games Guide Section for more dedicated guides.

Remnant From the Ashes Guide – Everything you need to know

It’s a difficult game at times, that is why we’ve put together a Remnant From the Ashes guide to assist you.

Remnant From the Ashes is a one-of-a-kind beast, sitting between looter shooters like Destiny and tough-as-nails action RPGs like Dark Souls. Even though many of the mechanics are similar, the total of the components is unique. It’s a fantastic horror game with plenty of action, terrifying bosses, and uncommon weaponry. Players will find themselves on a post-apocalyptic planet invaded by monsters from another dimension when they enter this game.

This incredible title has captivated admirers all around the world. Its snappy combat, hard yet fair difficulty, creative co-op elements, and some genuinely amazing bosses all contribute to this. This makes the most of the game’s diverse set of mechanics, which are straightforward yet effective. It’s a difficult game at times, and many players are surprised by how steep the learning curve is to become a great survivalist in this bleak environment. Below is a Remnant From the Ashes guide for you.

This game has two DLCs available

The fact that the game has gotten the second of two promised expansion packs, which have proven to be outstanding in every sense of the term, is the main reason why Remnant: From The Ashes has become such a huge talking point currently.

After finishing the game, players will immediately begin working on the content included in Subject 2923 and Swamps of Corsus, which has proved to be a worthwhile contribution to the Remnant: From The Ashes legacy.

You might be looking for Rite of Dawning Quest Guide for Destiny 2.

Remnant From the Ashes Guide: Explore

Remnant From the Ashes
Remnant From the Ashes (Image credit: Remnant on Steam)

In Remnant From the Ashes, each level is different, featuring a variety of randomized adversaries and awards. To get access to potentially advantageous commodities, it’s important to study side paths and track down stray enemies.

It will, at the absolute least, give you experience points and items to aid in the advancement of your character. If you’re experiencing problems with employers, it’s likely that you’re not doing enough exploring and need to go out more.

Remnant From the Ashes Guide: Play Solo

When you don’t have the assistance of another person to revive you and protect your back, solo gaming takes on a whole new meaning.

For players that appreciate spending time with locations, approaching every circumstance with this adjusted perspective will be rather pleasurable. Also, devising successful techniques for coping with any battle situation, particularly bosses and their minions.

If you like RPG games, then read Rage of Destiny Beginner’s Guide – Tips and Tricks for this Idle RPG

Remnant From the Ashes Guide: Looting

Remnant: From the Ashes is a mash-up of genres in one compact package, and the phrase “looter shooter” may be used to describe it as well. Exploring every part of the world for scrap, iron, and weaponry among other valuable materials is essential for any player who wants to complete the game without losing their mind.

Remnant From the Ashes Guide: Upgrade Dragon Heart

Remnant
Remnant From the Ashes (Image credit: Remnant on Steam)

One of a character’s most crucial pieces of equipment is the Dragon Heart. It is the primary way of healing throughout the majority of the game, and with just one charge, it may restore a character to full health. The issue is that when the item is initially received, the player only receives three charges, which is sometimes insufficient.

Upgrading the Dragon Heart as quickly as feasible should be a high goal. Simulacrums are scarce, and weapon upgrades are enticing, but when combined with Dragon Hearts, they provide more bang for your buck. Before upgrading weaponry, players should have at least five charges; however, players should preferably upgrade to 10 Dragon Heart.

Remnant From the Ashes Guide: Keep different loadouts

A great tip for surviving Remnant: From the Ashes is to prepare a loadout for each encounter the player is likely to face. Players should be prepared to deal with swarms of weak adversaries, single difficult enemies such as bosses, or a combination of both. This is especially true while playing solo because the player is required to handle each encounter independently. Some players will even create loadouts tailored to certain monsters or worlds. However, even having three to deal with the aforementioned situations will go a long way.

Remnant From the Ashes Guide: Use melee

Remnant From the Ashes Guide
Remnant From the Ashes (Image credit: Remnant on Steam)

In this game, ammo is the difference between life and death, thus it’s crucial to learn how to save it early on for crucial bouts against groups of monsters. Switch to a melee weapon while fighting lesser adversaries to save ammunition for those occasions when a melee isn’t an option.

Putting yourself at risk to conserve some bullets is never a good idea. It’s better to use them on opponents and hurry to a checkpoint for a refill than to perish because you didn’t want to waste your Ruin’s ammo. However, start crushing and slicing as soon as possible to increase your ammunition supply.

Look for the weak spots

Every adversary in this game has a vulnerability, from the tiniest insects to the most powerful bosses, and every weakness may be exploited for increased damage. Learning and memorizing weak points is important for rapidly dispatching difficult opponents, saving ammunition, or just getting rid of annoyances.

The head is a weak area for the majority of monsters, but take some time to experiment with weak points safely and carefully until you’re satisfied you know what to aim for on each adversary you face.

Remnant From the Ashes Guide: Upgrade weapons

You may enhance your existing weapons by spending Scrap and other elements like iron, in addition to discovering new gear. It’s tempting to save these materials for future weaponry, but Remnant doesn’t hold back when it comes to distributing them. It’s critical to constantly use the most powerful versions of your equipped weapons, so make frequent trips to Rigs in Ward 13 and keep your gear up to date. 

Similarly, make sure you’re investigating every nook and corner of each randomly generated level; there are plenty of Scraps to be found in hidden boxes.

Ward 13 guide

Ward 13 is the survivor’s hub; it’s where the merchants are, where you may improve your weapons, stow supplies, and so on. Many players make the mistake of coming there for what they need and without giving it much attention; nevertheless, because this game encourages exploration, Ward 13 is created to be explored.

Players that explore this location frequently during the game can find vital secrets and weaponry. If you’re having problems with a level, have a look around here to see if you can discover something that can help you out.

https://twitter.com/Remnant_Game/status/1453753601420038152?s=20

For more Guides, Tips, and Tricks

Check out our Video Games Guide Section for more dedicated guides.

Best way to get Ducats in Warframe – Guide

You will need Ducats in Warframe guide to know the best way to get it. We have also mentioned the way to farm it.

Prisma weaponry, Primed Mods, and other special products may only be obtained by purchasing them from Baro Ki’Teer. You’ll need a lot of Ducats and Credits to accomplish so. Obtaining it, however, is inefficient when compared to other currencies. 

If you’re wondering how to earn Ducats in Warframe, you’ve come to the right place. Our Warframe Ducats Guide will show you how to amass a large amount of this cash.

We have a few guides of this game, check out Mortus Horn in Warframe – A Complete Guide, Warframe Waverider Quest Guide – How to Farm Yareli.

Ducats in Warframe Guide: How to get them

Missions, killing foes, and selling goods all yield credits. When you reach the “endgame” levels, you’ll have millions in your pocket. You’ll need them to make goods in the Foundry, in addition to buying helpful stuff. Ducats, on the other hand, may only be acquired through the conversion of Prime Parts and Blueprints. One Part can provide up to 100 Ducats, although conversions can yield as low as 15 Ducats depending on the item.

Farming ducats is inefficient and reliant on chance. When compared to Credits, you only get a few. They are, however, obligated to trade with Baro Ki’Teer. In Warframe, there are only two methods to get Ducats. The first method involves opening Void Relics and converting the Prime Parts therein into Ducats. Follow these procedures if you need a reminder on how to open Void Relics and convert Prime Parts:

Ducats in Warframe Guide
How to get Ducat
  • Play some Void Fissure missions if you have Void Relics.
  • After you’ve opened the Relics and completed the assignment, pick the prize with the highest rarity, which is normally marked with a gold band.
  • Return to your Orbiter if you haven’t already.
  • Take a look at your Star Chart.
  • Join any session by finding a planet or moon with a Relay.
  • Enter the Relay once you’ve arrived.
  • Two Kiosks will be available in the vast space in the middle.
  • To access the menu, use the “Interact” button.
  • Select the Prime Parts you want to convert, as well as how many of each you want to convert, if appropriate.
  • To obtain your Ducats, go to “Sell Items.”

There is a problem

This is a 100% freeway. Some gamers have difficulty with repeating the same quest, which may get monotonous. With Void Traces, you can always boost the possibilities of the rarest prizes dropping, but it’s not guaranteed. In general, the rarer the prize, the more Ducats you’ll get in return.

If an award valued at 100 Ducats was “downgraded” to 65 Ducats, the exception applies. Changes can occur at any moment, and this might have an impact on your award values. Old Relics are vaulted, and new ones are released, affecting the prizes’ starting worth. To avoid this, make sure to hunt for the most valuable prizes and conduct a thorough study.

Look for “Radshare” squads if you want the highest odds. When Tenno joins these teams, they all agree to upgrade their Relics to Radiant, which increases the likelihood of getting the finest prizes. This raises your chances of receiving them and saves you a lot of time.

To improve your Relics with any relevance, you’ll need a lot of Relics and Void Traces, but a Resource Booster should help you farm Void Traces faster. The second option is to just purchase Ducats from other Tenno. When Baro Ki’Teer arrives or arrives shortly, many of them will begin selling prime junk. It’ll cost you some Platinum, but if you’re in a hurry, it’s a viable choice. You can convert your prime junk into Ducats once you have it.

Ducats in Warframe Guide: How to get Baro Ki’Teer?

Every two weeks or bi-weekly, Baro Ki’Teer arrives. When you check into the game, you’ll get an inbox message telling you when and where he’ll be. Many Tenno will throng to the relay where he will make his great debut even before he comes to see his magnificent arrival. You may just type “when Baro” in the Region Chat if you’re wondering about where and when you’ll find him. The information will be sent to you by a bot.

Baro doesn’t usually show up in the same Relay at the same moment. He alternates between the two. Look for his emblem on the Star Chart 24-hours before he’s expected to appear if you want to know where he’ll be next. Follow the course of the moving symbol to see which Relay he’s going to and which he intends to attend.

Ducats in Warframe Guide: How to Farm Ducats?

Ducats may be obtained by opening Void Relics. The only way to open them is to complete Void Fissure quests. Before the Void Fissure missions are replaced with others, there is a limited period. As a result, relic farming missions are often updated. You may keep track of these changes by monitoring the top-right corner of the Star Chart regularly. The following are some of the most common quests for unlocking Void Relics:

Ducats in Warframe Guide
How to farm Ducat

Survival

You can continue in the same mission and open Relics many times if you survive. Some teams are on missions for hours since the longer you stay, the more Void Traces and goodies you obtain. Certain Survival missions reward you with additional Relics that you can open later.

Try to select a suitable squad in Recruiting Chat to ensure your survival during these assignments. To secure your survival, discuss the squad’s Warframes and weaponry. Otherwise, you risk failing and losing everything.

Interception

Interception missions aren’t the most popular way to farm Void Relics, but with a little planning, teams can achieve objectives with ease. You can access the Relic sooner if each capture point is kept without being lost. In Interception missions, Warframes with strong AoE stats excel. Hydroid can simply turn into a pool of water to keep attackers away from the spots. He doesn’t even have to do anything other than eliminate the stray stragglers.

Capture

Perhaps the most popular missions are capture missions. Many Tenno squads will carry their high Damage Per Second (DPS) Warframes and weaponry since capturing a single adversary is all that is required. They have the ability to knock down and grab their prey in a matter of seconds. You can find yourself initiating the same task twice before you realize it if you receive a fortunate tileset. If everyone is powerful, even random teams can complete the assignment five times in ten minutes.

Exterminate

Exterminate missions are similar to Capture missions, except instead of capturing a single adversary, you must kill enough adversaries to accomplish the task. Ember, Volt, and other warframes with strong DPS and AoE are excellent alternatives. After you seize the target, Capture missions might occasionally turn into Exterminate missions.

With this sort of task, combining your most powerful Warframes and weapons with huge areas of attack is critical since you may swiftly cut a bloody path through the throngs of foes. Volt also offers all Tenno a boost in speed, which affects attack and running speed.

Defense

Another technique that might help you swiftly cultivate Ducats is defense. The waves of opponents rushing to attack the objective will be quickly dealt with by a team of Area of Effect (AoE) Warframes. You can clear a wave in under a minute if one of your Tenno has a Speed Nova build.

You get to open and extract a Relic every five waves, so if you’re quick, you can open two of them in under 10 minutes. Defense missions are preferred by certain Tenno since they allow them to level up their equipment and maybe get Void Relics as a reward.

For more Guides, Tips, and Tricks

Check out our Video Games Guide Section for more dedicated guides.

What is the ‘Cracker’ Issue on Twitch? — Pokimane, HasanAbi, Nmplol, and more

What is the ‘Cracker’ Issue on Twitch? Why are streamers like Pokimane, Hasanabi, Nmplol, and more getting banned? Read below to know everything.

Fresh difficulties might have developed for prominent Twitch streamers Pokimane, HasanAbi, Nmplol, and others, as we all know about the recent heated issue centered around the term “cracker.”

The term has sparked a lot of controversy on Twitch, and the community is still debating it. Many people appreciate Twitch’s action, but others, such as HasanAbi and minders, believe it is simply another term and that Twitch’s harshness is unjustifiable. There were creators, such as Nmplol, who stated why HasanAbi’s ban was unreasonable.

As the debate about what is proper and wrong in the use of a term continues, many streamers are refraining from using the word or expressing any position on the subject. Furthermore, they appear to be playing it safe, as if they don’t want to stir up another round of controversy by using the phrase.

Cracker Issue on Twitch: HasanAbi suspended

HasanAbi, a popular Twitch streamer, has been suspended for a week, allegedly for uttering the term ‘cracker’ on-stream. He was removed from the platform for calling white people “crackers.” This comes after Piker, in his normal sarcastic tone, stated what is now humorously referred to as the “c-word” a number of times throughout the course of many streams. On his channel, Piker regularly promotes social justice and informs viewers about key issues such as Black Lives Matter and universal healthcare.

“Yes,” Piker remarked in reaction to the news of the ban, which broke about midnight ET last night. It’s for the precise reason you believe it’s for. For using the epithet “cracker,” anti-white racism exists.

He was banned immediately after finishing his live on December 13, during which he had challenged a viewer about the usage of the term “white people.” It was a continuation of an earlier talk in which he supported its usage. He said that because he is extremely online, he has called a cracker more often than others.

HasanAbi is on the list of the top 10 streamers of 2021. To know who is first, read Top 10 Twitch Streamers of 2021

What others are saying?

Redditors, unfortunately, have already had a field day with this one. A frightening percentage of the internet has already pretended to be upset by the word cracker, with some even claiming that “cracker” is a derogatory epithet similar to racial insults used against Black people.

Others are pointing to Piker’s suspension, which is expected to last three to seven days, as an example of Twitch’s uneven policy enforcement. Stephabue, a Twitch streamer, claims that the platform doesn’t care about most instances of prejudice and only draws the line when white people are angry.

Cracker Issue on Twitch: Nmplol

Cracker Issue on Twitch
Nmplol on twitter

Nmplol, a Twitch streamer, is enraged with the platform because his head mod was banned for thirty days for using the term “cracker.” The term has since gained a lot of traction, with Twitch banning Nmplol’s buddy and streamer HasanAbi after the latter’s moderators were suspended.

However, since Nmplol came to Hasan’s aid, it appears that the streamer is now facing his own set of issues, with his mod Oro missing for thirty days, which the streamer says is unjust. In a recent show, Nmplol reported that Twitch has banned fan-favorite head moderator Oro for 30 days for using the term “cracker.”

He even shared images of her conversation logs in which she used the phrase. While some fans speculated that she was attempting to persuade the platform to prohibit her, it also demonstrated that viewers who use the term “cracker” may be punished. Nmplol was upset on the broadcast because Oro had been banned since his channel was at risk of becoming toxic without her.

He also went on a tangent about how Twitch banned people like Oro and HasanAbi for using a phrase that most people don’t find offensive. When Hasan was suspended earlier this week, the streamer came out in favor of him, voicing similar sentiments on the meaning of the word “cracker.”

Nmplol went on to explain why Oro didn’t deserve to be banned because she helps him a lot with nasty people that want to damage his channel. While he feels that individuals should not be banned for using the term “cracker,” he also claims that the platform has done nothing to safeguard his mod from users who send obscene messages.

See Nmplol’s reaction here.

Cracker Issue on Twitch: Pokimane

During a recent stream, an audacious fan almost made her spill the word “cracker.”. She would have been in serious trouble had she done so. In quite an unpredictable manner, Pokimane was caught in the trap. A shower of donations rained down on her chat, as she receives them regularly on her stream. She thanked all the people who subscribed and re-subscribed. In order to show appreciation, streamers usually read out their usernames.

An anonymous user offered her a Tier 1 subscription for one month with a red flag, right at that moment. She was about to say “cracker” when she noticed that the username was itself the word “cracker”. A quick reflex or her professionalism saved her from a ban this time.

https://youtu.be/Inc0F_-vRwU

Ableist slurs

xQc, a French-Canadian streamer who has also used the r-word publicly and extensively while streaming without being banned, has Twitch’s second highest-earning channel. Unlike Asmongold, however, xQc was aware of the potential harm that such statements might inflict. Following an experience with a handicapped fan last year, xQc realized the r-word was harmful and announced to his community that he would no longer use it.

Unlike the word “cracker” ableist insults cause harm to a marginalized group and have contributed to a long history of disability discrimination and condemnation. The r-word came from the phrases “idiot” and “moron” which were formerly commonly used (even by the whole medical community) to insult handicapped persons, according to the Global Down Syndrome Foundation.

History

What many newcomers to the live streaming industry may not realize is that Twitch’s hate raid endemic, which received some media exposure this year, has existed since 2016: After coming out as transgender, Twitch streamer DistractedElf was hate-raided by 4chan members. Twitch has mostly neglected the subject of hate raids since then until a media tempest this year prompted it to decide to sue two anonymous individuals.

The suspension of Hasan Piker by Twitch feels like a rerun of the “simp”, “incel”, and “virgin” word restriction dispute. It’s been a year, but Twitch has failed to demonstrate that it has made significant steps to combat the incel culture that still exists on its site. 

As for HasanAbi, he says he is going to join Ludwig on YouTube and also appear with Amouranth on Ethan Klein’s channel.

There will likely be many streamers with similar stories about Twitch’s lack of support. The actions of the platform may cause other content creators like Nmplol and HasanAbi to consider leaving the platform, given that popular streamers like Ludwig have already left.

For more stories

Check out the Entertainment section for more stories.

Neon Abyss Beginner’s Guide – Tips and Tricks you should know

We have brought Neon Abyss Beginner’s Guide with all the tips and tricks for you so that you can improve your gameplay.

Neon Abyss is a fast roguelike action-platformer in which you play as part of Hades’ ‘Grim Squad’ and run and gun your way into the Abyss. Each run diversifies the experience, and every option changes the ruleset, thanks to endless item synergies and a unique mechanism of dungeon evolution. Prepare to unleash the wrath of God! 

There are no online multiplayer or co-op elements in Neon Abyss. To defeat each game’s chambers, two players would need to work together due to its zaniness. But it’s not all doom and gloom. Because of the game’s design, it’s incredibly simple for many local players to join in.

You could pass the controller around and have each person finish one area at a time. You may even have one person take the wheel and dare the other players to go further than the previous player. Even though Neon Abyss lacks official multiplayer capabilities, it’s simple to enjoy in couch co-op with a little effort. Unfortunately, there is no way to play this game online. The game has got a 79 rating on Metacritic based on critic reviews.

Neon Abyss places you as a part of the ‘Grim Squad,’ a task force set up by Hades himself to penetrate the Abyss and fight the New Gods, combining intense run-and-gun action with complex, roguelike features. Death isn’t the end, since each time you die, you’ll gain greater strength than before. When you get used to it, you’ll find it easier to get further into the dungeon each time, but at first, it’s tricky. In case that fails, take a look at the Neon Abyss Beginner’s Guide with tips and tricks below.

Neon Abyss Beginner’s Guide: Hidden rooms

Neon Abyss Beginner’s Guide
Neon Abyss (Image credit: Neon Abyss on Steam)

There’s always something worthwhile in a hidden chamber. It’s a matter of luck, and depending on how excellent it is, it might be a game-changer for your prospects of success. You may locate them in the levels by glancing at the walls. Look for a golden light with little flakes emerging from a break in the wall to find a secret area. To get access to the interior, use a grenade to blow it open.

If you locate the lidless eye powerup, you’ll have an easier time finding them. This will reveal the whole map, revealing all the secret sections and automatically blowing open all the barriers.

Neon Abyss Beginner’s Guide: Pink Crystals

Neon Abyss Beginner’s Guide
Neon Abyss (Image credit: Neon Abyss on Steam)

You can use the pink crystals to open doors to the shop, chests, and to clear the large diamond things that turn red when shot. A meter will fill up on the bottom right of the screen. When you spend lots of crystals, the purple amount will fill up. When the pink door turns red, the red amount will fill up. Upon filing, you will receive a message informing you of a strange sound from afar. If you see this, it means you’ve unlocked a special room.

In return for a power-up, you will lose a heart in the red chamber. It will be given to you without stealing a heart from the pink chamber. It’s better to spend the crystals because they’re so prevalent. When I might have been cashing in on this simple source of stuff, I spent a lot of time just leaving them behind.

Neon Abyss Beginner’s Guide: Guns

Neon Abyss Beginner’s Guide
Neon Abyss (Image credit: Neon Abyss on Steam)

The best part about getting a new gun is getting to try it out. If you like your previous gun, don’t hesitate to go back to it. While there is a lot of strange and fantastic weaponry in Neon Abyss, they aren’t always better than your basic weapon. With a few upgrades, the Seagull, which you start with, may become a devastating weapon. 

Please try out any other weapon pick-ups you come across, but don’t assume that just because something is new and sounds fancy, it is better than what you already have. Many weapons have valuable extra abilities, such as the ability to utilize crystals to level it up in one area or the ability to use dodge roll. However, the trade-off frequently comes at the expense of a weapon that is less effective. See what works best for you, and if necessary, swap back to your prior gun before exiting the level.

You can change the difficulty to hard or easy

difficulty
Neon Abyss (Image credit: Neon Abyss on Steam)

At times, the difficulty may be rather harsh. You can alter the difficulty at the bar if you’ve had enough and merely want to beat the game. You may also make it harder if you find it too easy. By default, the game is set to normal. Go to the bar and turn left instead of right to alter the difficulty level. On the wall is a neon light with a cheerful face. Change the game’s difficulty by interacting with it.

Directly challenging the boss is not a good idea

boss fight
Neon Abyss (Image credit: Neon Abyss on Steam)

When you enter Neon Abyss, you’ll see a red door with a demon’s head above it, indicating that you’re about to enter a boss fight. Don’t proceed until you’ve investigated the rest of the level. You might be missing out on boosts, pets, hearts, and shields that could make a significant difference in your battle.

Because you’re already maxed out, you could encounter hearts or crystals in an area that you can’t pick up. Those pick-ups don’t vanish; they’ll remain in the level as long as you’re in it. So, if you run out of health after killing the monster or in a particularly difficult room, go back and pick up whatever is left lying about.

Neon Abyss Beginner’s Guide: Gold Triangle Doors

Whether you have a lot of keys or are trying to find them, it’s all a matter of chance. If you come across a key, you should use it to open the golden triangle-shaped door. You’ll have a higher chance of slaying the boss after the stage if you obtain more power-ups from these areas. A door like this should never be overlooked.

At present, Neon Abyss is free on Epic Games, so grab it quickly.

Another Game was free earlier, we have written a guide on it with its link to the store.

For more Guides, Tips, and Tricks

Check out our Video Games Guide Section for more dedicated guides.

Shenmue 3 Beginner’s Guide – Best tips and tricks

We have brought you Shenmue 3 Beginner’s Guide. This will help you to advance in the games. Make sure to read every tip and trick carefully.

A 2019 action-adventure video game developed by Ys Net, published by Deep Silver, and manufactured by Shibuya Productions, Shenmue III is developed by Ys Net. There are several open-world environments interspersed with brawler battles and quick-time events, just like the previous Shenmue games. A variety of minigames are included along with a day-and-night system, variable weather effects, and non-player characters with daily schedules. In the 1980s Guilin, China, teenage martial artist Ryo Hazuki continues searching for the killer of his father.

In the previous Shenmue games, the player takes control of Ryo Hazuki, a teenage martial artist on the hunt for his father’s killer. In Guilin, China, the player spends most of his time searching for clues, examining objects, and interacting with non-player characters for information. 

Ryo can practice moves to increase their power through the game’s 3D fighting system similar to Virtua Fighter. Quick time events require players to press the right buttons at the right time. Ryo can earn money from minigames like fishing, woodchopping, and forklift driving, as well as by harvesting herbs and selling them.

Talk to people if you’re lost

You won’t be given quest markers or detailed instructions in Shenmue 3 because it doesn’t hold your hand. Although there are hints, you’re largely on your own to discover where to go, just like in the originals. Talking to NPCs is the best thing you can do if you’re lost. Wherever Ryo needs to go, whether it’s to someone’s house or the Sunflower Grove, he’ll always ask an NPC for directions. Many times, you’ll get directions on how to get there as well.

You should read The Dead Ends Dungeon Guide – FFXIV Endwalker

Shenmue 3 Beginner’s Guide: Health and Food

Food and health
Shenmue 3 (Image credit: Shenmue 3 on steam)

The systems of health and stamina are inextricably intertwined. When your health reaches the last three circles, it will rapidly deplete while sprinting. It replenishes to three circles, so you’re not going to die of hunger or something. However, while your health is thus low, you will only be able to sprint in brief spurts. Shenmue 3’s surroundings are also large. The last thing you want is to get trapped wandering many kilometers from home! To avert this dreadful destiny, have a few food items with you at all times.

Food is also necessary to heal yourself after battles, so you should keep a generous supply of food available if you wish to compete against other fighters. That way, you can take care of your health between battles. In addition, check the prices of the various foods on offer compared to the health benefits they offer. Buying a bunch of carrots for just one Yuan and healing 30 hit points each is more economical than buying a dumpling for five Yuan but healing only 120 health points.

The Niaowu Hotel in Niaowu and Shenhua’s home in Bailu Village both offer free food. On the kitchen cabinet of Shenhua’s home are an apple and a banana. There are four apples on a table near the door of the Niaowu Hotel. Respawns of these food items happen every day, so grab them in the morning before you leave for your day.

Shenmue 3 Beginner’s Guide: Cut woods

In Shenmue 3, it’s difficult to get money, and what’s worse, there’s a lot to buy. You’ll want to keep your health up by having enough money to buy some food, early on in the game. Tao’s store near the Verdant Bridge is the place to go if you want to chop wood. If you chop enough during the minigame, you will usually receive between 40 and 50 Yuan. It doesn’t matter how much you do, so if you like you can just set aside thirty minutes to earn some Yuan.

Shenmue 3 Beginner’s Guide: Improve skills

Shenmue 3 Beginner's Guide
Shenmue 3 (Image credit: Shenmue 3 on steam)

The game features numerous difficulty settings, so if you’re having problems, you may lower the level at any time. However, regardless of the difficulty level, you’ll want to enhance Ryo’s martial arts talents and level him up. Attack Power, Endurance, and Kung Fu are the three elements that may be leveled up.

Of course, Attack Power increases your damage and can be raised by sparring with monks in the Martial Hall or other characters around Bailu. Endurance improves your health and reduces damage taken, and it may be raised up in the Martial Hall by practicing Horse Stance and One-Inch Punch. All of these actions level up your Kung Fu, which correlates to your total skill and mastery of movements.

Shenmue 3 Beginner’s Guide: Check notes

Another thing to do if you’re stuck for story advancement is to look over your notes. By hitting Square, you may access the notepad. The files contain notes on your story’s development, as well as advice on what you should do next. After all, this is a mystery game, and you’re generally simply trying to figure out how to proceed. You’ll also discover a map here in case you get lost, as well as some other valuable information, such as the locations of past side quests, gambling activities, and fishing places.

Shenmue 3 Beginner’s Guide: Collect Herbs

Shenmue 3 Beginner's Guide
Shenmue 3 (Image credit: Shenmue 3 on steam)

You can find some special herbs in both Bailu village and Niaowu. These herbs can be harvested in groups and sold for a profit. Smaller collections bring in a little money, but some larger ones bring in a lot. There are, however, a limited amount of herbs to harvest. That is why it is advisable not to squander your herbs by selling them in low-quality packages. Keep your collection and attempt to accumulate some of the most valuable sets before selling them. 

You’ll be grateful for the money later in the game when you’re seeking to purchase some of the more costly skill books. You can also swap herb sets for skill books directly with specific vendors. One of them may be seen at Bailu’s Panda Market.

What are shop cards?

Shop cards will appear on your menu once you reach Shenmue III’s second area. How does a shop card work? As soon as you get off the ferry, Ryo notices a flyer that says you need to find Chobu-chan. However, the game refuses to elaborate. The next step is to complete a set of shop cards in order to unlock a whole new set of scrolls.

A shop card features a picture of the proprietor and the name of the shop. Go to the store first person and look for Chobu-chan figurines. You will receive a card if you follow these steps. Due to Chobu-chan’s camouflage or just difficulty finding him, this is easier said than done.

Shenmue 3 is currently free on Epic Games. Do not miss the opportunity to buy it.

For more Guides, Tips, and Tricks

Check out our Video Games Guide Section for more dedicated guides.